How to deploy a container application to AWS Lambda
This how-to assumes:
- Basic familiarity with System Initiative
- Are familiar with AWS ECR and AWS Lambda
- Have docker cli installed locally
- Have aws cli installed locally
It will teach you how to deploy an AWS ECR Repository, build and push a docker container to it, then deploy that application on AWS Lambda with System Initiative.
We will cover:
- The creation of an ECR Repository
- The creation of a Lambda function with the necessary permissions to invoke the application
Setup
All activities in this how-to happen within an AWS Region and AWS Credential.
Start in a Change Set named ECR Infrastructure How-to.
Walkthrough
What it will look like
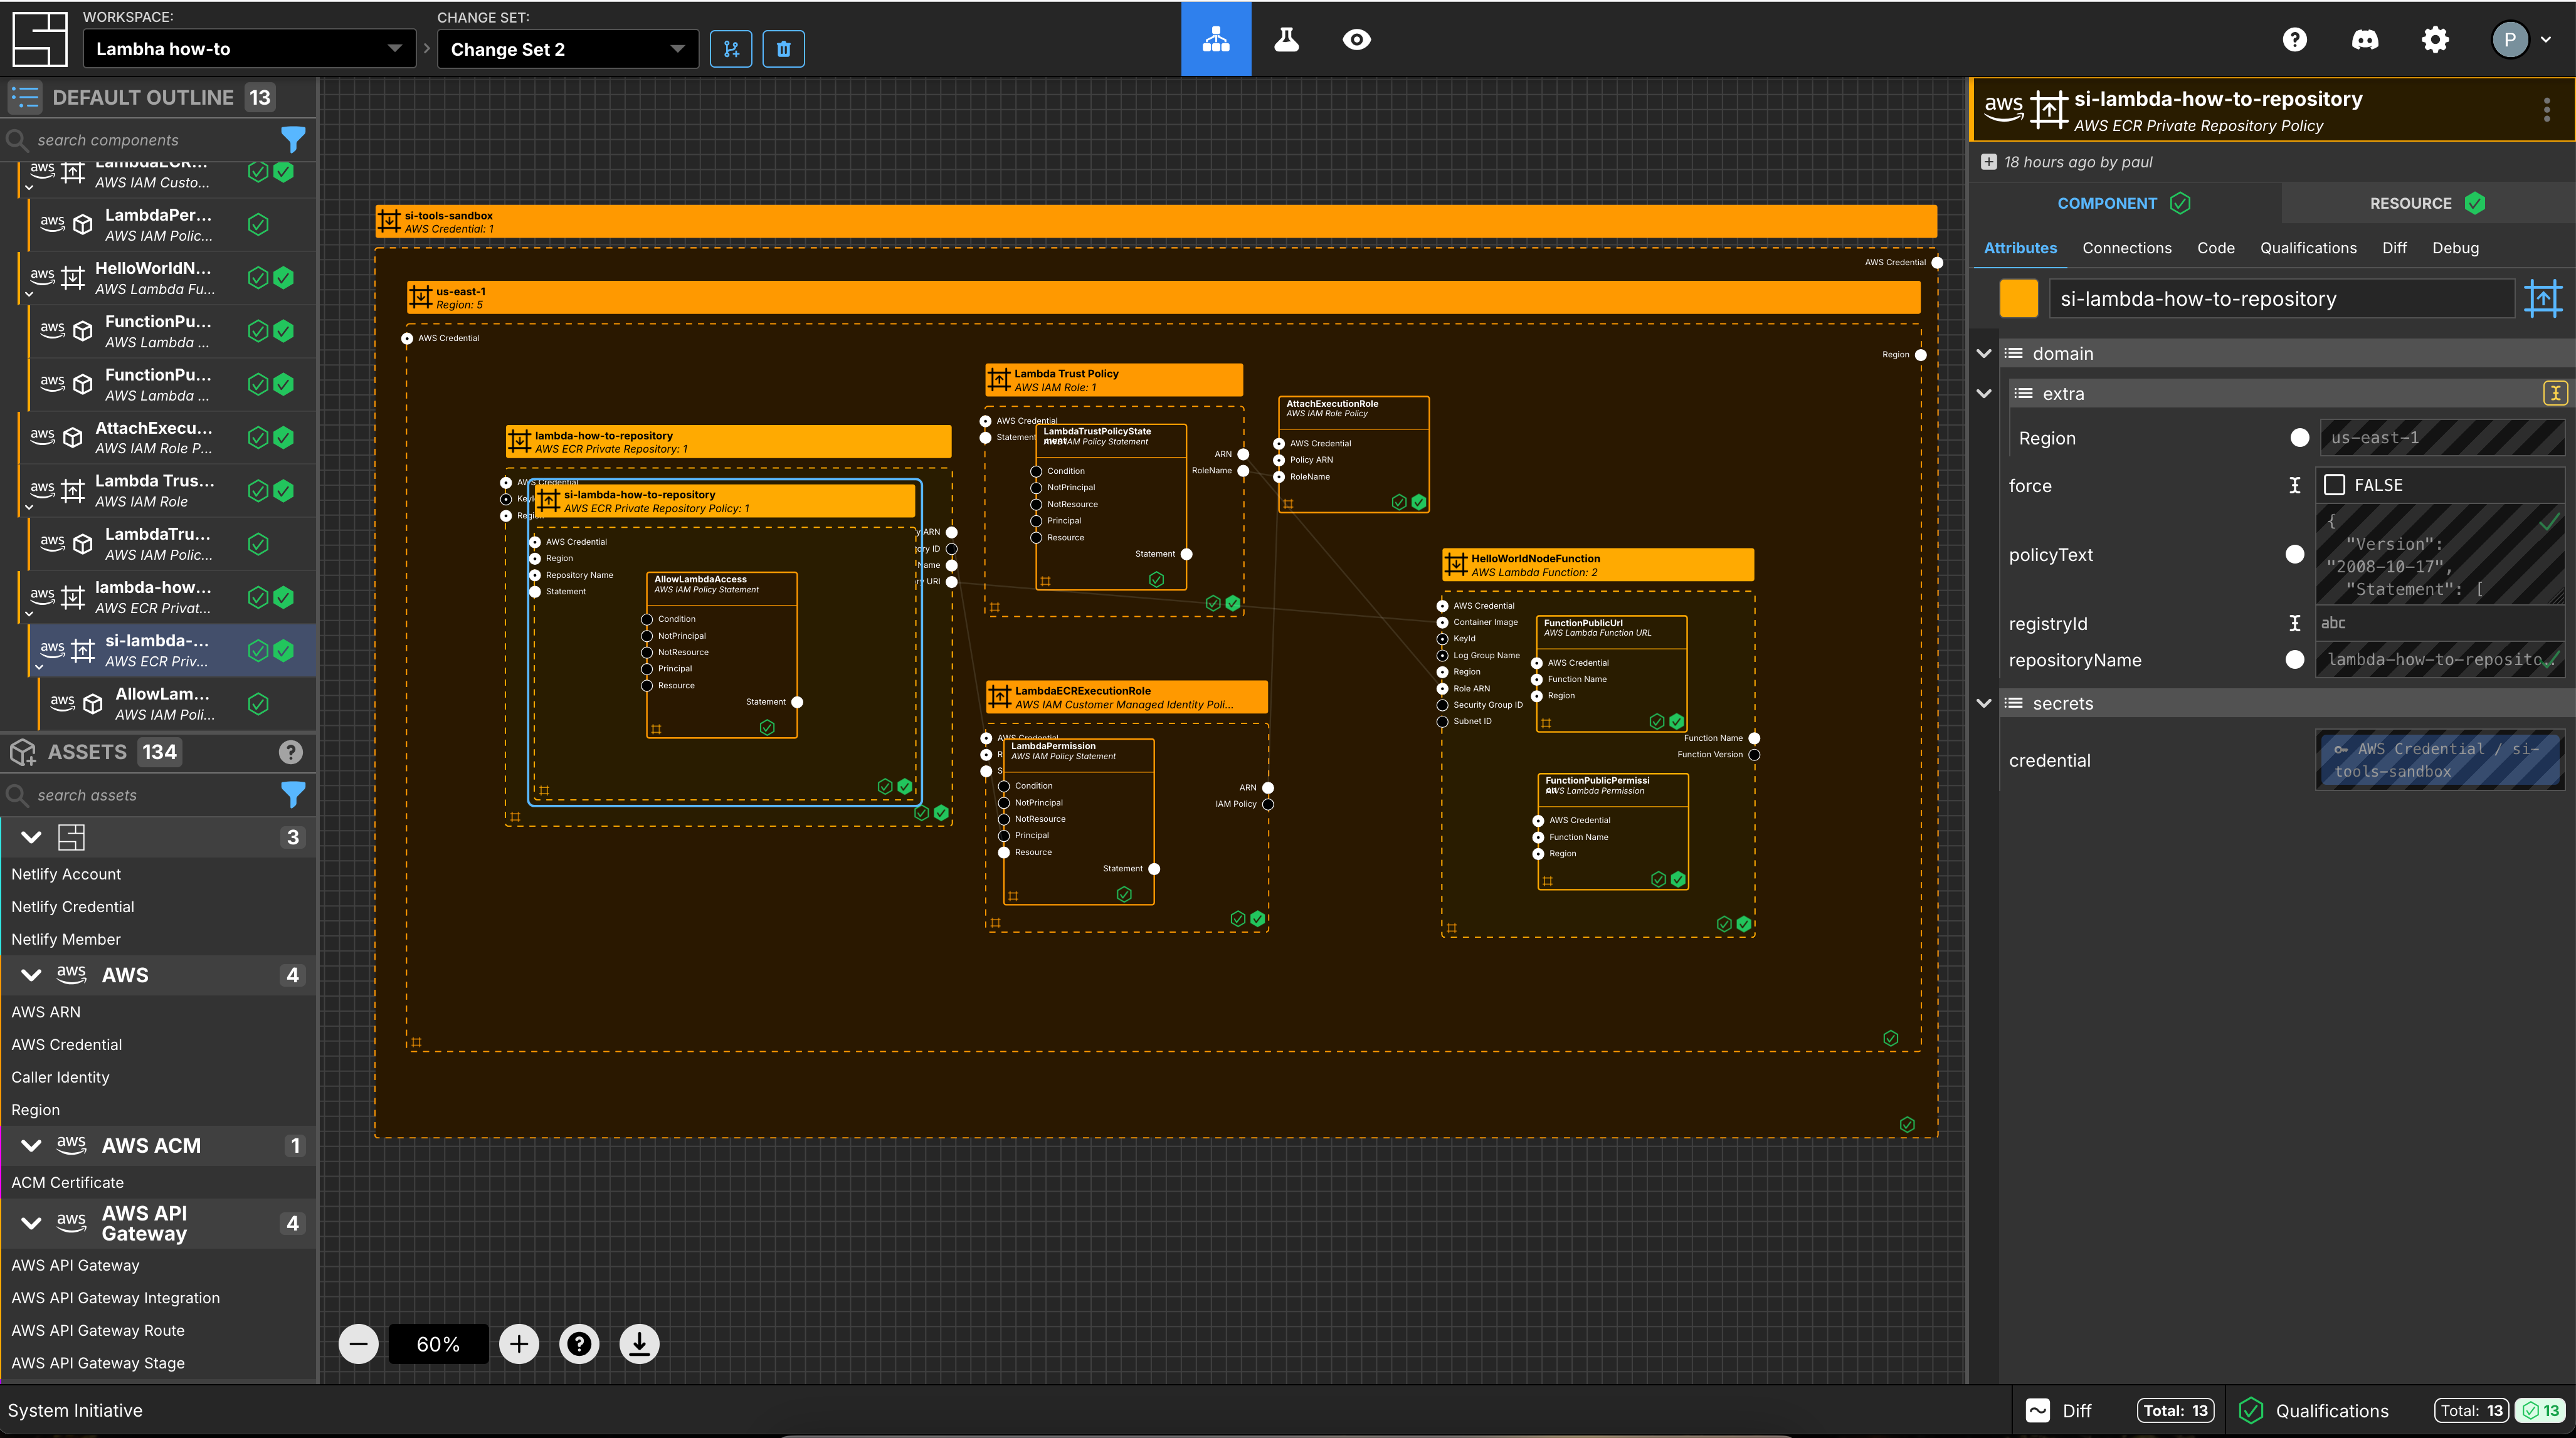
When you are through with this guide, you should have Components that look like this in your Diagram:
Create AWS Credentials
Add an AWS Credential to your Change Set and configure your AWS credentials
Select an AWS Region
Add an AWS Region to your Change Set and set the region property to us-east-1.
Create an ECR Repository
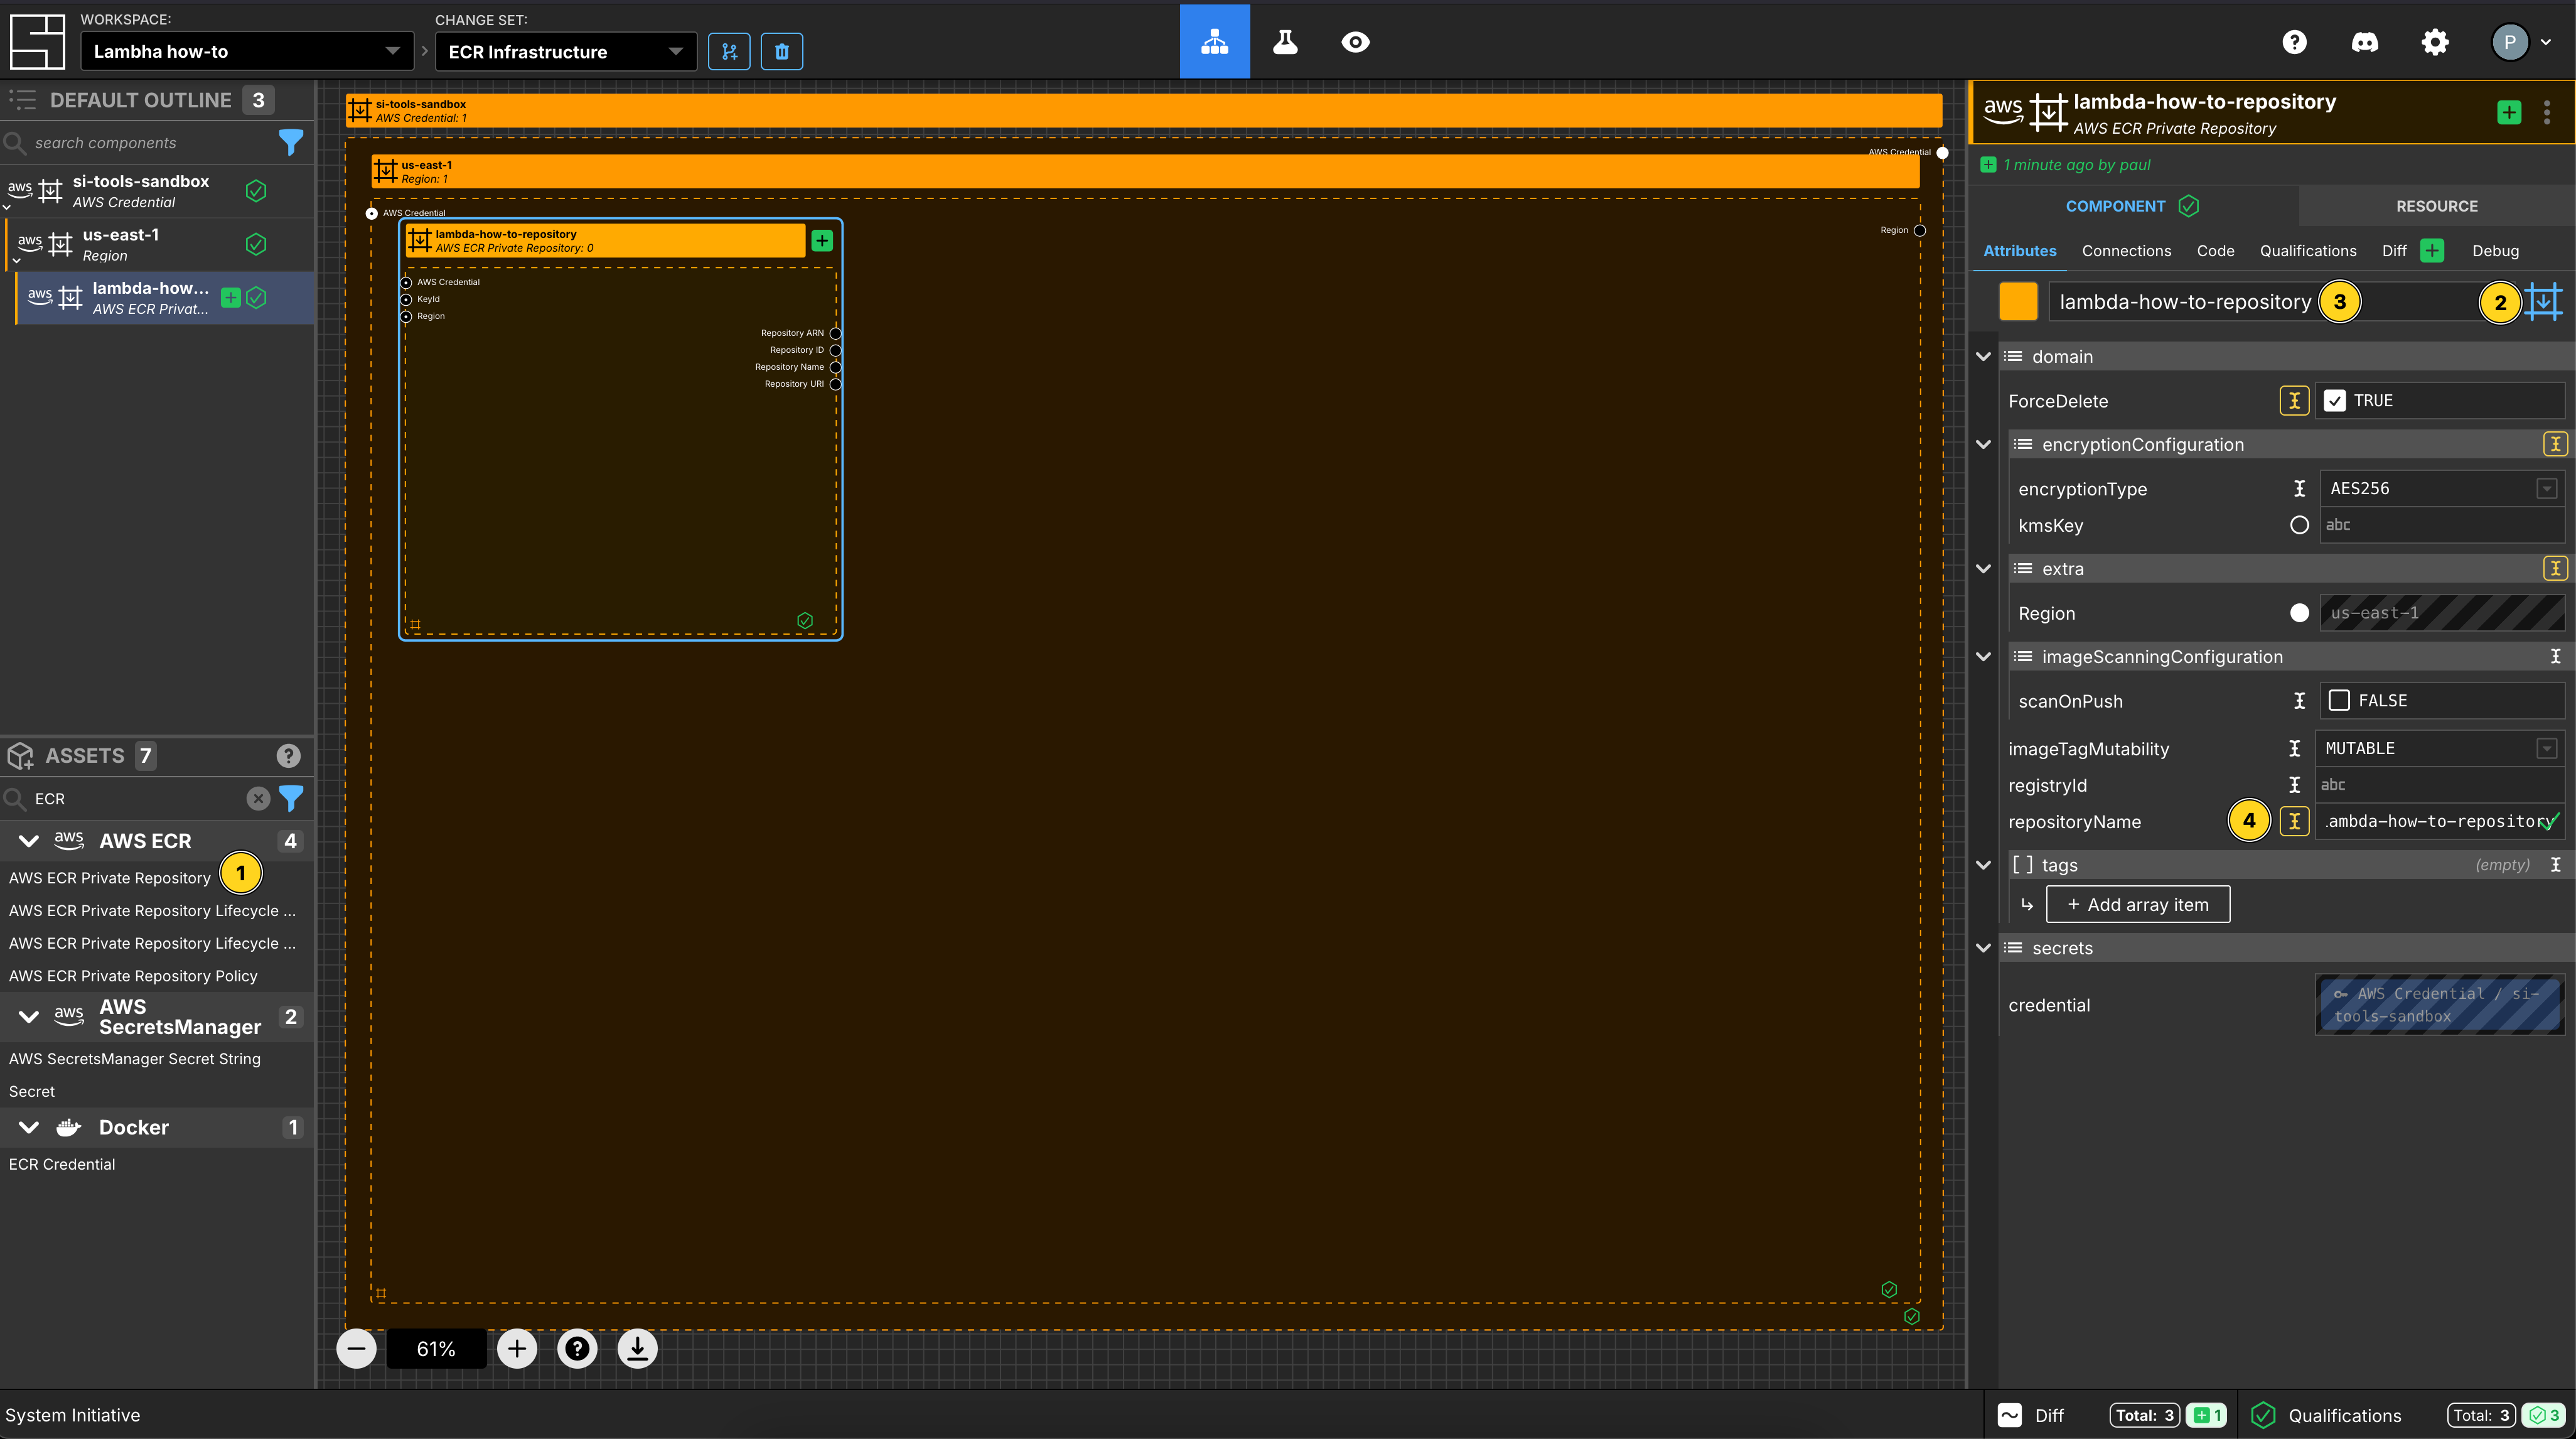
Add an ECR Private Repository to your us-east-1 region frame.
Set the Component name to be lambda-how-to-repository.
Set the Component type to be Configuration Frame (down).
Set the repositoryName to be lambda-how-to-repository.
Set ForceDelete to be true.
Create an ECR Repository Policy
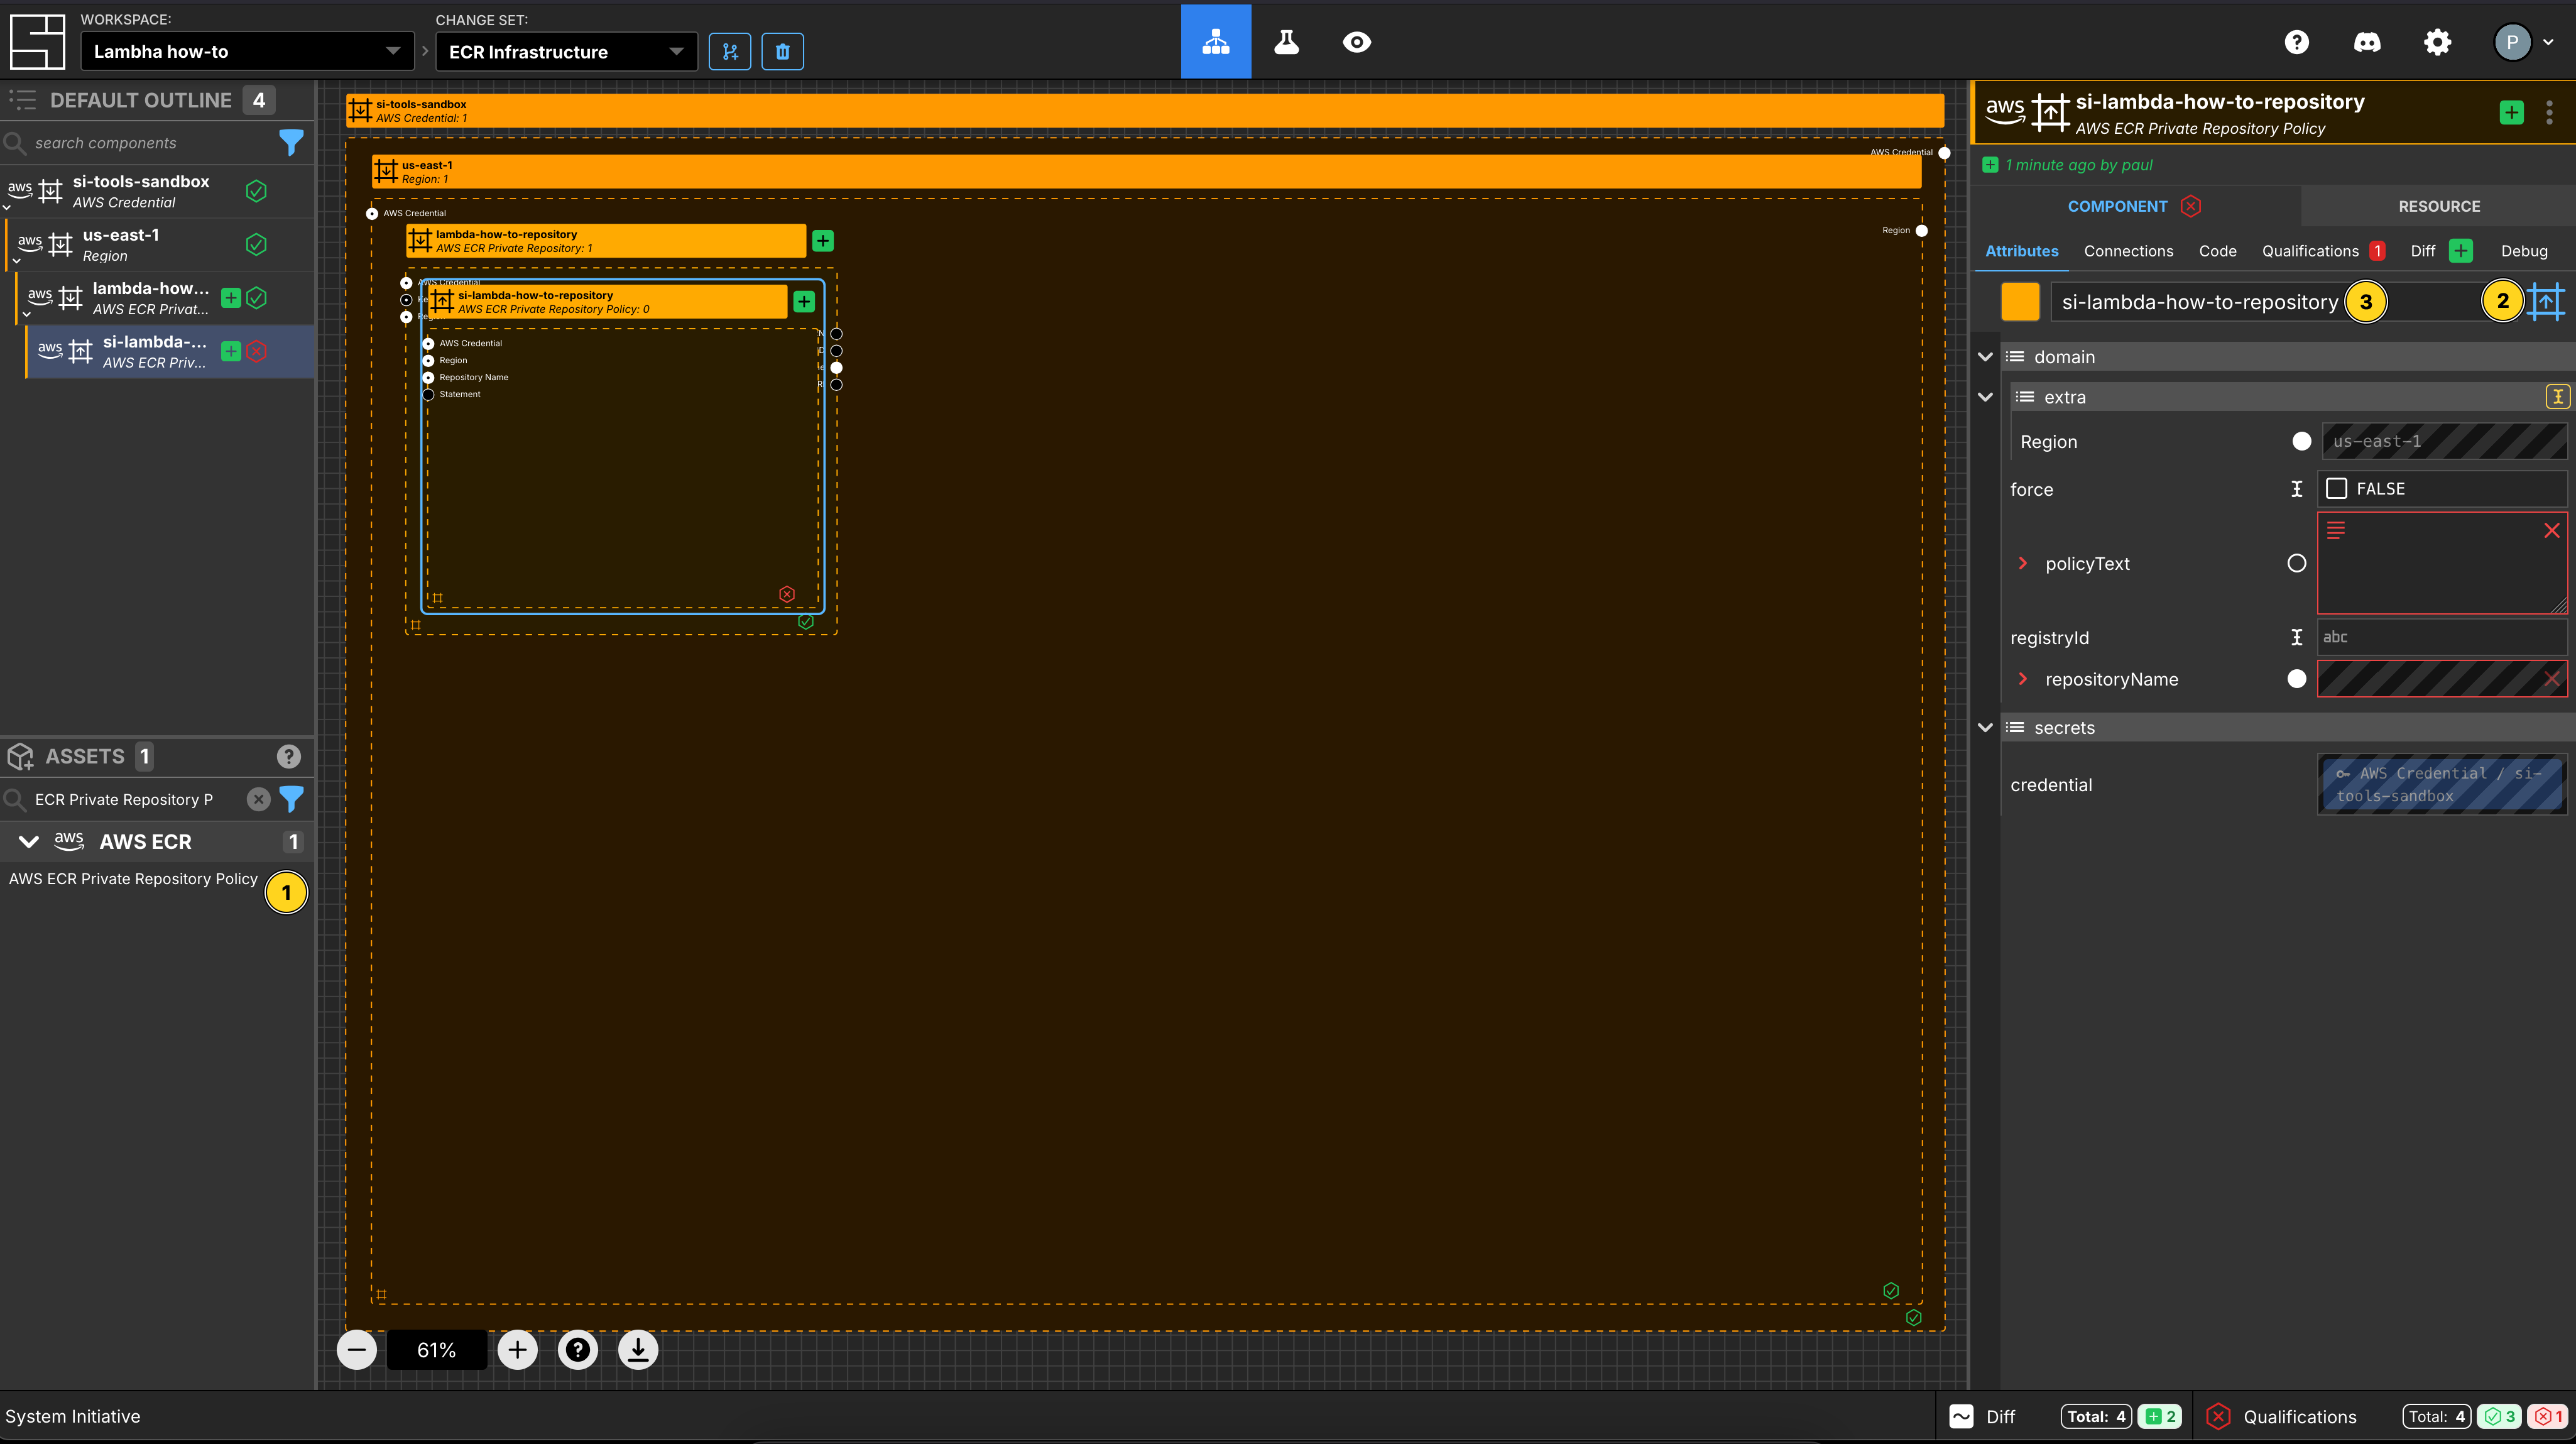
Add an ECR Repository Policy to your demo-app-repo repository frame.
Set the Component name to be lambda-how-to-repository policy
Set the Component type to be Configuration Frame (up).
Create an IAM Policy Statement
Add an IAM Policy Statement to the lambda-how-to-repository policy frame.
Set the Component name to be AllowLambdaAccess.
Set the Sid to be AllowLambdaAccess.
Set the Principal to be set manually.
Add an array item to the Service section.
Set the value to be lambda.amazonaws.com.
Set Effect to be Allow.
Add 2 array items to Action.
Set the values to be:
ecr:GetDownloadUrlForLayerecr:BatchGetImage
Apply your ECR Infrastructure Change Set
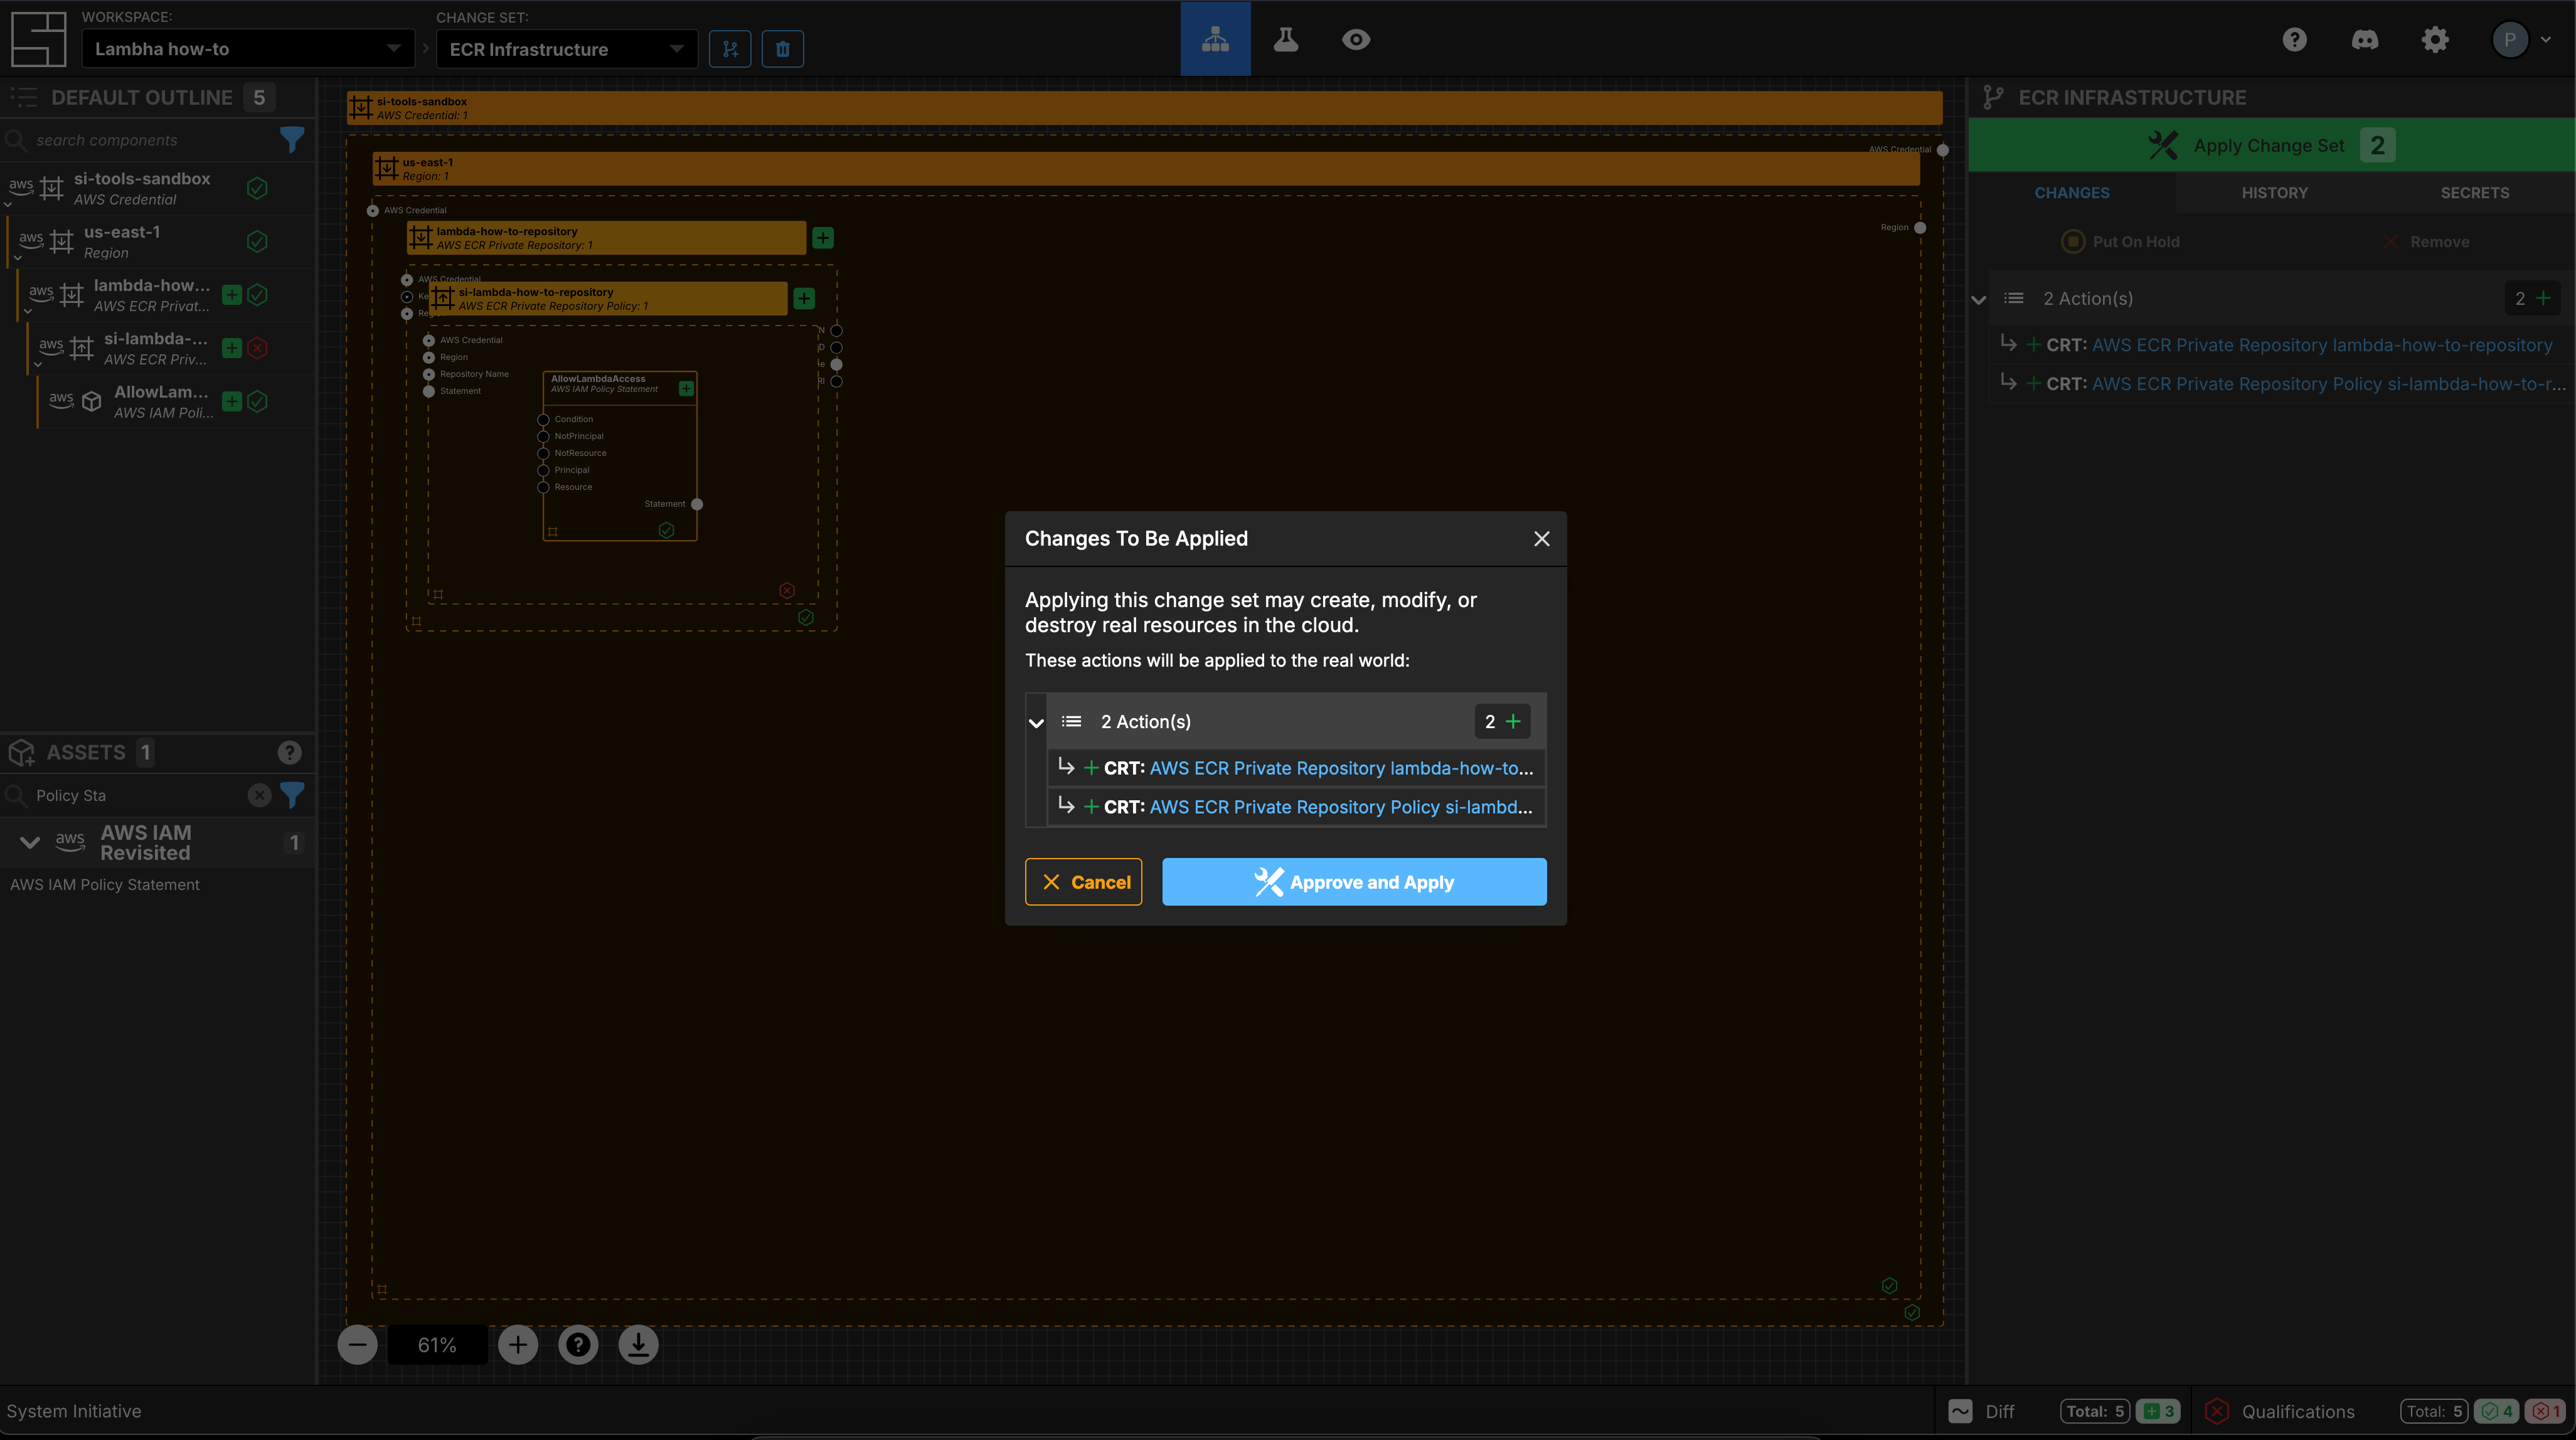
Press Escape or click anywhere on the canvas background to select the Workspace.
Click the Apply Change Set button to:
- Create an ECR Private Repository
- Create an ECR Private Repository Policy
Build & Push Docker Image
We are going to build a very simple demo application, in the form of a Lambda Container Image that we can deploy to ECS.
Firstly, create an index.js in any empty directory:
exports.handler = async (event) => {
  const response = {
    statusCode: 200,
    body: JSON.stringify("Hello from a Lambda, managed by System Initiative!"),
  };
  return response;
};
Now, create a package.json file:
{
  "name": "hello-world-lambda",
  "version": "1.0.0",
  "description": "A simple Node.js Lambda function",
  "main": "app.js",
  "scripts": {
    "start": "node app.js"
  },
  "dependencies": {}
}
Lastly, create a Dockerfile that we will use to create the container image:
FROM public.ecr.aws/lambda/nodejs:22

COPY index.js ${LAMBDA_TASK_ROOT}

CMD [ "index.handler" ]
We are going to build this container, and push it to our newly created ECR repository.
Using your terminal, let's run a build of the container:
$ docker build --platform linux/arm64 -t docker-image:test .This will build the dockerfile in the current directory for arm64 architecture.
Next, docker tag the image for the ECR container created earlier:
docker tag docker-image:test 'repositoryUri':latestNote: the use of repositoryUri. Ensure the correct data from the Resource Data is added to this command.
Next, docker login to the ECR repository, similar to the following:
aws ecr get-login-password --region us-east-1 | docker login --username AWS --password-stdin 573113295293.dkr.ecr.us-east-1.amazonaws.comNote: You must be authenticated to the correct AWS account to run this command. You can find the accountId from the repositoryUri.
Lastly, docker push the image:
docker push 'repositoryUri':latestNOTE: Amazon supply multi-architecture images as the basis for lambda container images, but Lambda does not support functions that use multi-architecture container images.
Can I test my lambda container image?
Yes, you can test the container that you have built:
docker run --platform linux/arm64 -p 9000:8080 docker-image:testThen you can use the API endpoint of the container to test it:
curl "http://localhost:9000/2015-03-31/functions/function/invocations" -d '{}'That should give you the correct API response from the container to prove that the container has been built correctly.
Create a new Change Set
Create a new Change Set called Lambda Infra.
Create an IAM Role for the Lambda
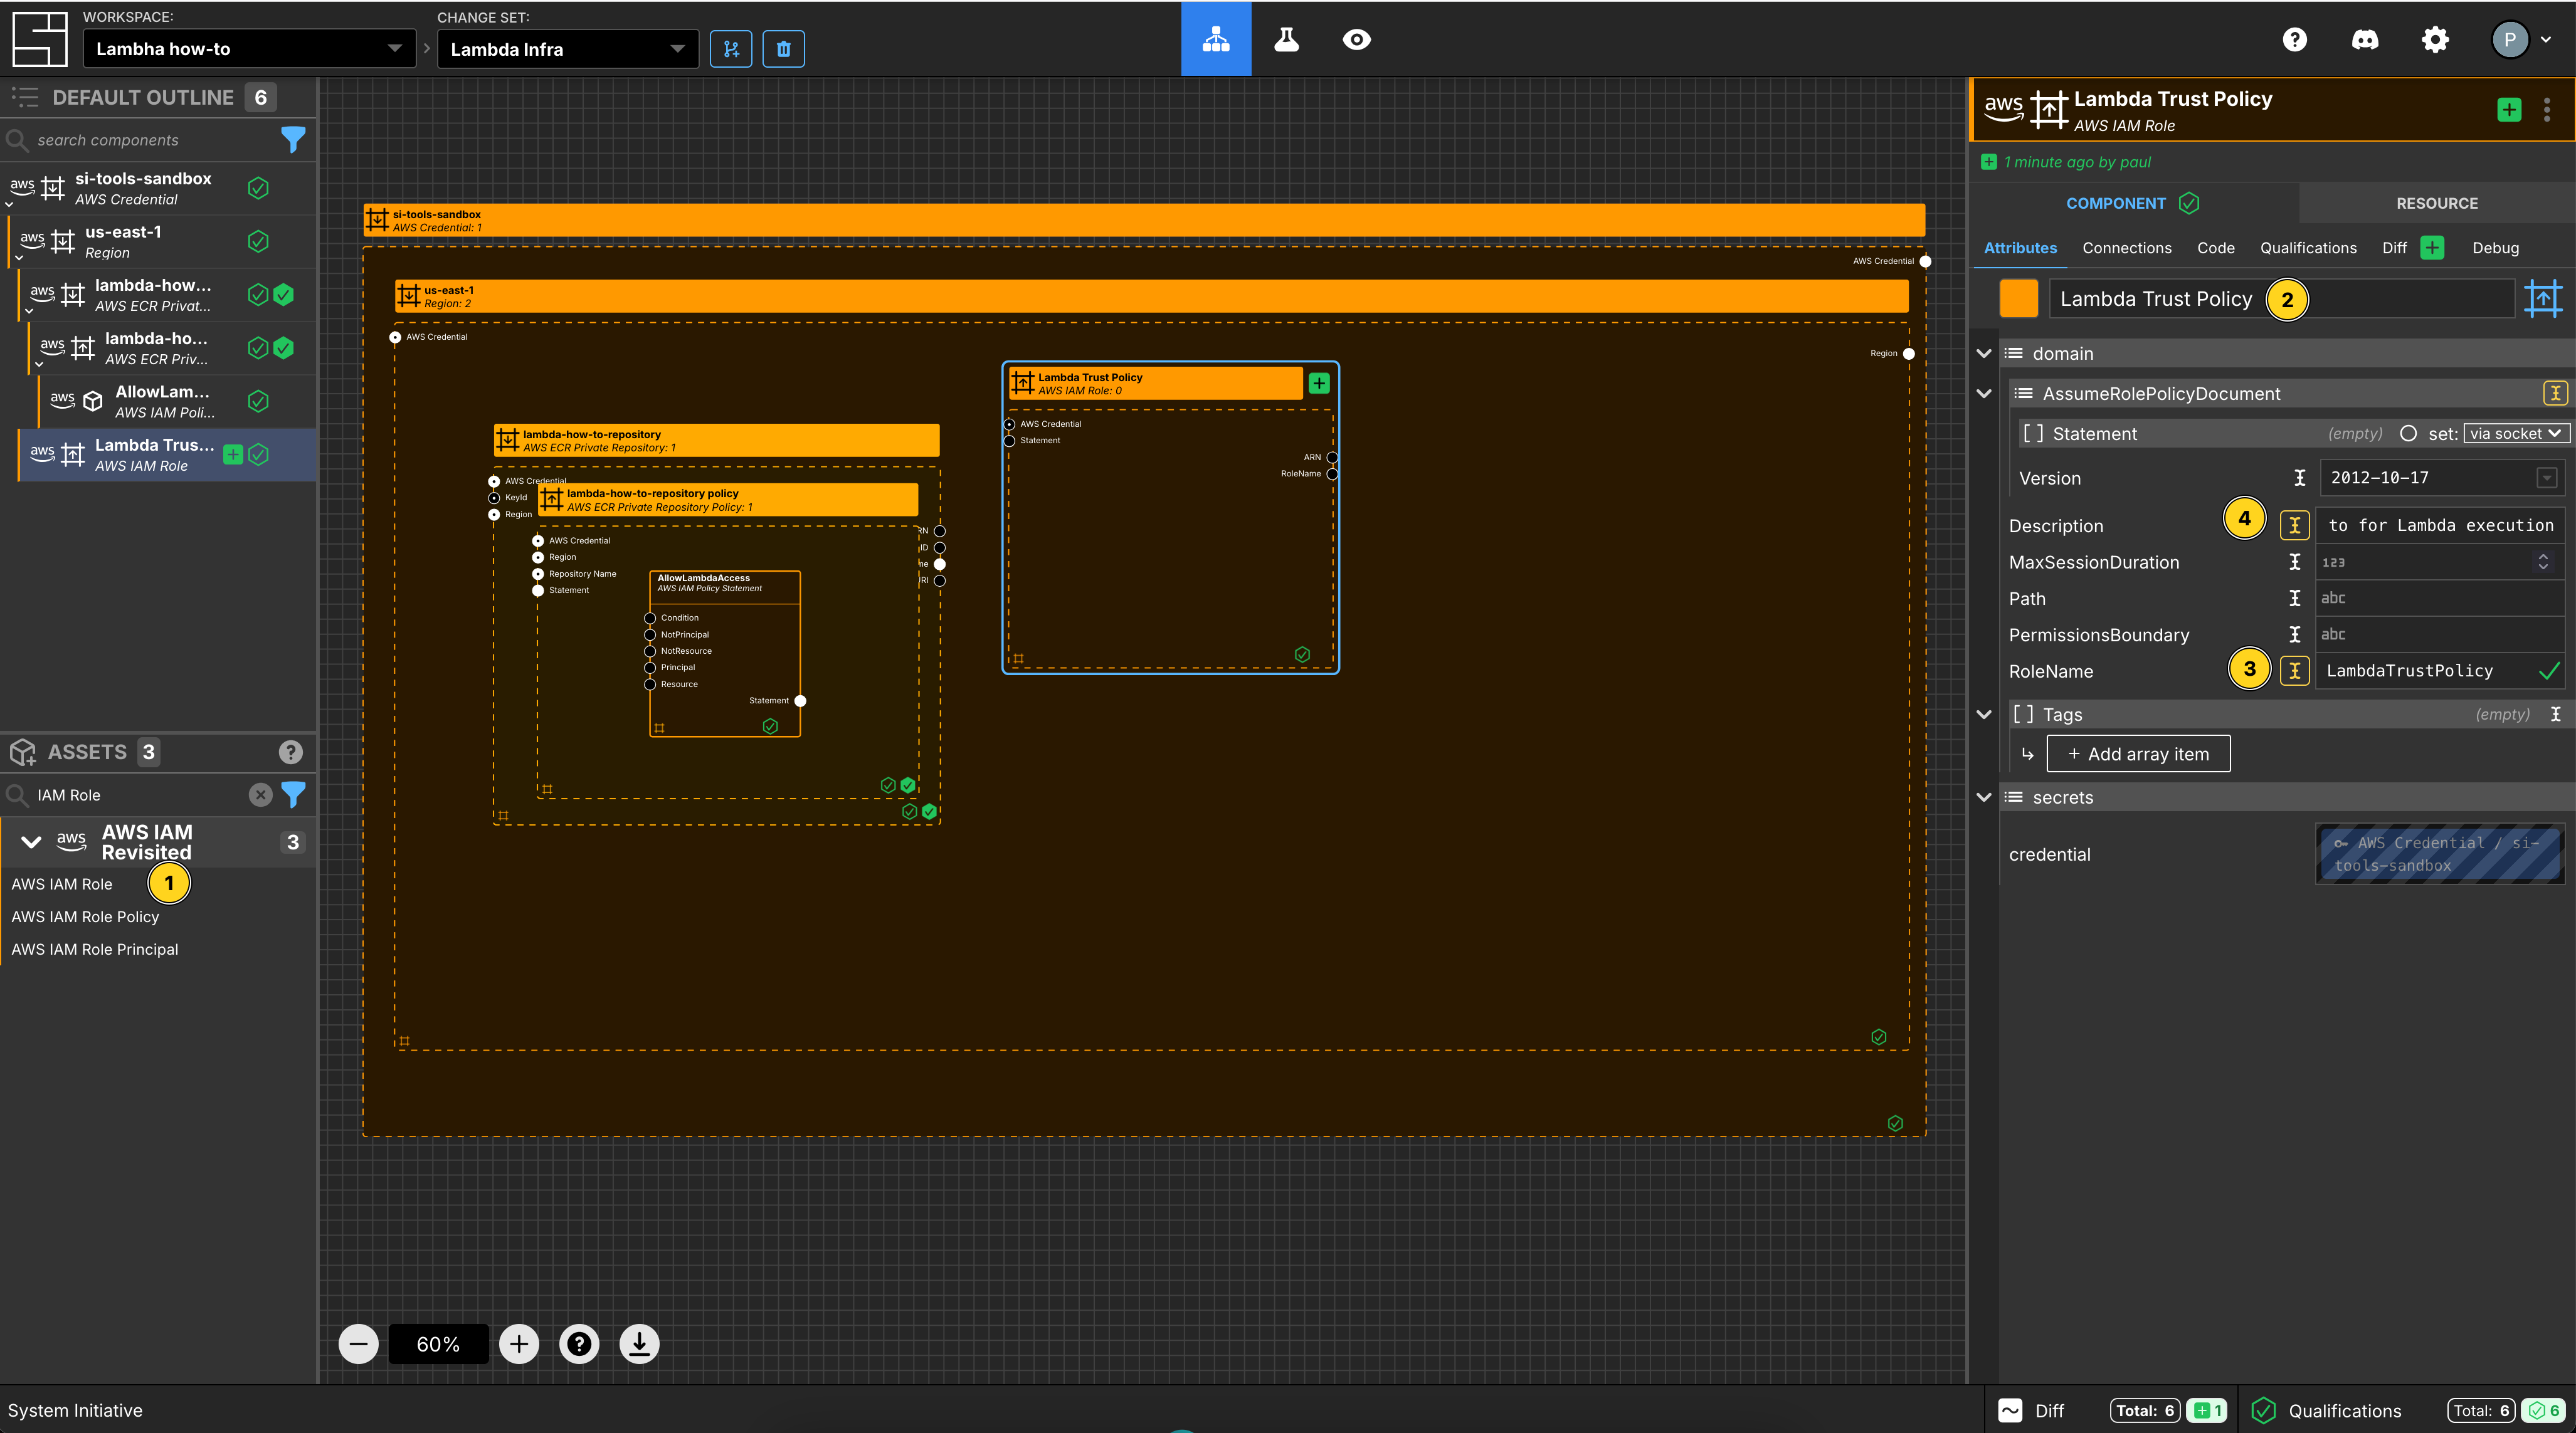
Add an AWS IAM Role Component to your us-east-1 region frame.
Set the Component name to Lambda Trust Policy.
Set the RoleName to LambdaTrustPolicy.
Set the Description to IAM Role to for Lambda execution.
Create an AWS IAM Policy Statement
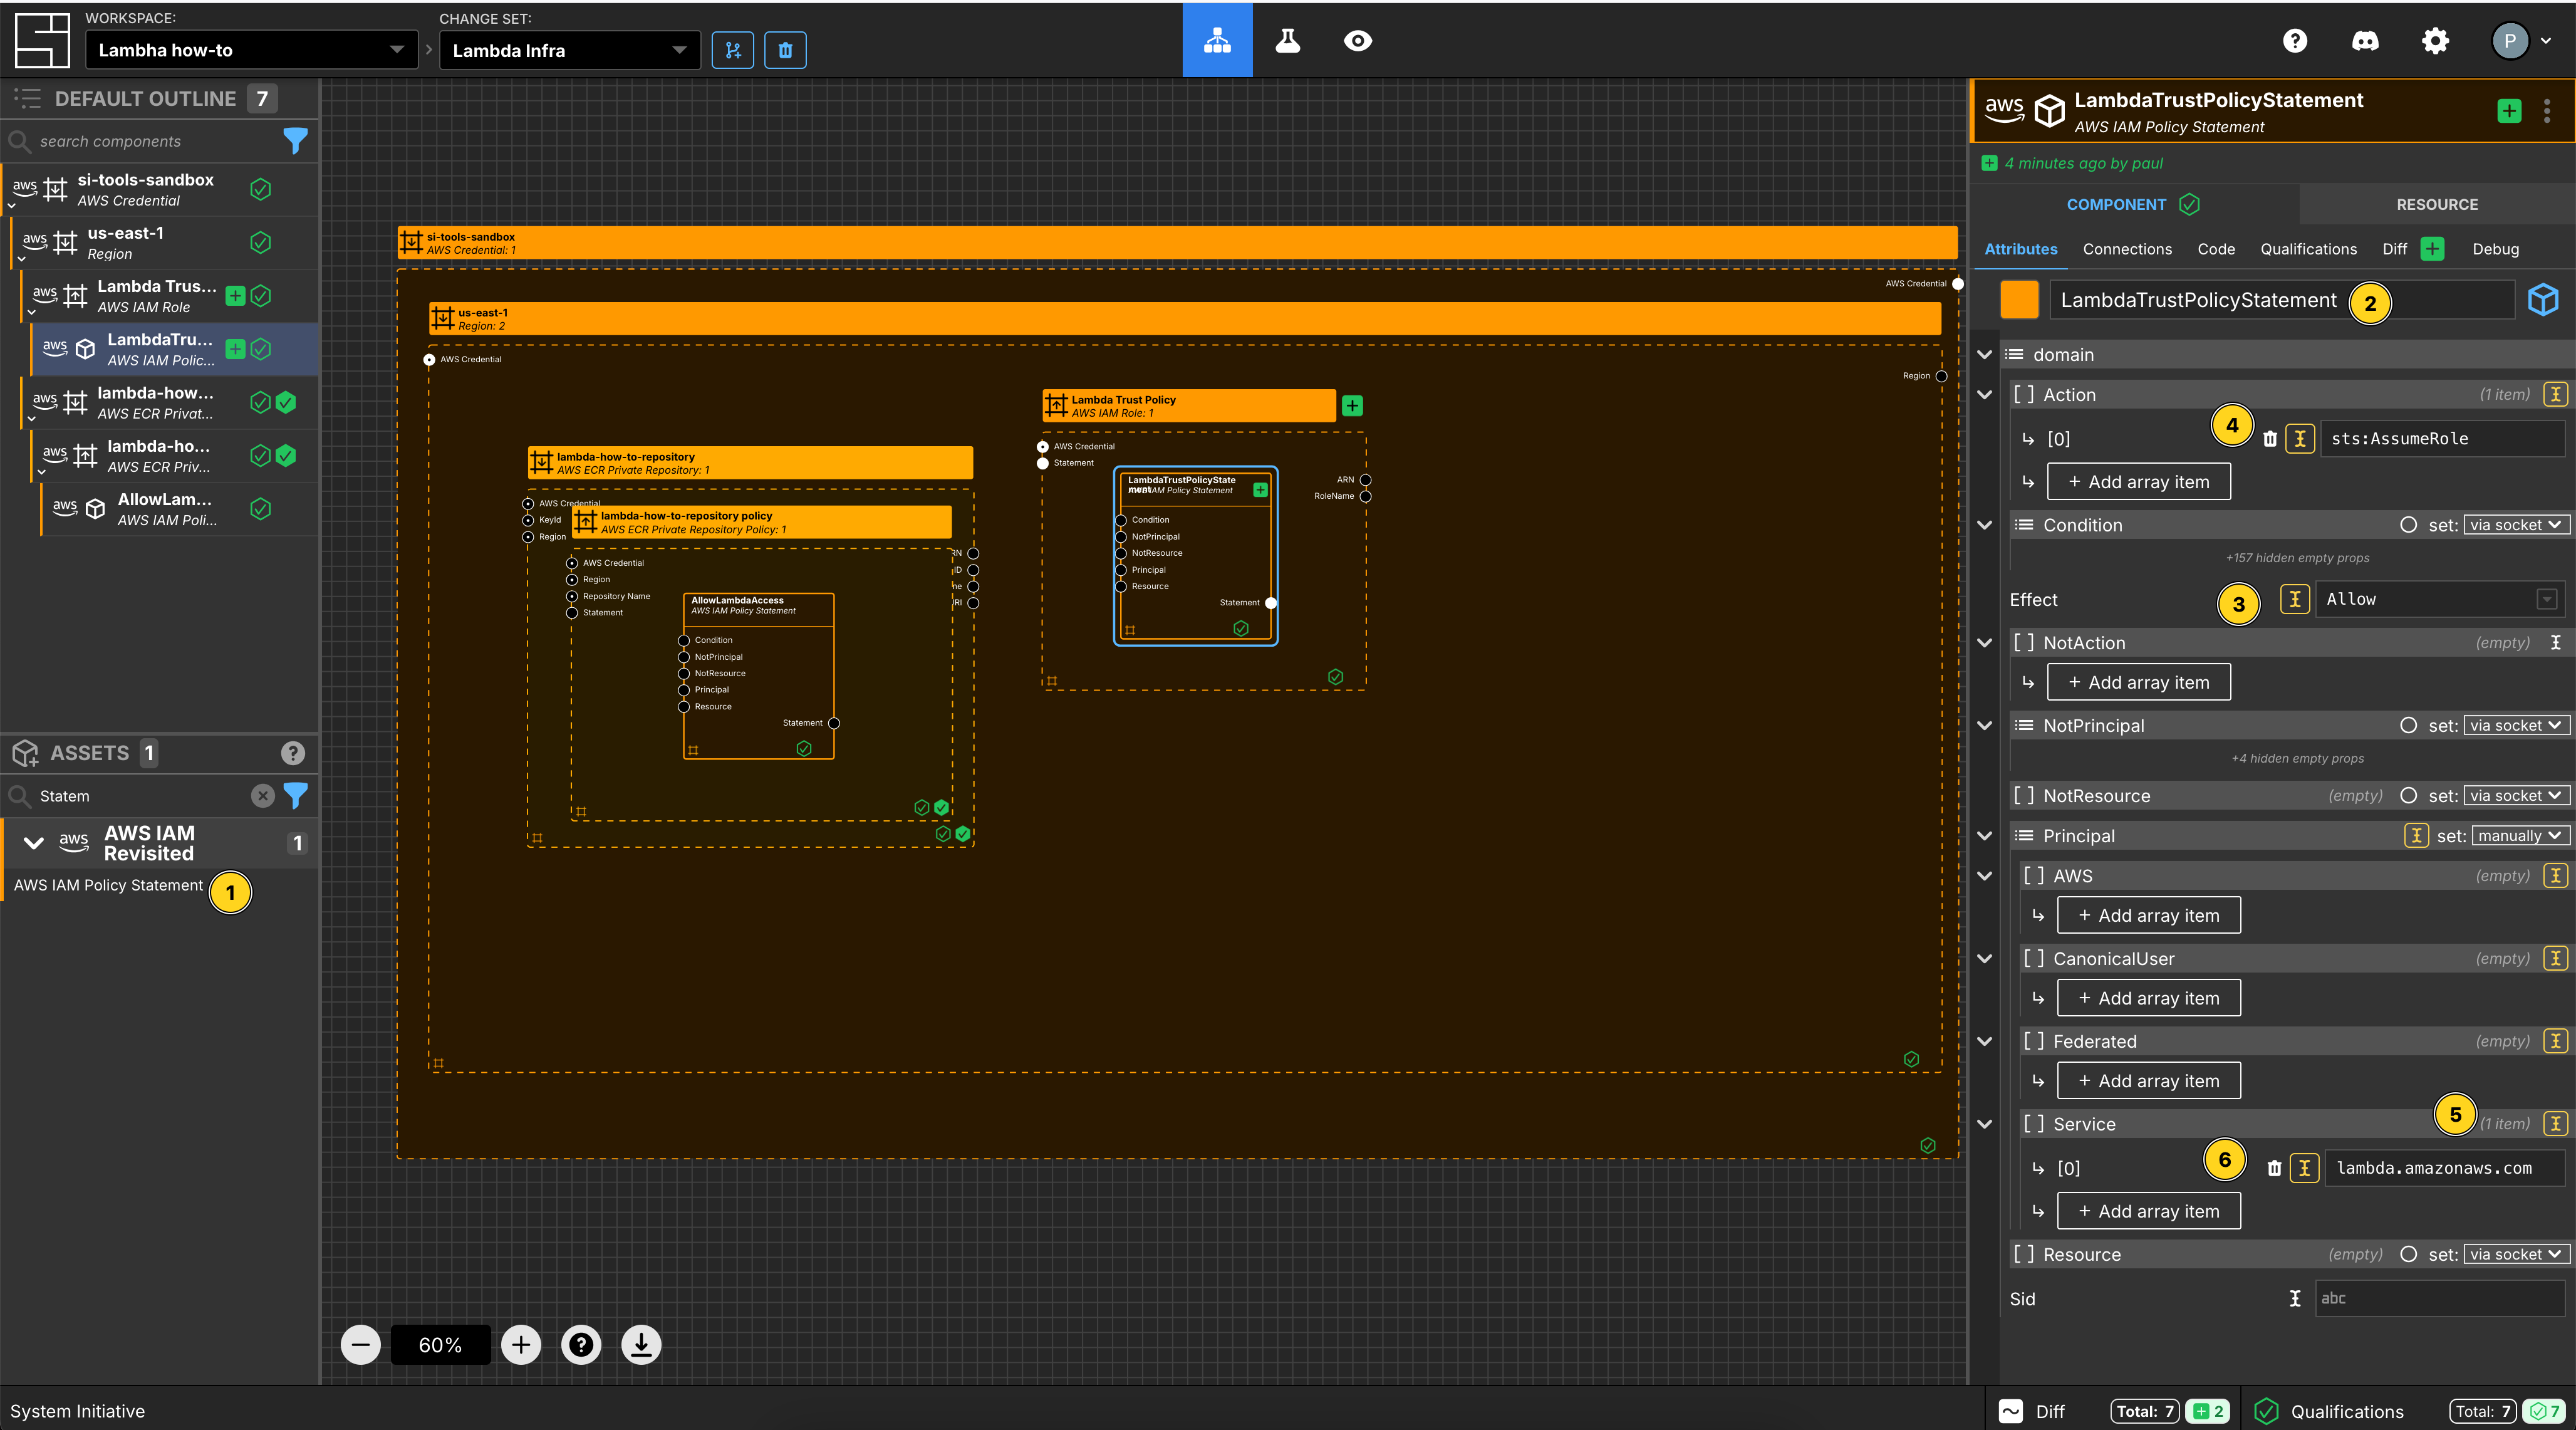
Add an AWS IAM Policy Statement within the Lambda Trust Policy AWS IAM Role frame.
Set the Component name to LambdaTrustPolicyStatement.
Set the Effect to Allow.
Add an array item to the Action array.
Set the [0] value for the Action array to sts:AssumeRole.
Set the Principal to be set manually.
Add an array item to the Service section.
Set the value to be lambda.amazonaws.com.
Create an AWS IAM Customer Managed Identity Policy
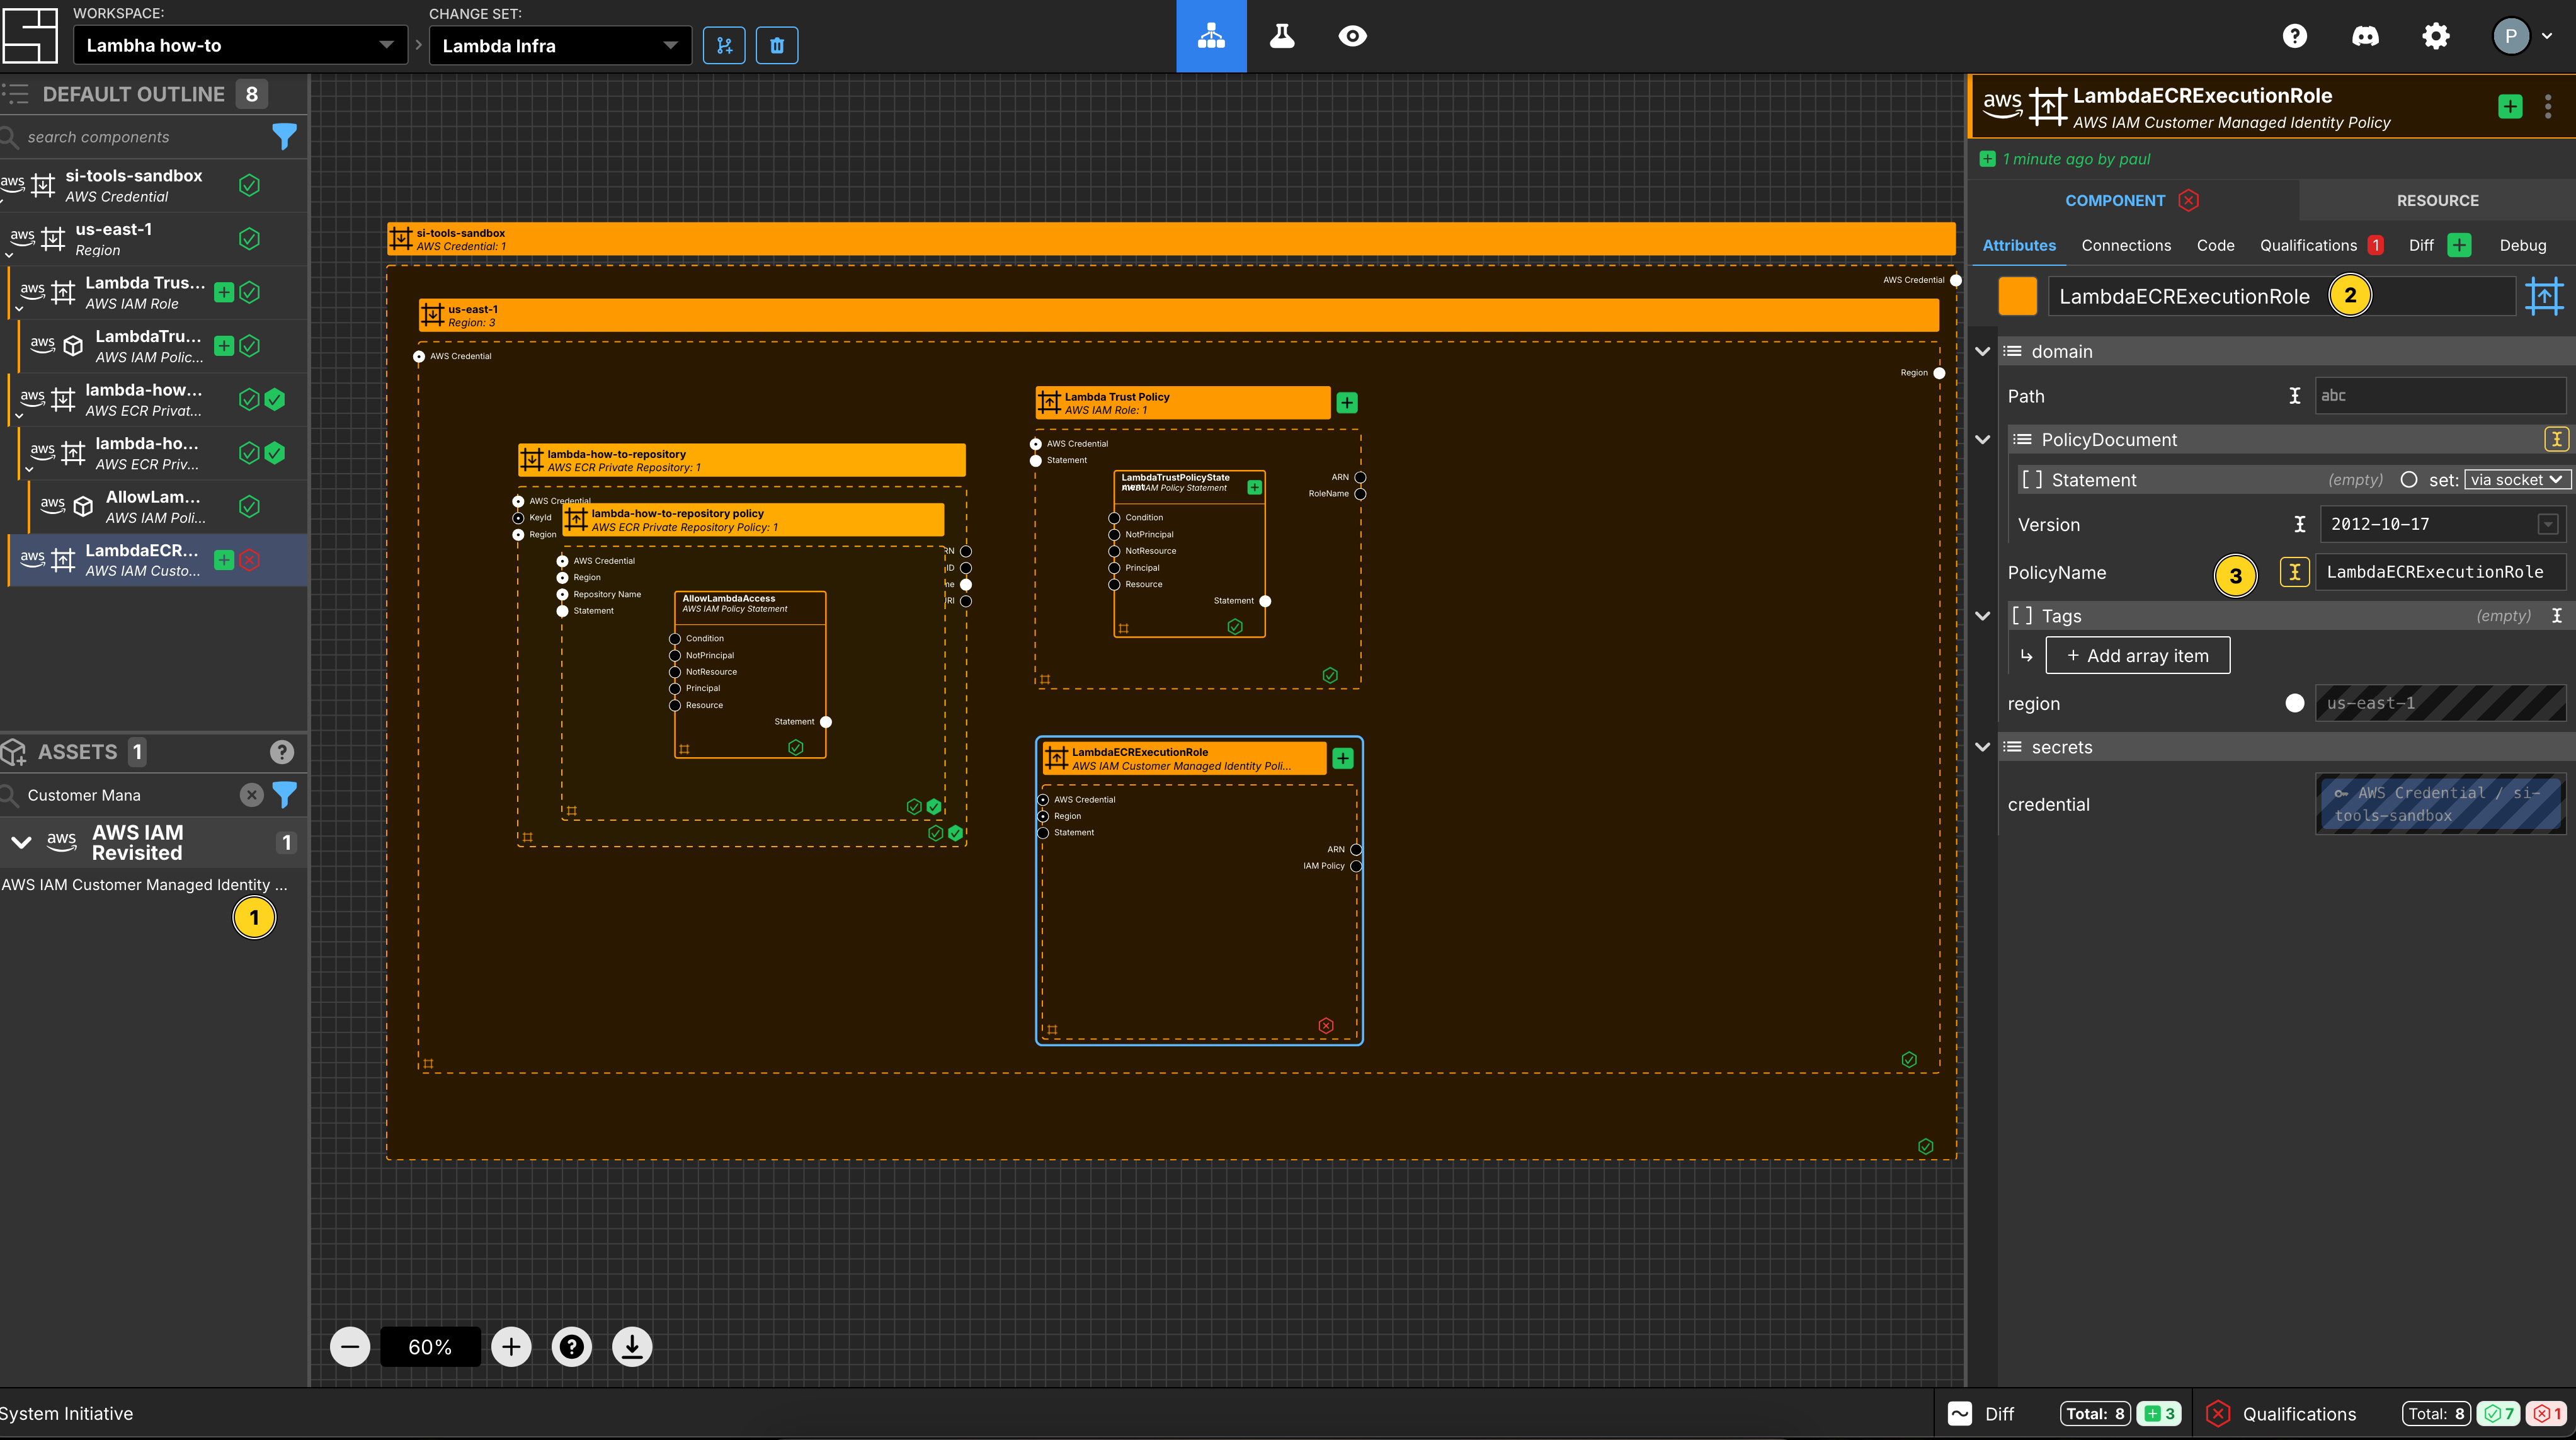
Add an AWS IAM Customer Managed Identity Policy Component to your us-east-1 region frame.
Set the Component name to LambdaECRExecutionRole.
Set the RoleName to LambdaECRExecutionRole.
Create an AWS IAM Policy Statement for the Identity Policy
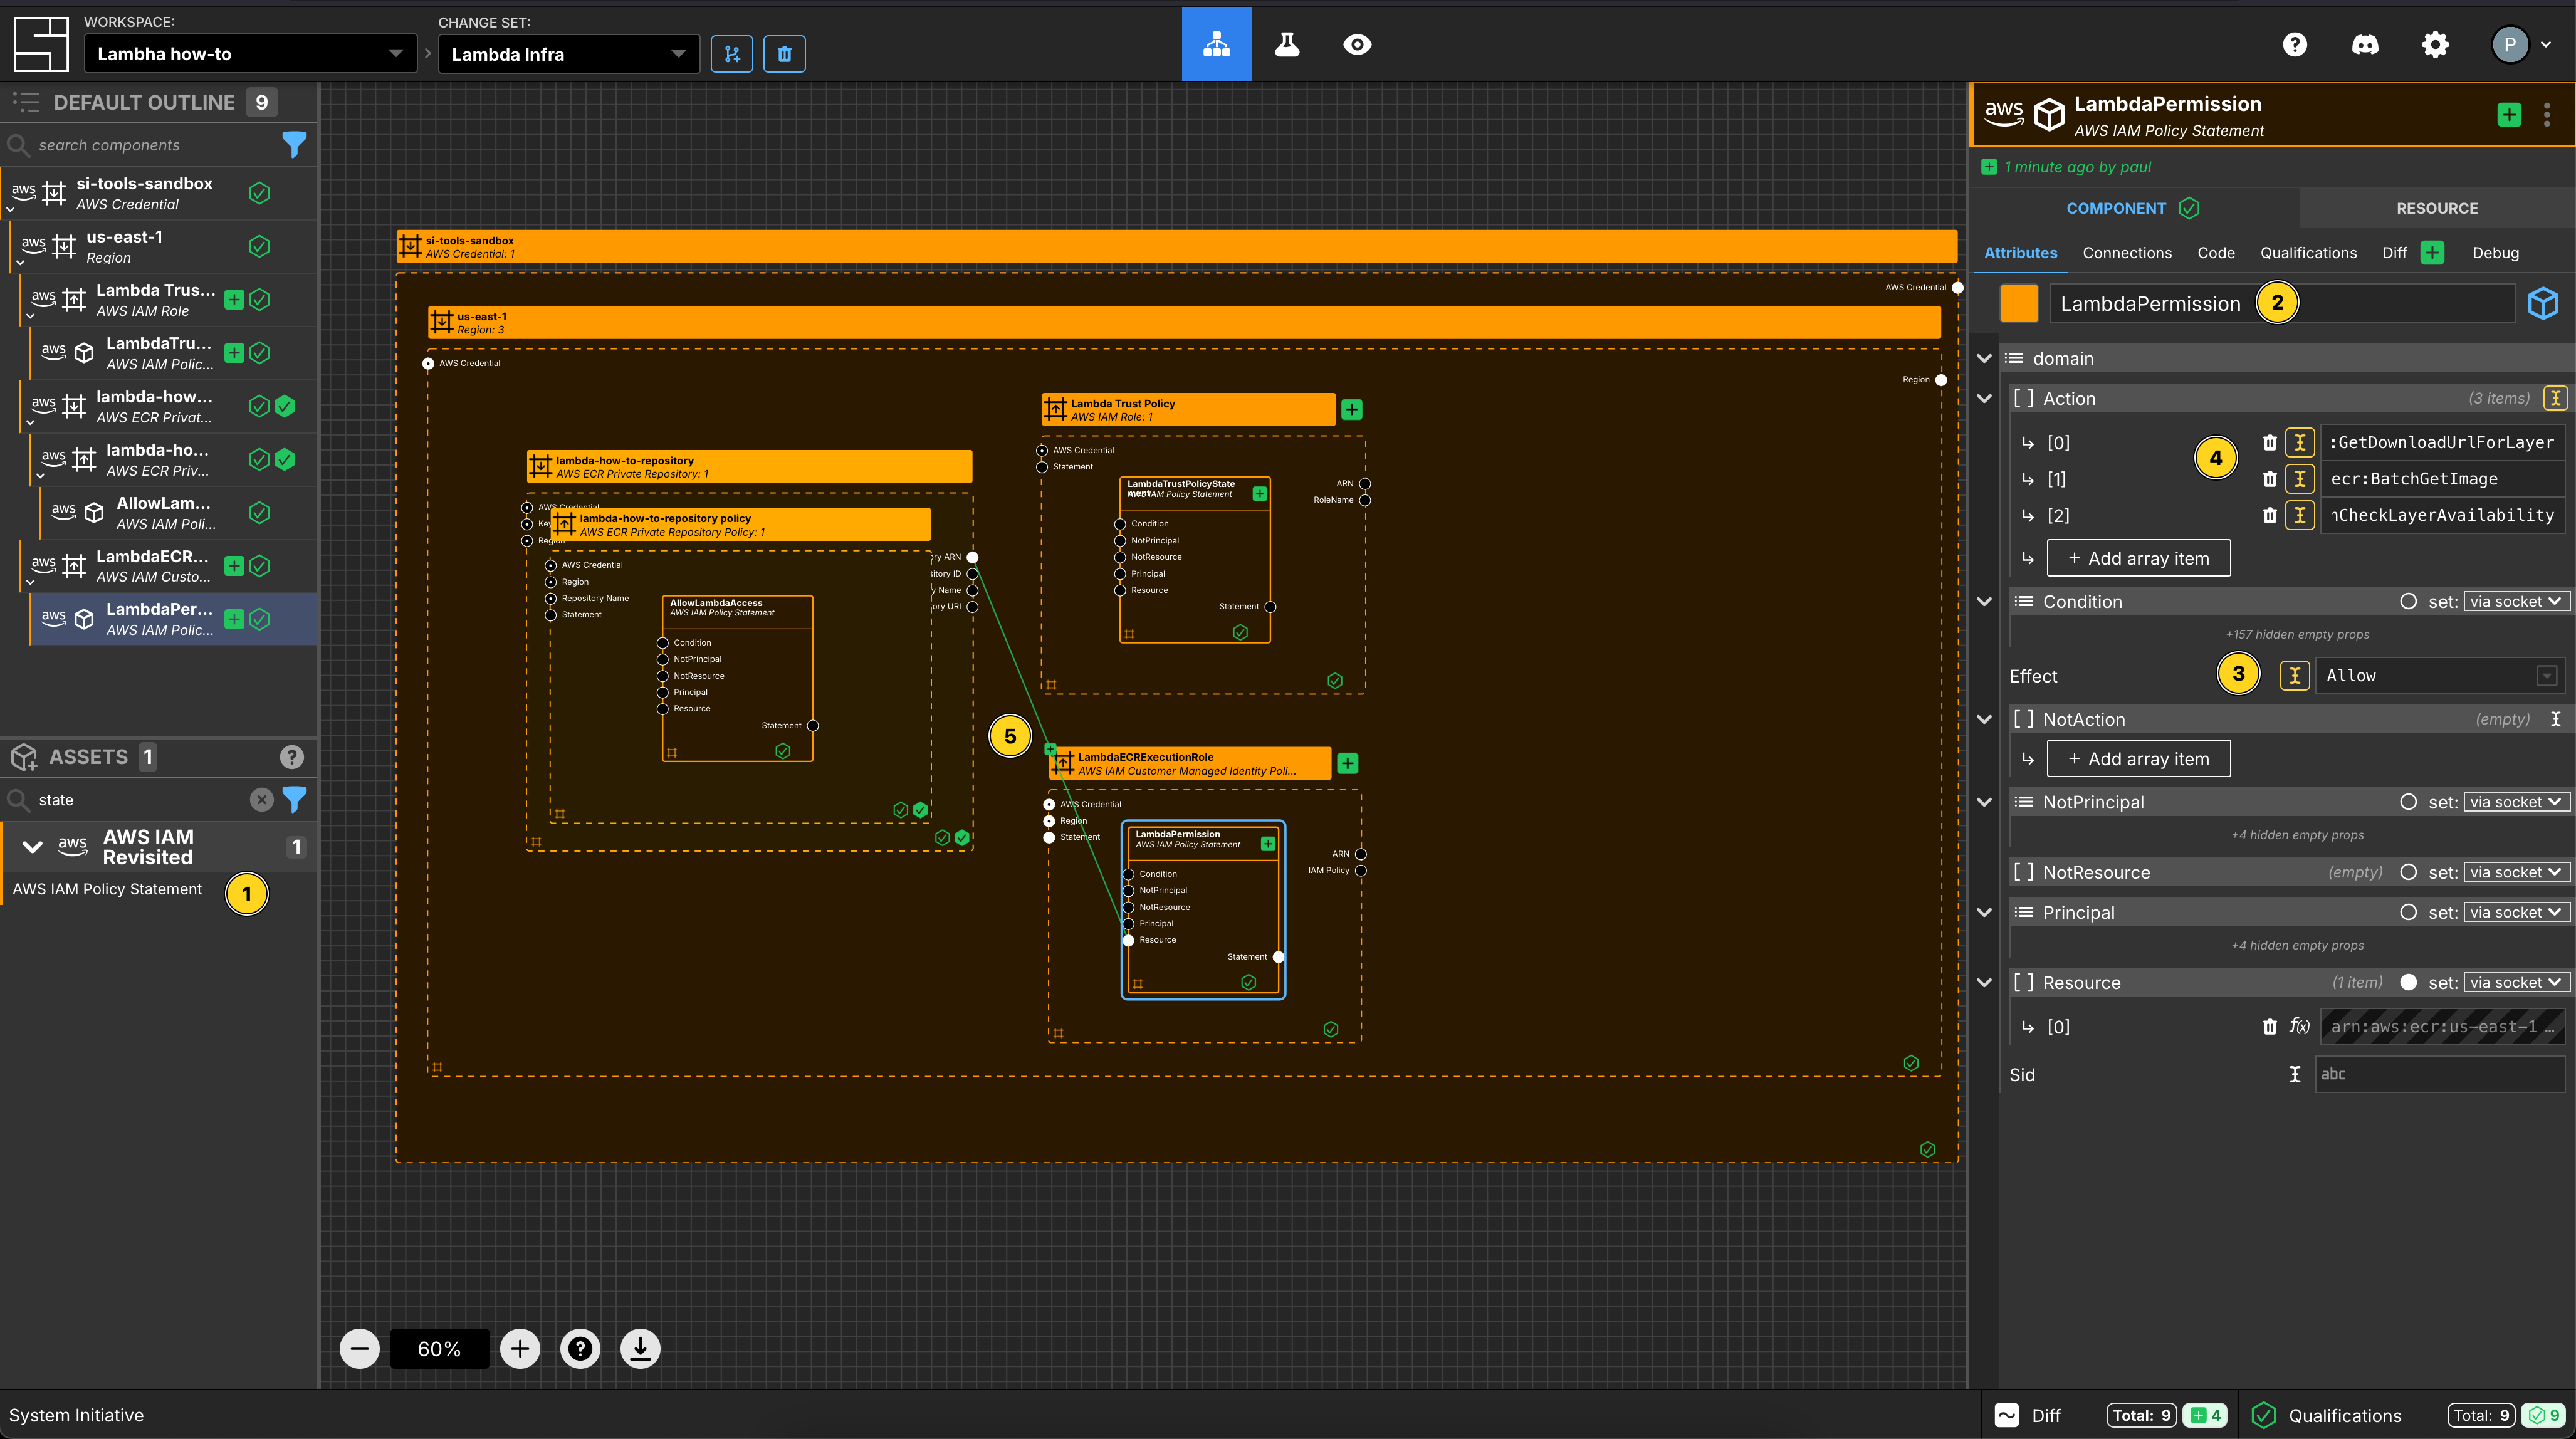
Add an AWS IAM Policy Statement within the LambdaECRExecutionRole AWS IAM Role frame.
Set the Component name to LambdaPermission.
Set the Effect to Allow.
Add 3 array items to Action.
Set the values to be:
ecr:GetDownloadUrlForLayerecr:BatchGetImageecr:BatchCheckLayerAvailability
Connect the Repository ARN Output Socket of the lambda-how-to-repository to the Resource Input Socket of this LambdaPermission Component.
Create an AWS IAM Role Policy
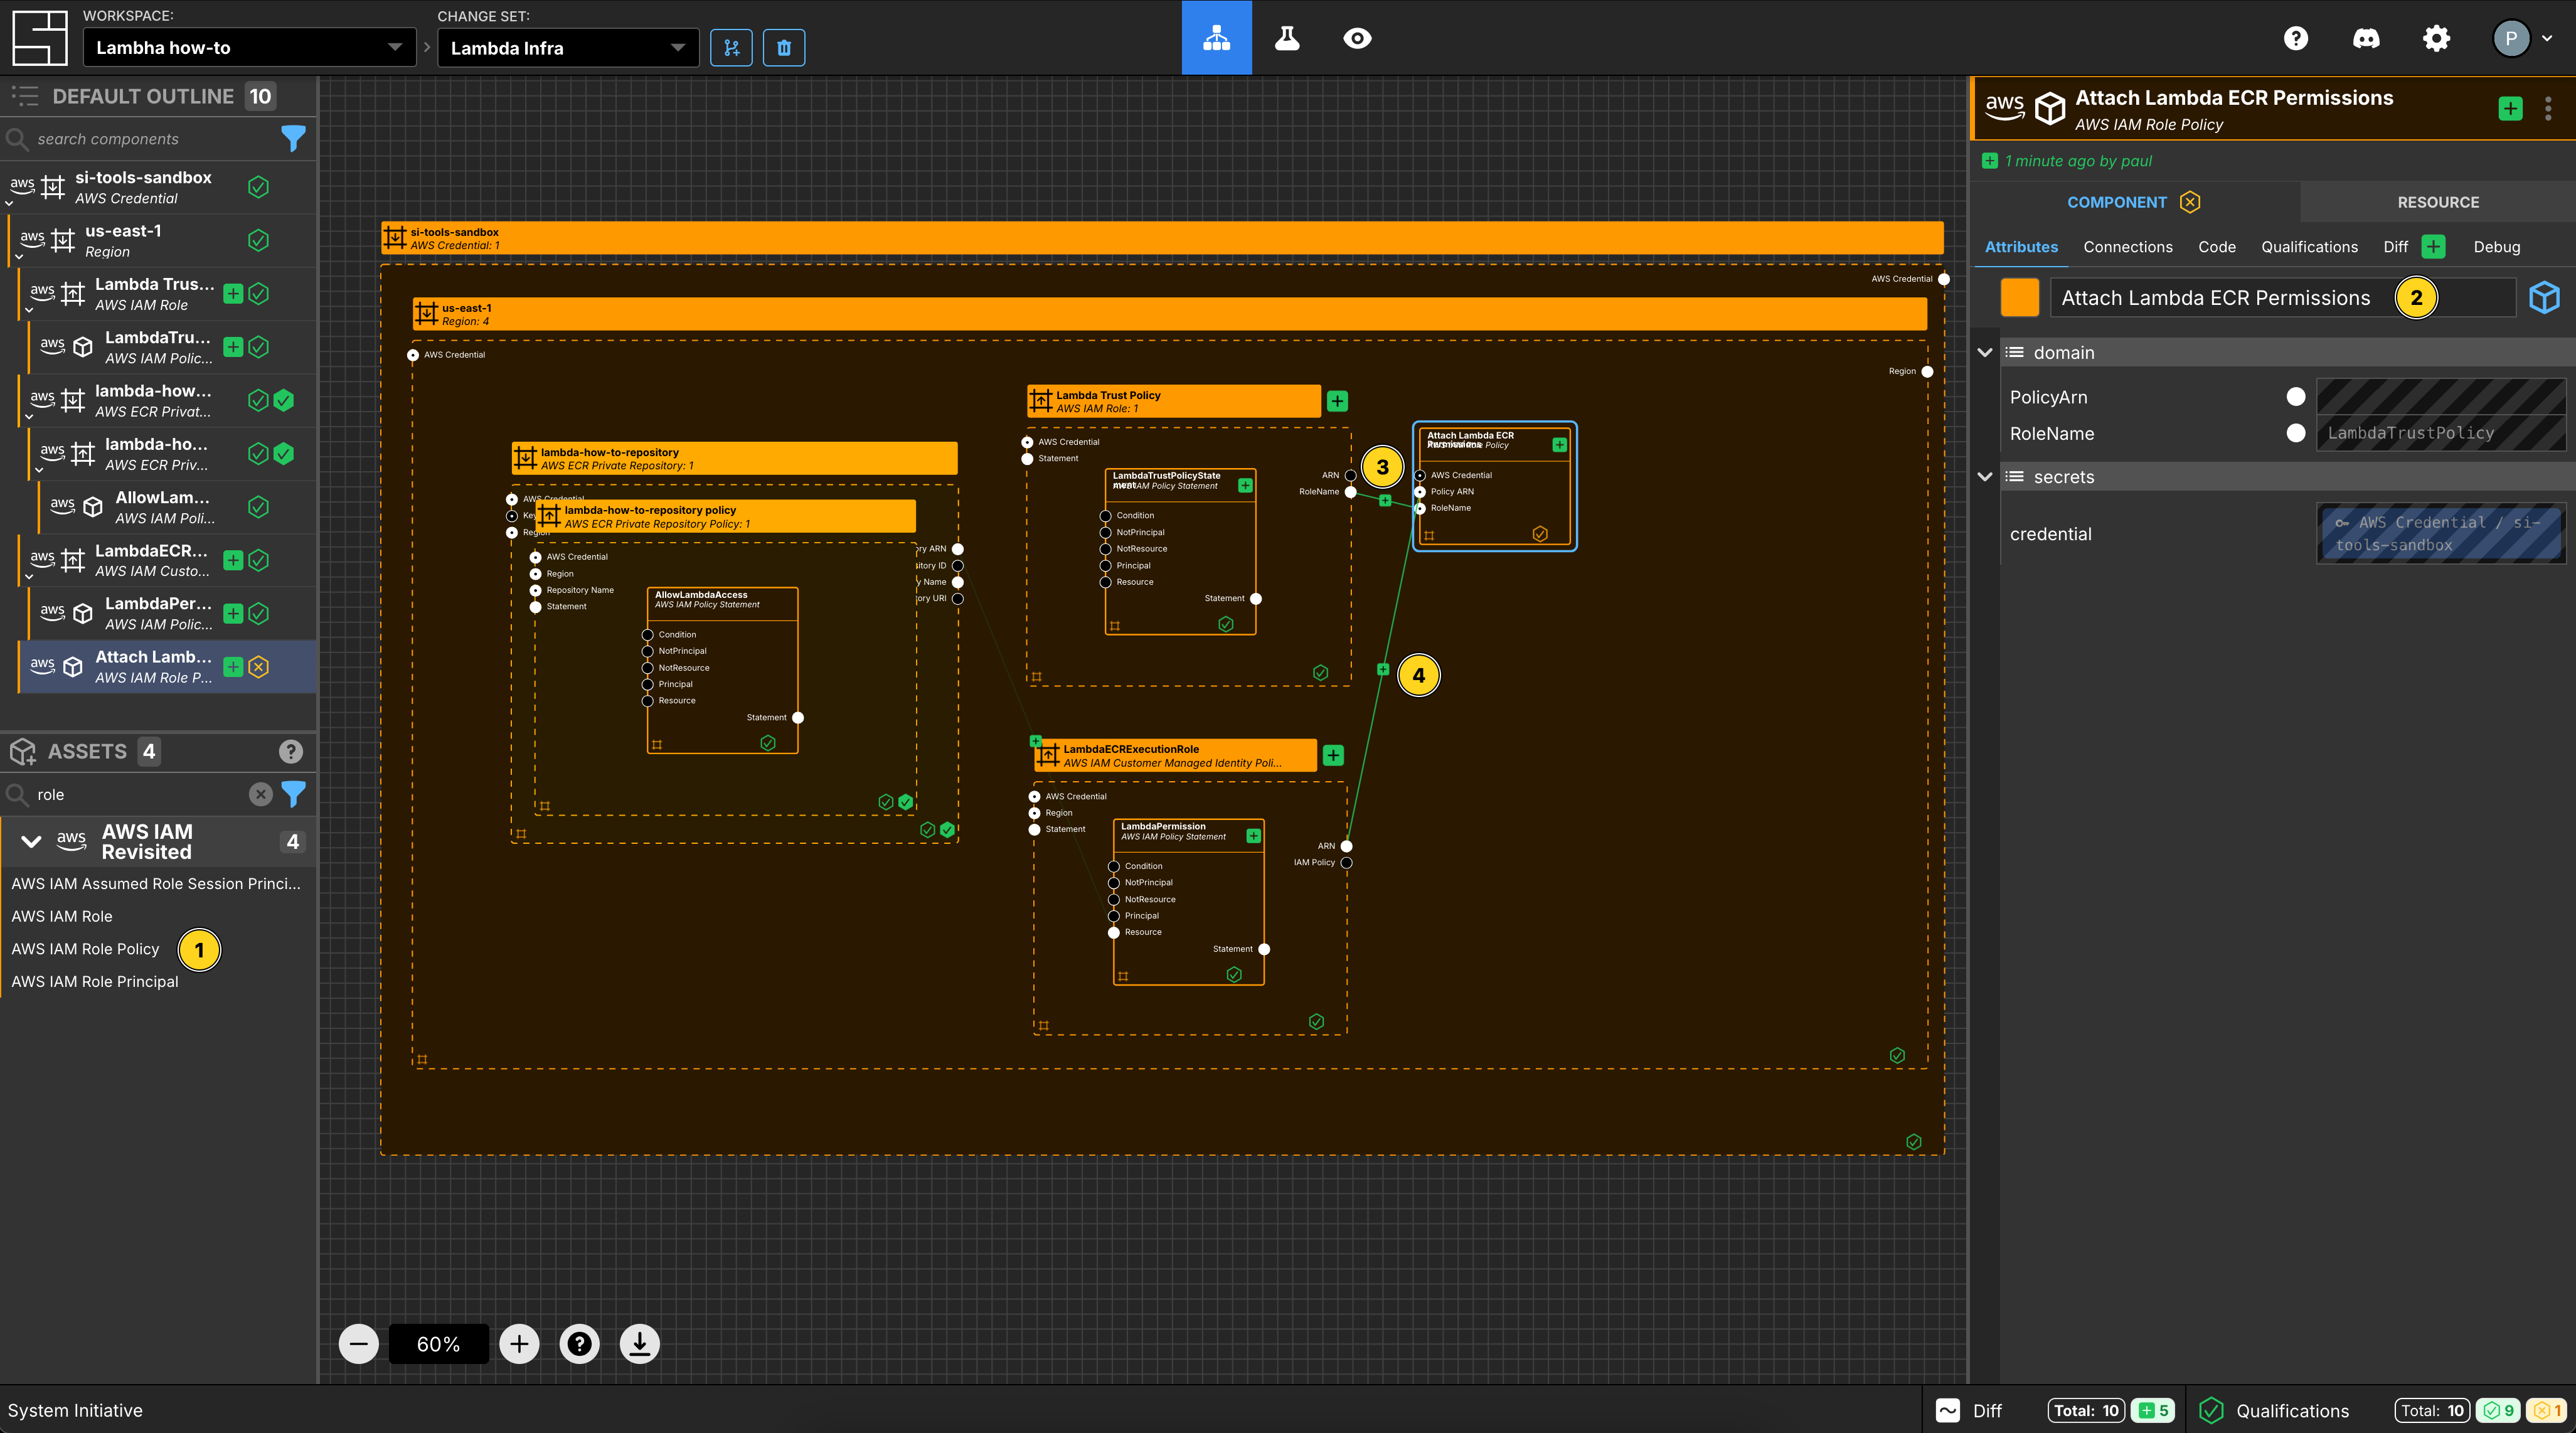
Add an AWS IAM Role Policy to your us-east-1 region frame.
Set the Component name to Attach Lambda ECR Permissions.
Connect the RoleName Output Socket of the Lambda Trust Policy Component to the RoleName of this Attach Lambda ECR Permissions Component.
Connect the ARN Output Socket of the LambdaECRExecutionRole to the Policy ARN Input Socket of this Attach Lambda ECR Permissions Component.
Create a Lambda Function
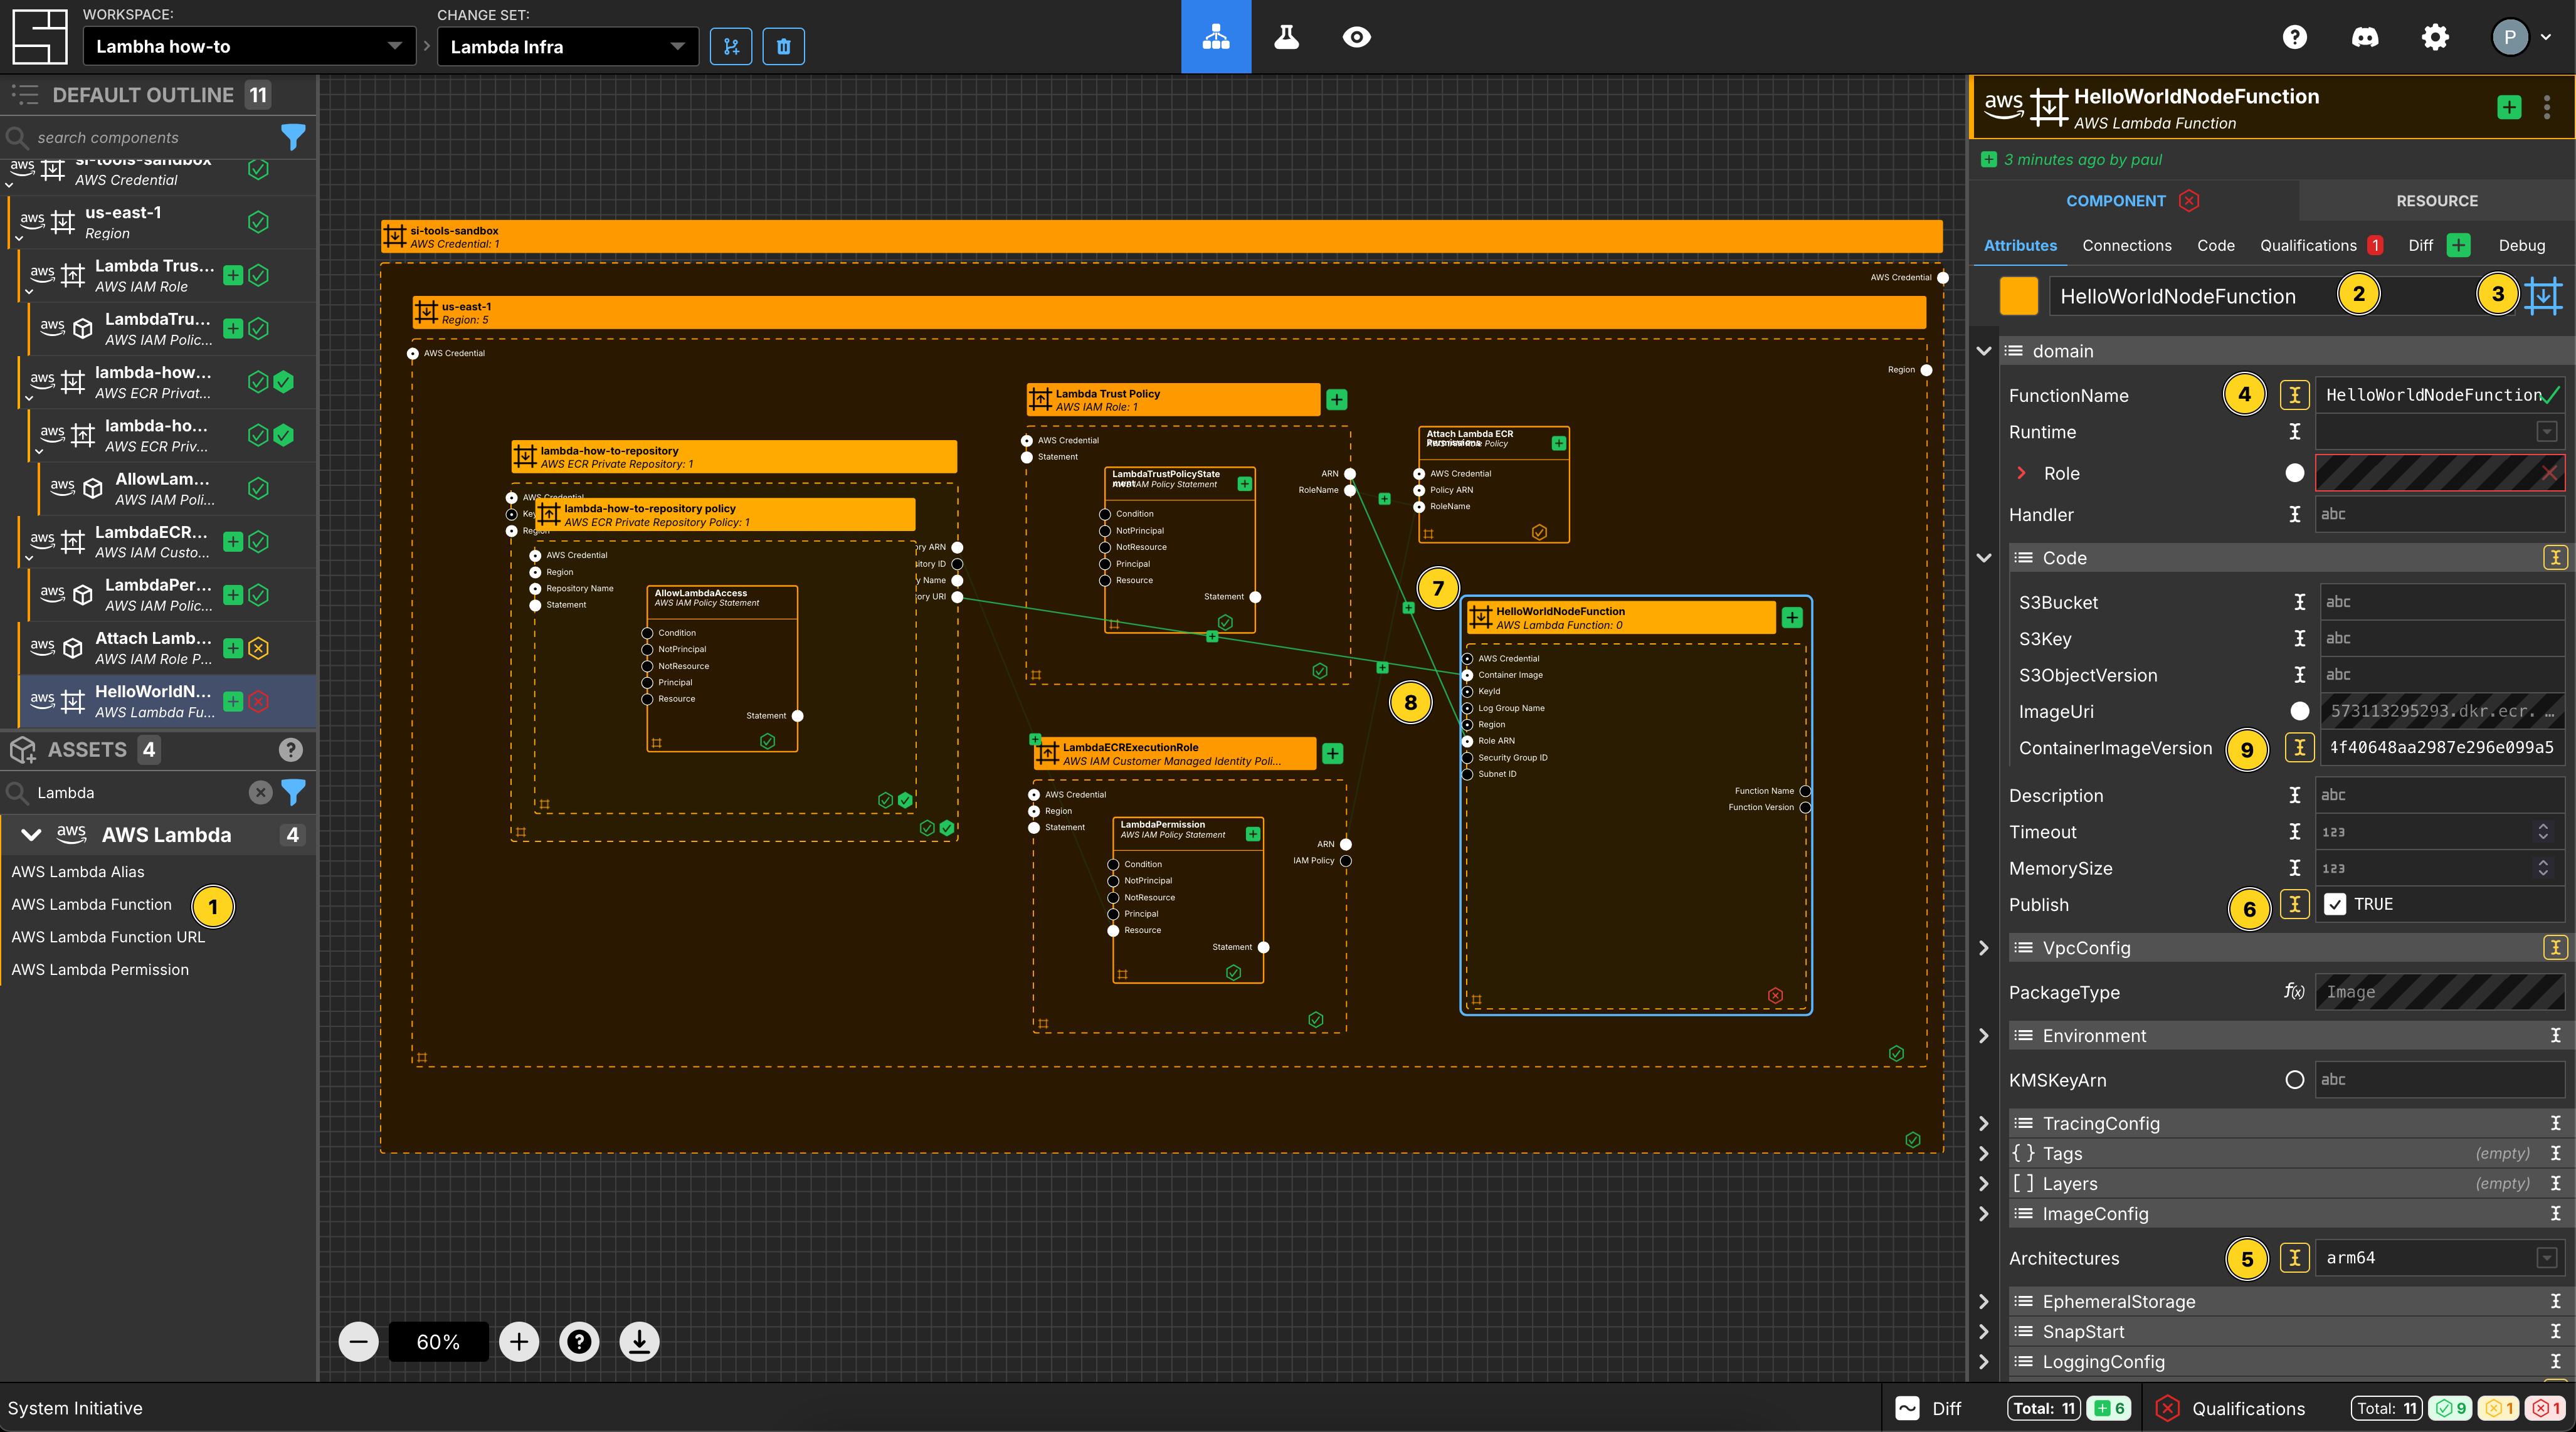
Add a Lambda Function to your us-east-1 region frame.
Set the Component name to be HelloWorldNodeFunction.
Set the Component type to be Configuration Frame (down).
Set the FunctionName to be HelloWorldNodeFunction.
Set Publish to be true.
Set Architectures to be arm64.
Connect the Repository URI Output Socket of the lambda-how-to-repository to the Container Image Input Socket of this HelloWorldNodeFunction Component.
Connect the ARN Output Socket of the Lambda Trust Policy Component to the Role ARN Input Socket of this HelloWorldNodeFunction Component.
In order to ensure that you are setting the correct version of the container image, you can inspect the docker container manifest to ensure you set the correct image to use as the container image. My local setup will try and build multi-architecture containers, so I need to select the correct arm64 architecture for the function.
docker manifest inspect 573113295293.dkr.ecr.us-east-1.amazonaws.com/lambda-how-to-repository:latest
{
   "schemaVersion": 2,
   "mediaType": "application/vnd.oci.image.index.v1+json",
   "manifests": [
      {
         "mediaType": "application/vnd.oci.image.manifest.v1+json",
         "size": 1626,
         "digest": "sha256:703e717188a34c38e53d80a3dec4bf345c5b9b97a4f40648aa2987e296e099a5",
         "platform": {
            "architecture": "arm64",
            "os": "linux"
         }
      },
      {
         "mediaType": "application/vnd.oci.image.manifest.v1+json",
         "size": 566,
         "digest": "sha256:e425754d9a0571c59a7a138eb4989b5cdcdc7153d2c2dbd9b47f4adc0b91cb8d",
         "platform": {
            "architecture": "unknown",
            "os": "unknown"
         }
      }
   ]
}
In this case, I would set the ContainerImageVersion to be @sha256:703e717188a34c38e53d80a3dec4bf345c5b9b97a4f40648aa2987e296e099a5.
Create Lambda Permission
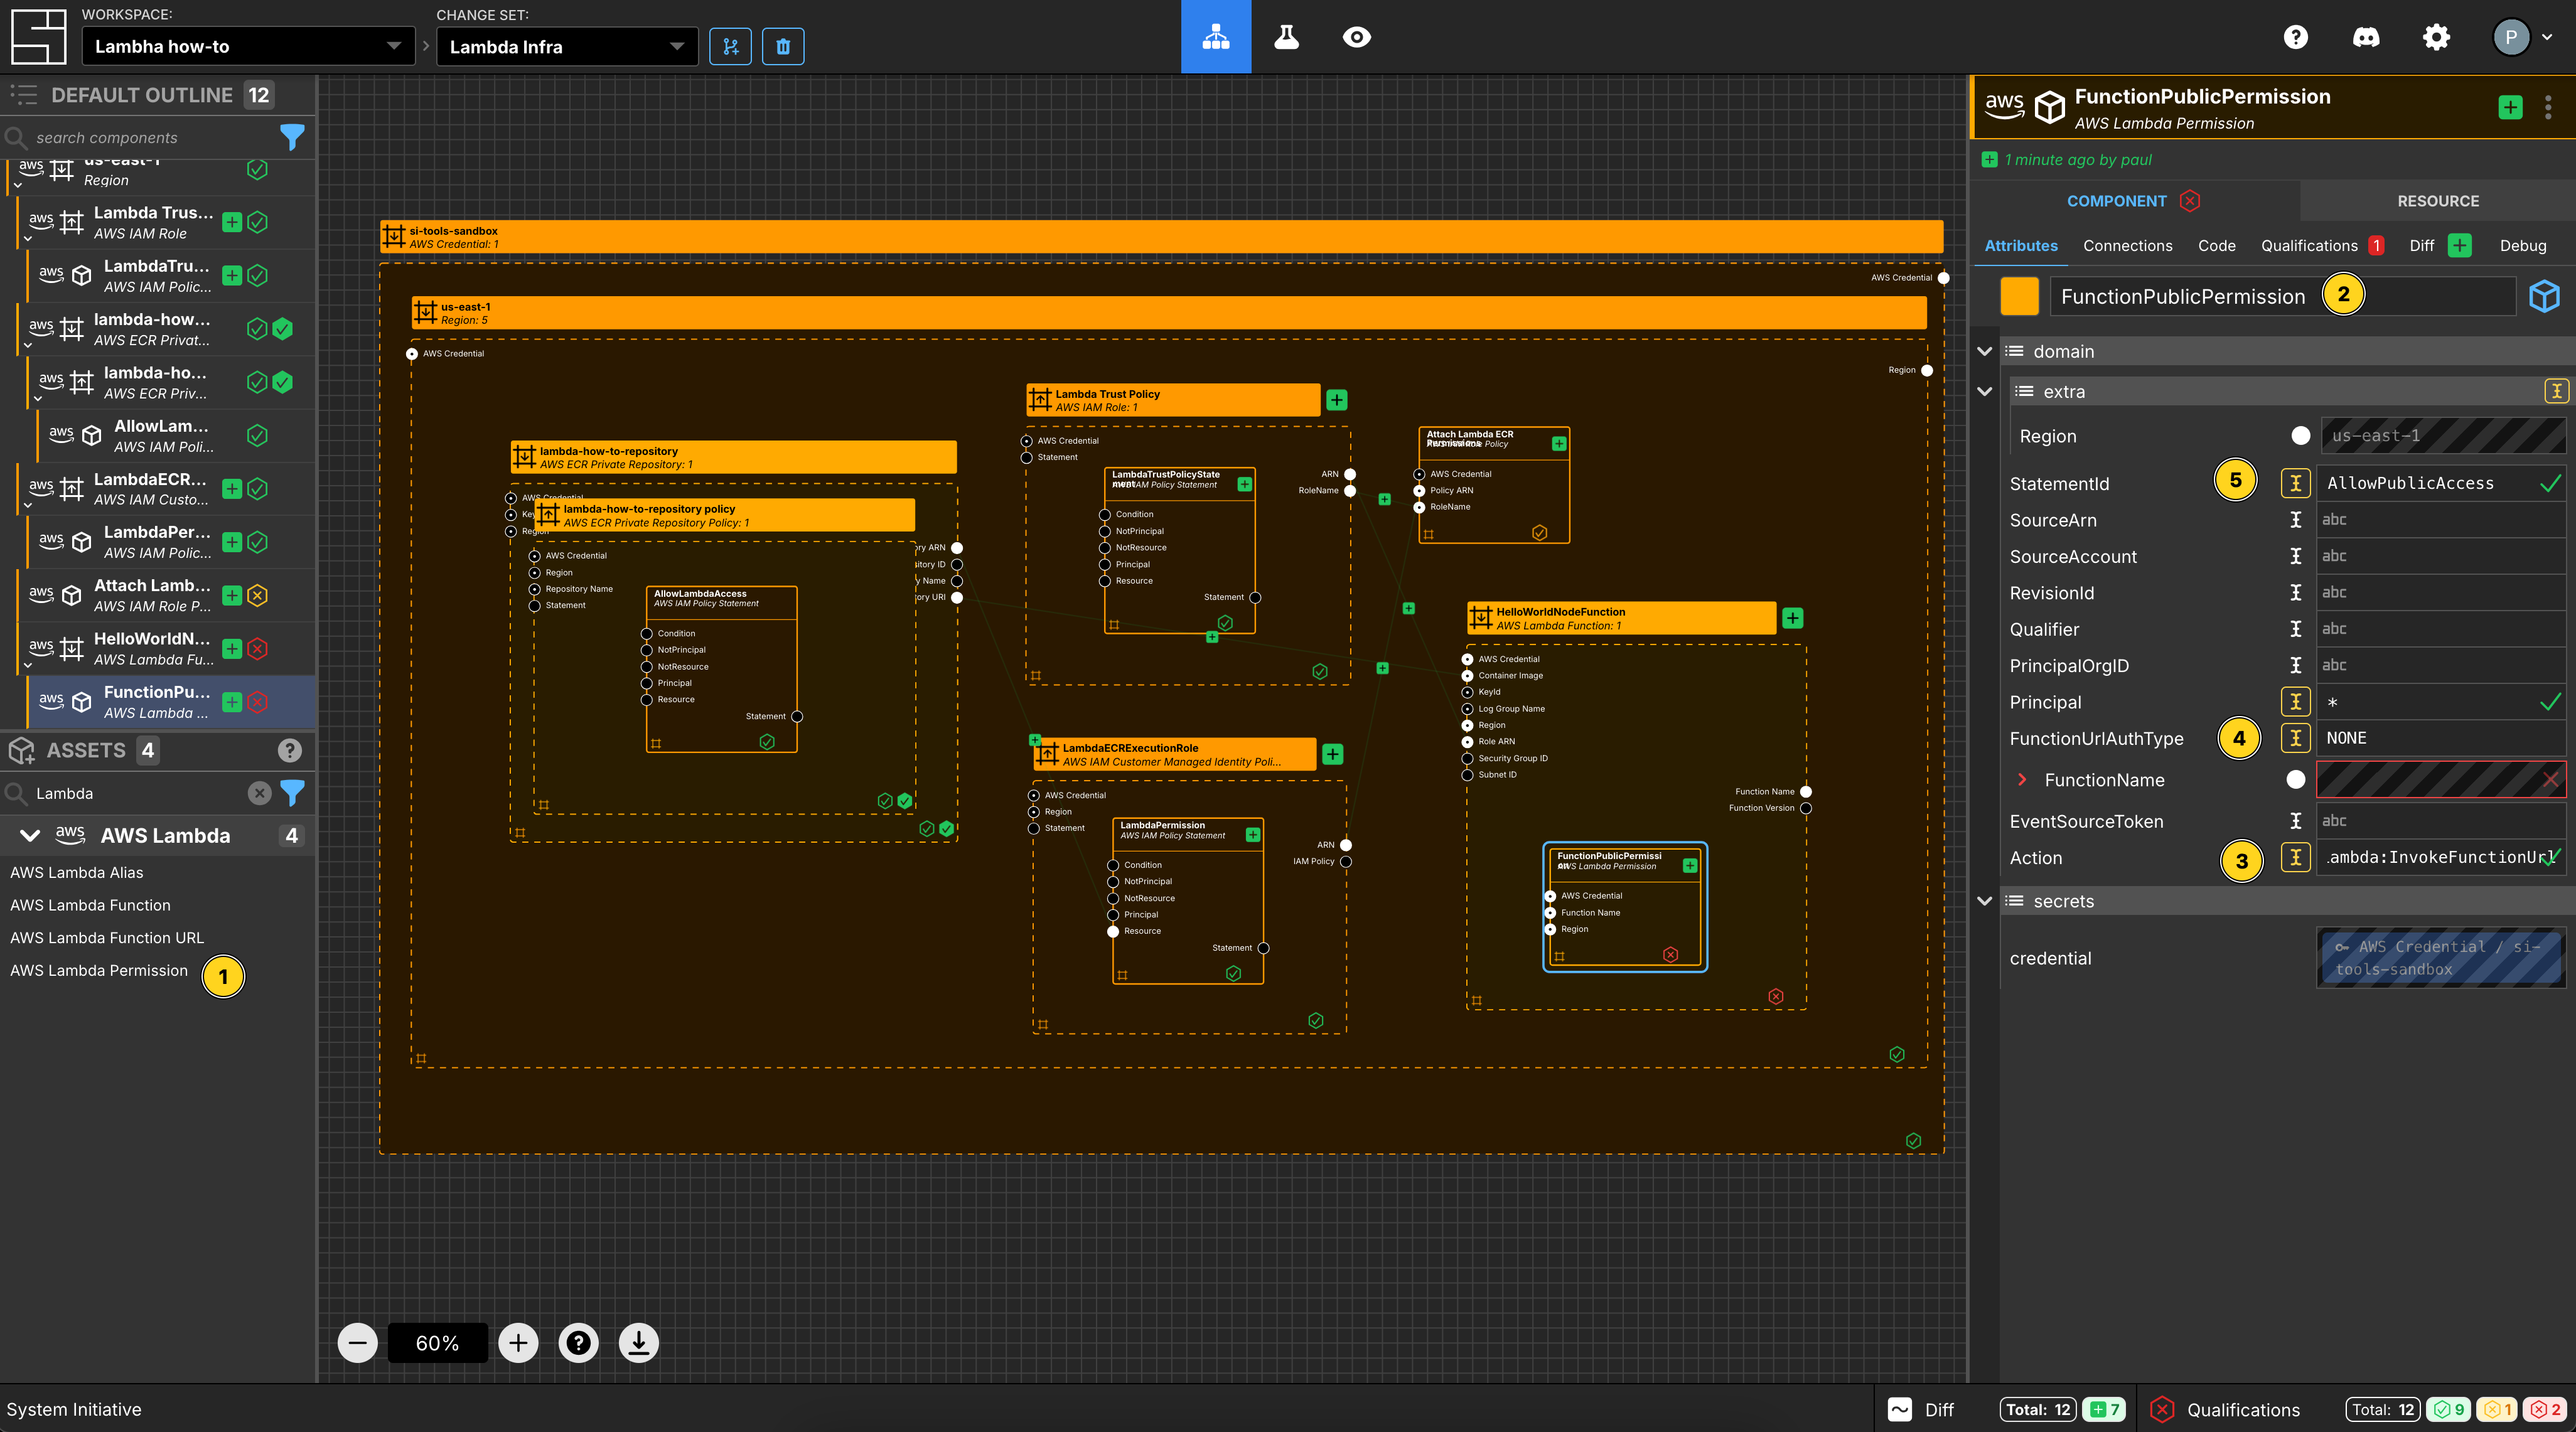
Add a Lambda Permission to your HelloWorldNodeFunction Lambda function frame.
Set the Component name to be FunctionPublicPermission.
Set Action to be lambda:InvokeFunctionUrl.
Set FunctionUrlAuthType to be NONE.
Set Principal to be *.
Set StatementId to be AllowPublicAccess.
Create Lambda Function Url
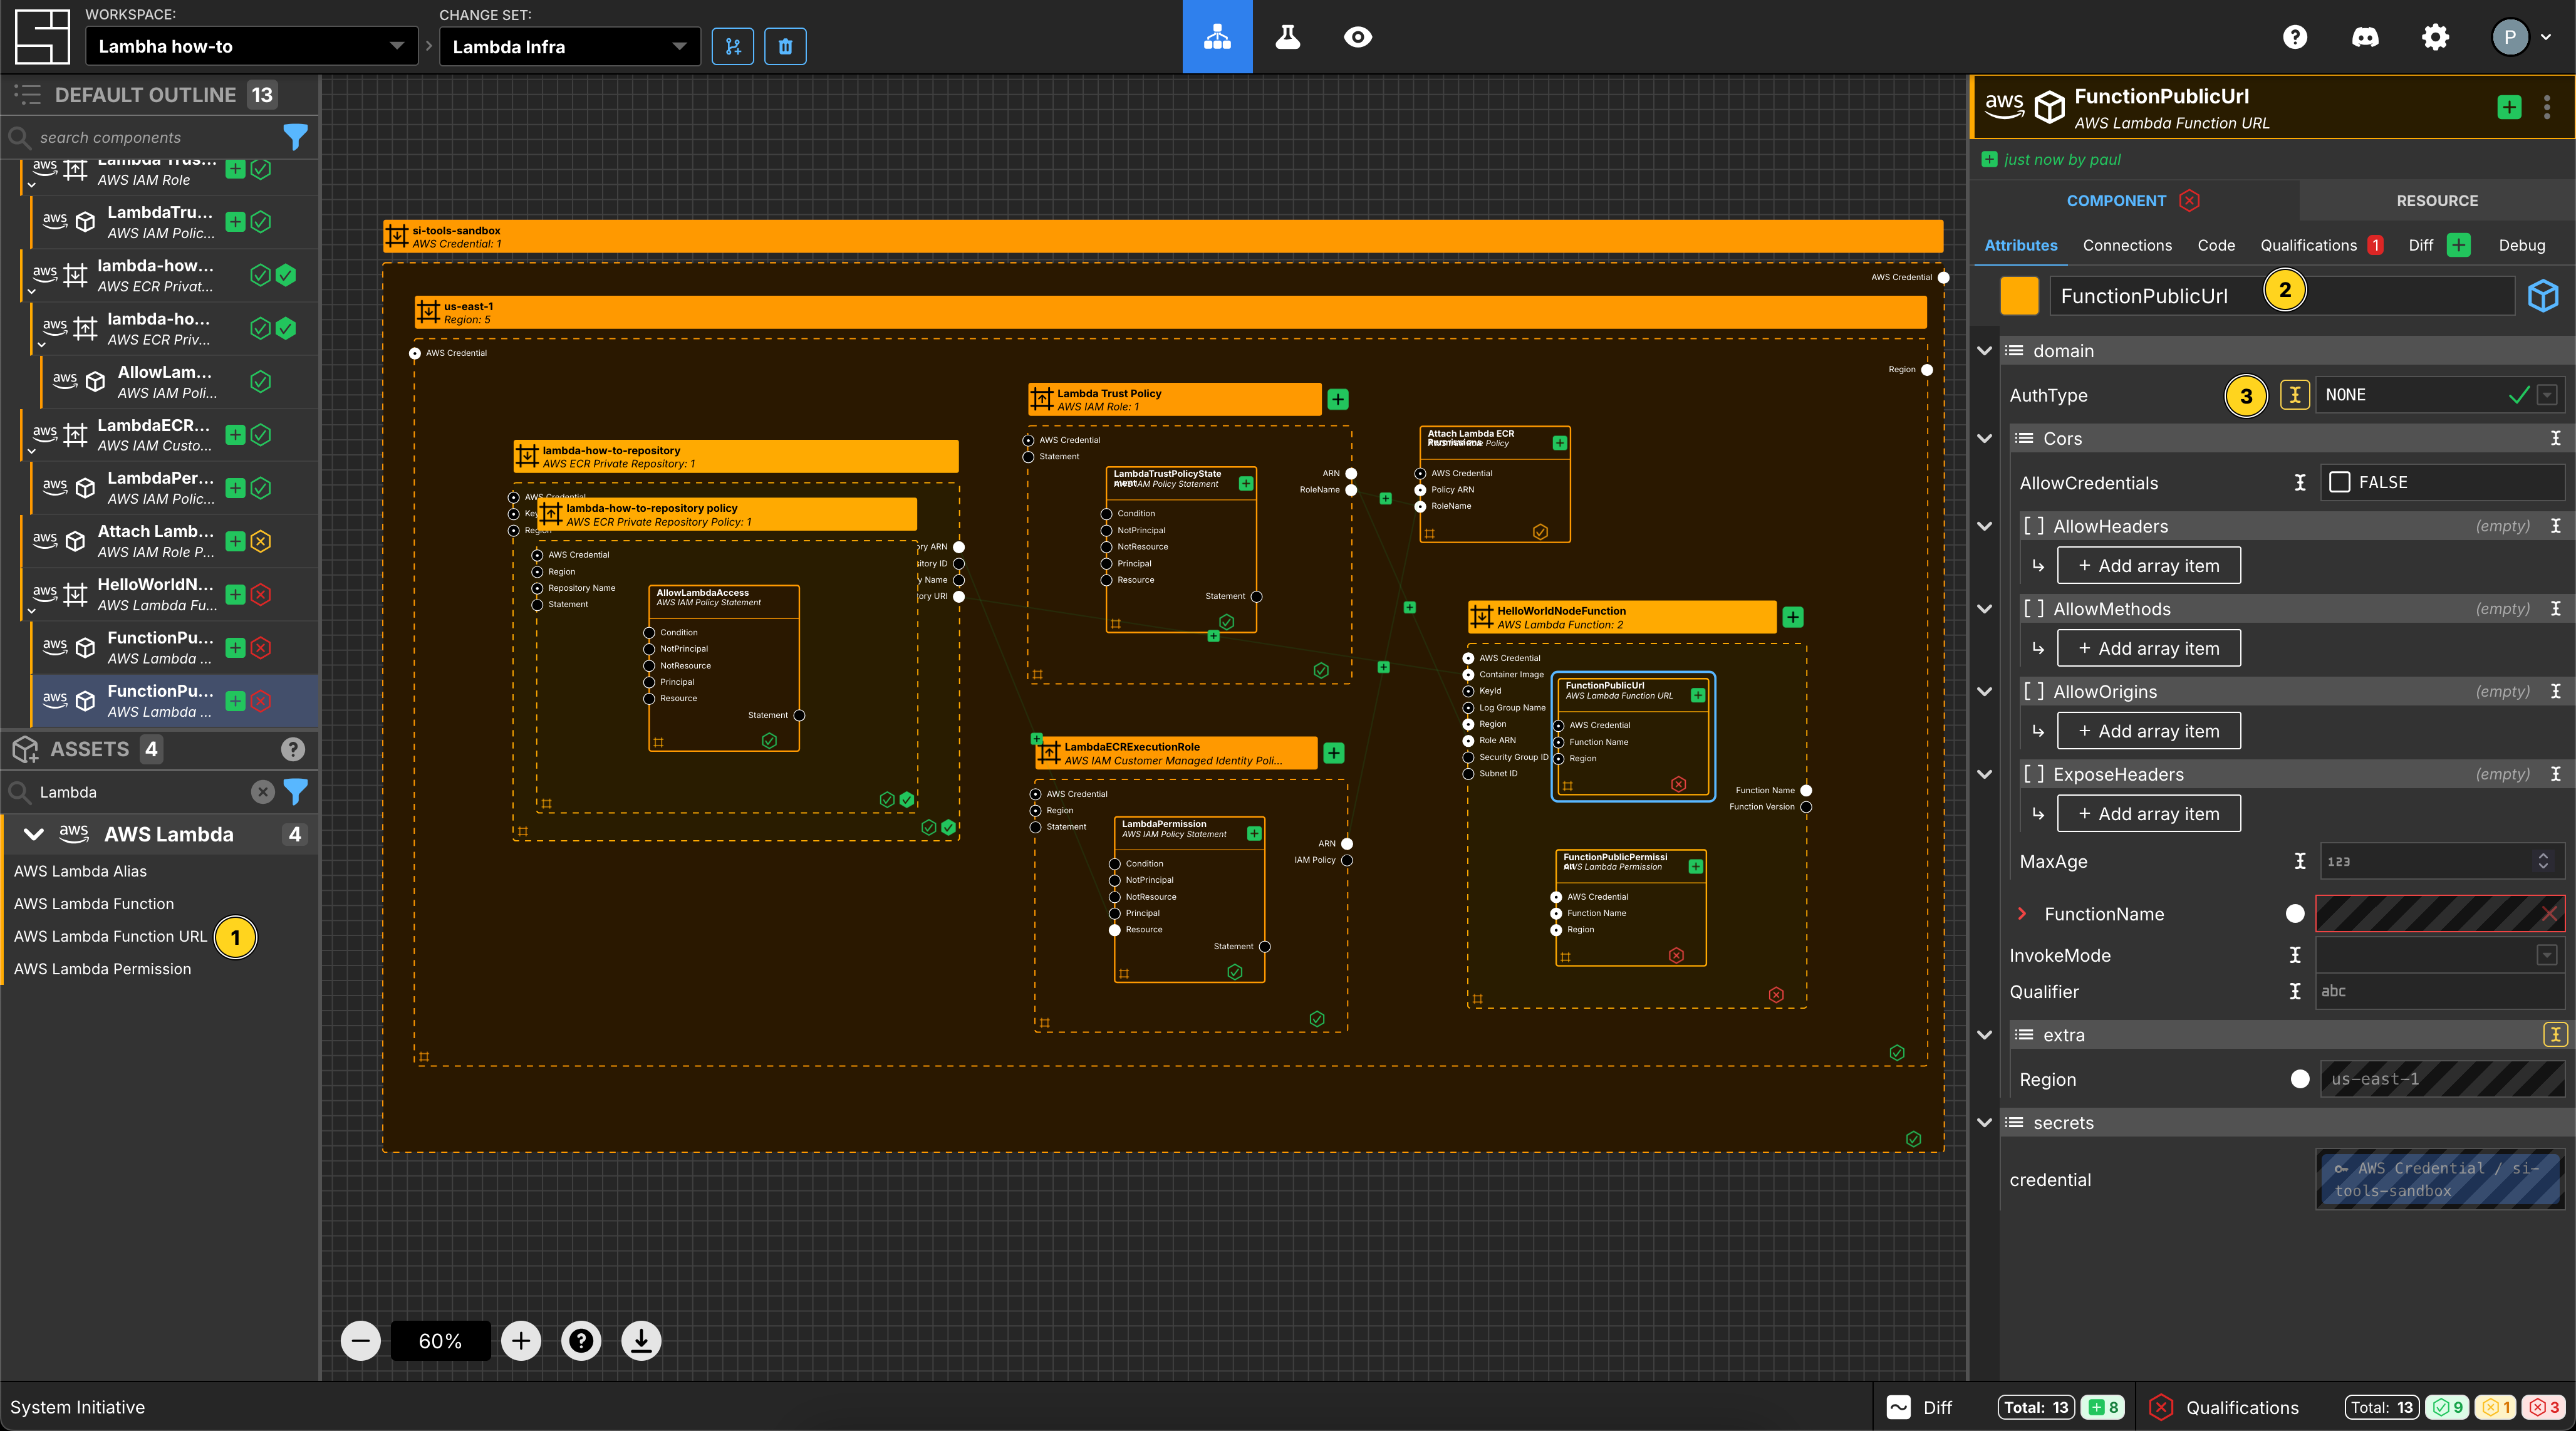
Add a Lambda Function Url to your HelloWorldNodeFunction Lambda function frame.
Set the Component name to be FunctionPublicUrl.
Set the AuthType to be NONE.
Apply your Change Set
Press Escape or click anywhere on the canvas background to select the Workspace.
Click the Apply Change Set button to:
- Create 2 IAM Roles and the correct attachment between them
- Create a Lambda Function
- Create a Lambda Permission
- Create a Lambda Function URL
Explore your resources
Review the completed AWS resources by clicking the Resource sub-panel for each of your new resources.
Select the FunctionPublicUrl Component on the Model. Go to the Resource Data screen and you will find the FunctionUrl. You can visit that URL in the browser and inspect the running application.
Clean Up
Create a new Change Set called Clean up How-to
Delete all of the Components.
Click Apply Change Set.
All your new resources should be deleted from your AWS account.
Vocabulary
In this guide bits of System Initiative Vocabulary will be shown with a capital letter. All definitions for these can be found here: System Initative - Vocabulary