How to deploy a static Website with AWS S3 and CloudFront
This how-to assumes:
- Basic familiarity with System Initiative
- Are familiar with AWS
It will teach you how to deploy a website using AWS S3 and CloudFront with System Initiative.
We will cover:
- The creation of the correct AWS S3 bucket to host a website
- Deployment of a CloudFront Distribution for the Website
Setup
All activities in this how-to guide use an AWS Region and AWS Credential.
Start in a Change Set named S3 Website How-to.
Walkthrough
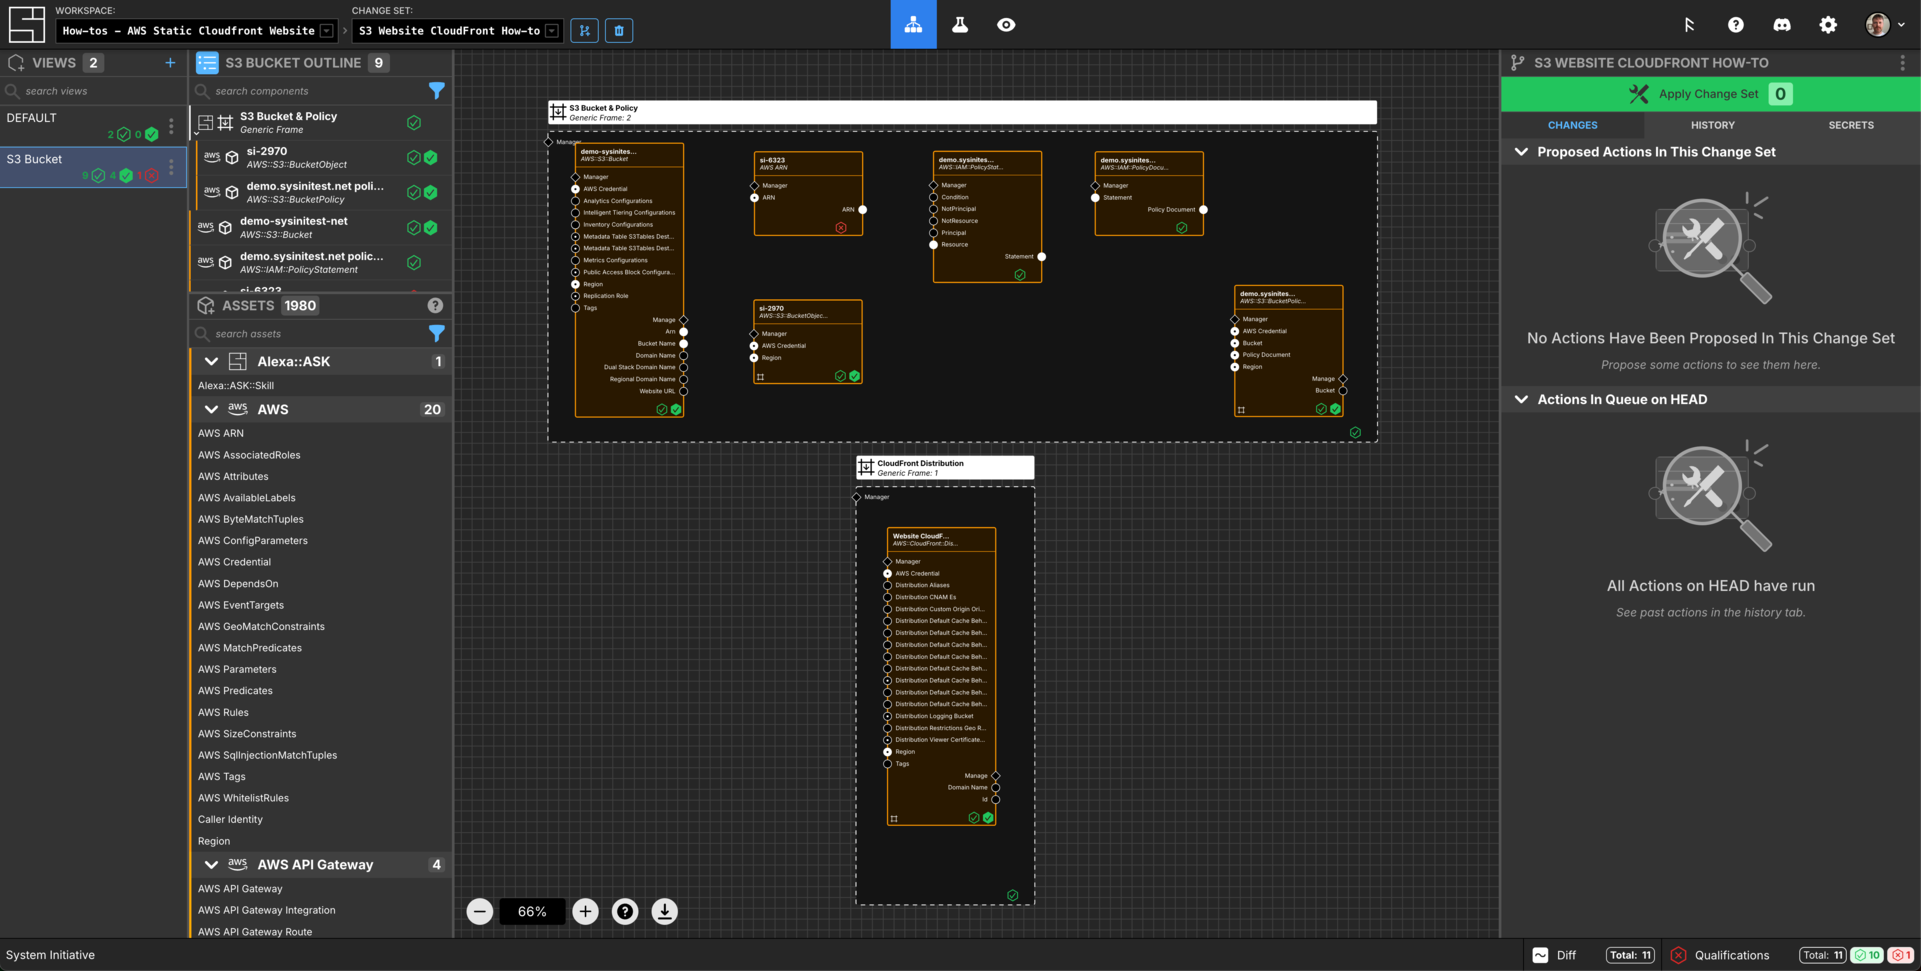
What it will look like
When you are through with this guide, you should have Components that look like this in your diagram:
Create AWS Credentials
Add a AWS Credential to your Change Set and configure your AWS credentials.
Select an AWS Region
Add a AWS Region to your Change Set and set the region property to us-east-1.
Create an S3 Bucket
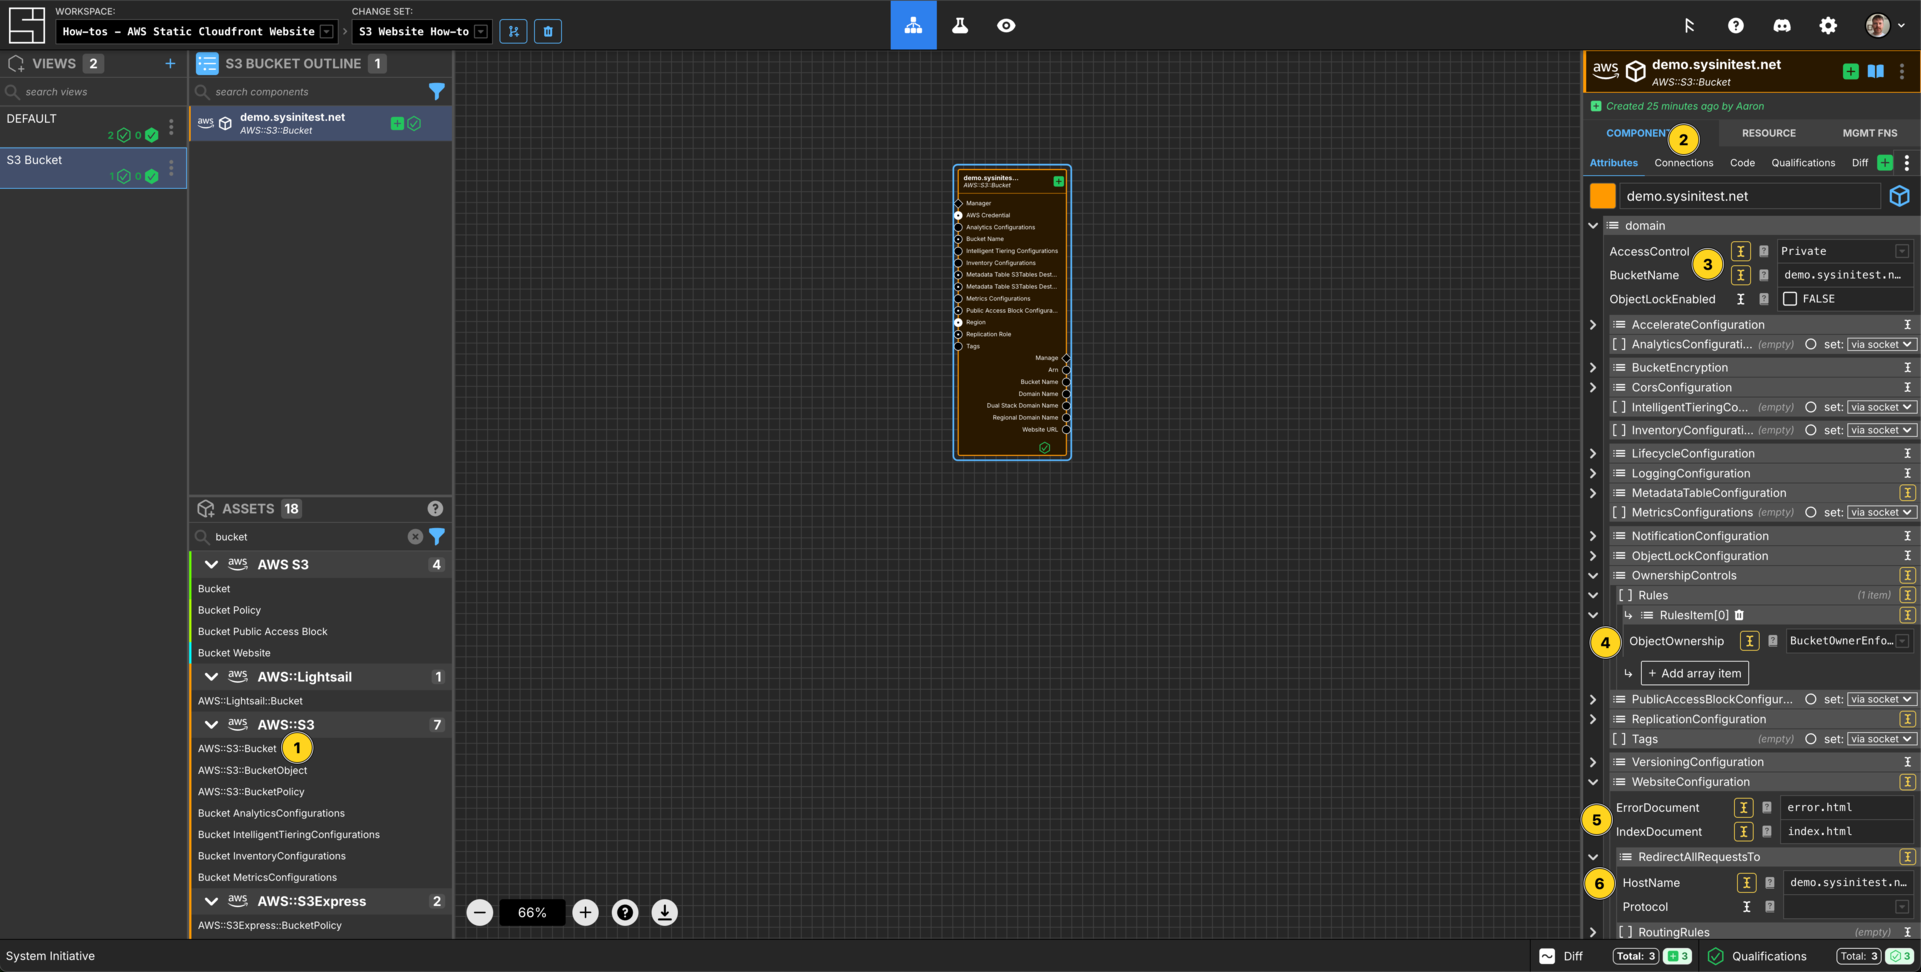
Add an AWS::S3::Bucket component to your canvas and connect the Credentials and region via the Connections menu.
Right click on the AWS::S3::Bucket component and select Move to > Create new View... Call this S3 Bucket.
Set the Component name to demo-sysinitest-net.
Set the BucketName to demo-sysinitest-net.
Add an array item to OwnershipControls -> Rules and set to be BucketOwnerEnforced.
Set PublicAccessBlockConfiguration to be set:manually and leave all options as FALSE.
In WebsiteConfiguration Set the IndexDocument to be index.html.
Set the ErrorDocument to be error.html.
Add an AWS ARN Component

Add an AWS ARN component to your canvas.
Set the resource-postfix to /*.
Connect the Arn Output Socket of the AWS::S3::Bucket to the ARN Input Socket of the AWS ARN Component.
Create an IAM Policy Statement
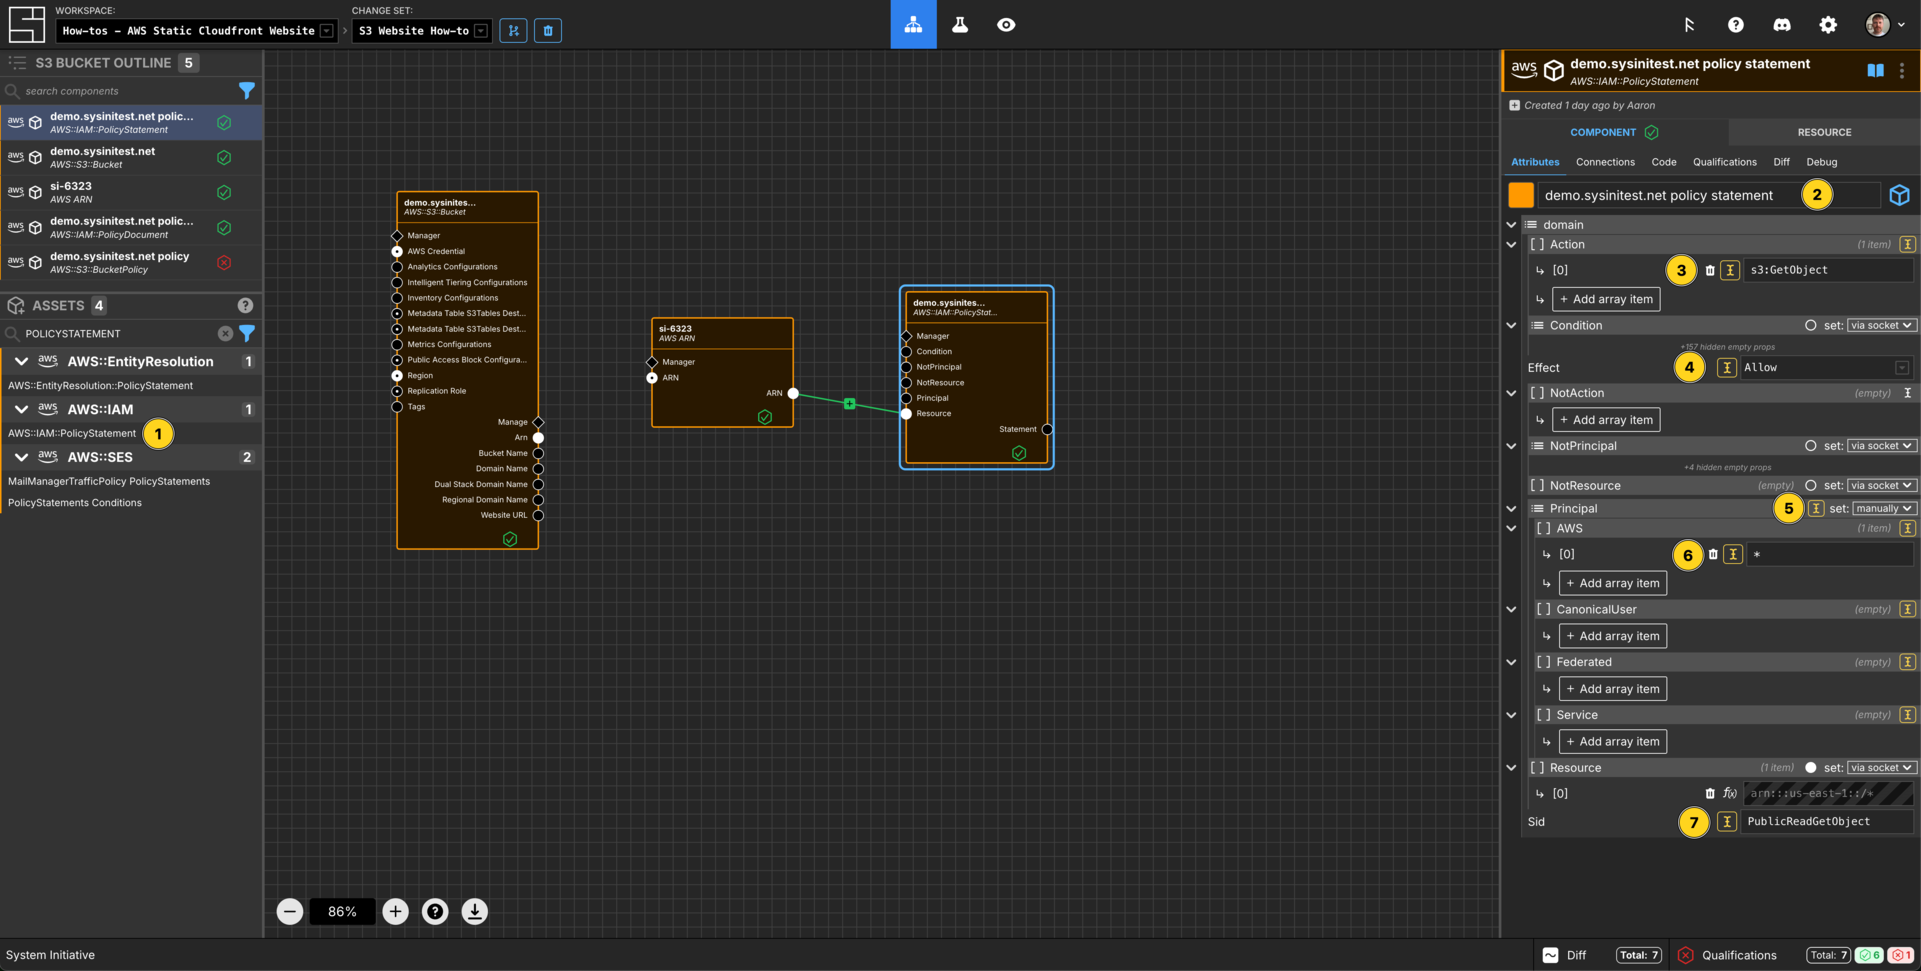
Add an AWS::IAM::PolicyStatement component to your canvas.
Set the Component name to demo-sysinitest-net policy statement.
Add an array item to Action and set the value to be s3:GetObject.
Set the Effect to Allow.
Change the Principal to be set: manually.
Add an array item to AWS and set the value to be *.
Set the Sid to be PublicReadGetObject.
Connect the ARN output socket of the AWS ARN component to the Resource input socket of the AWS::IAM::PolicyStatement component.
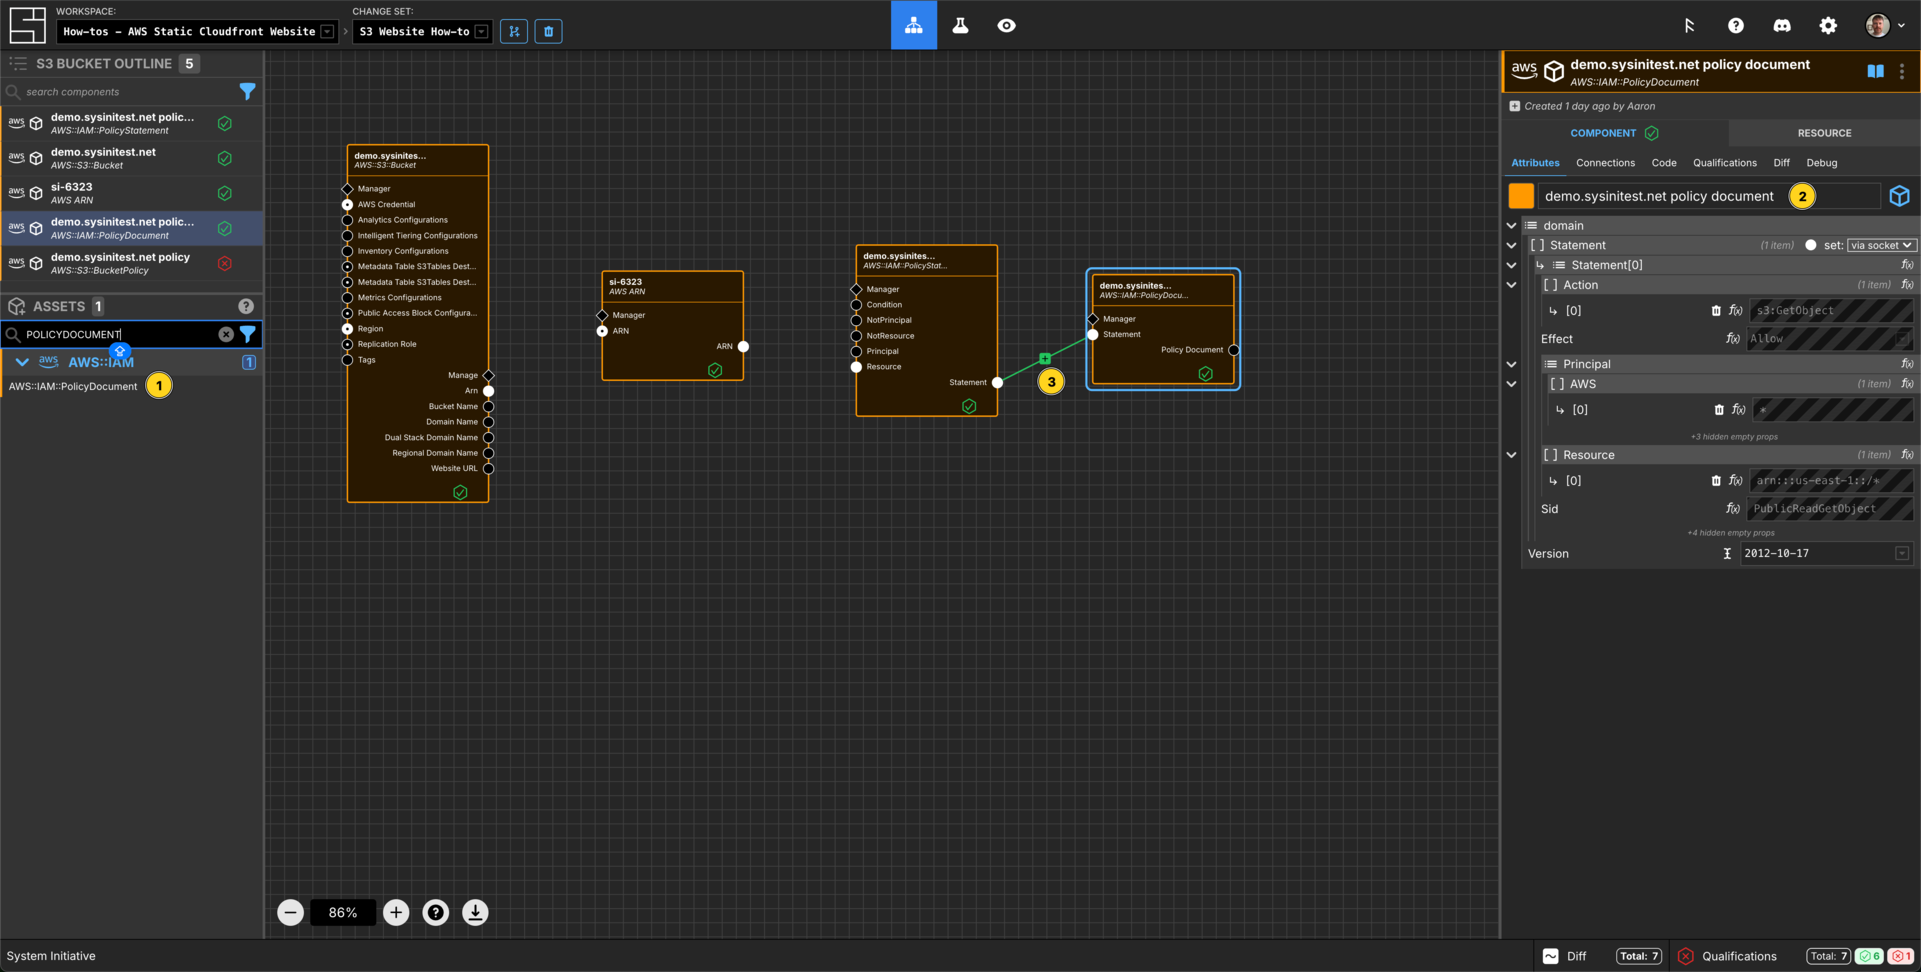
Add a AWS::IAM::PolicyDocument component to your canvas. Change it from Up Frame to Component.
Set the Component name to demo-sysinitest-net policy document.
Connect the Statement output socket of the AWS::IAM::PolicyStatement component to the Statement input socket of the AWS::IAM::PolicyDocument component.
Create a Bucket Policy
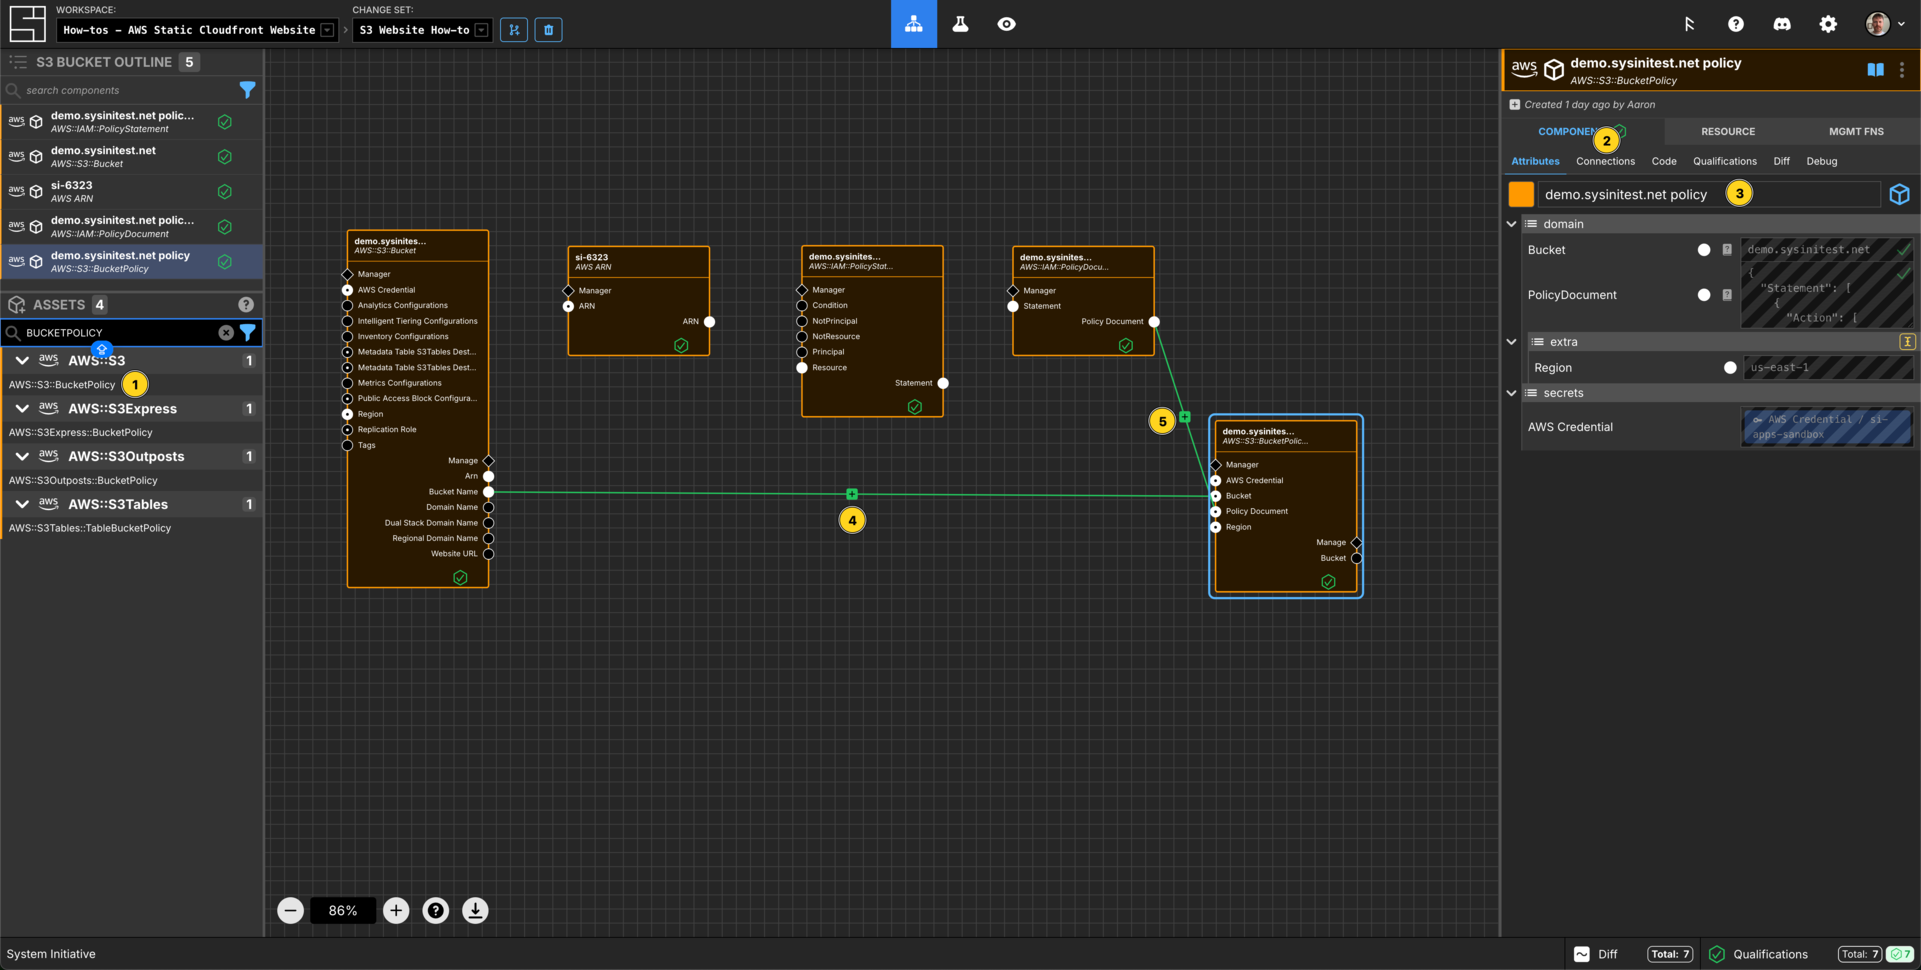
Add a AWS::S3::BucketPolicy component to your canvas.
Connect the AWS Credentials and region via the Connections menu.
Set the Component name to demo-sysinitest-net policy.
Connect the Bucket Name output socket of the AWS::S3::Bucket component to the Bucket input socket of the AWS::S3::BucketPolicy component.
Connect the Policy Document output socket of the AWS::IAM::PolicyDocument component to the Policy Document input socket of the AWS::S3::BucketPolicy component.
Deploy the Bucket Website
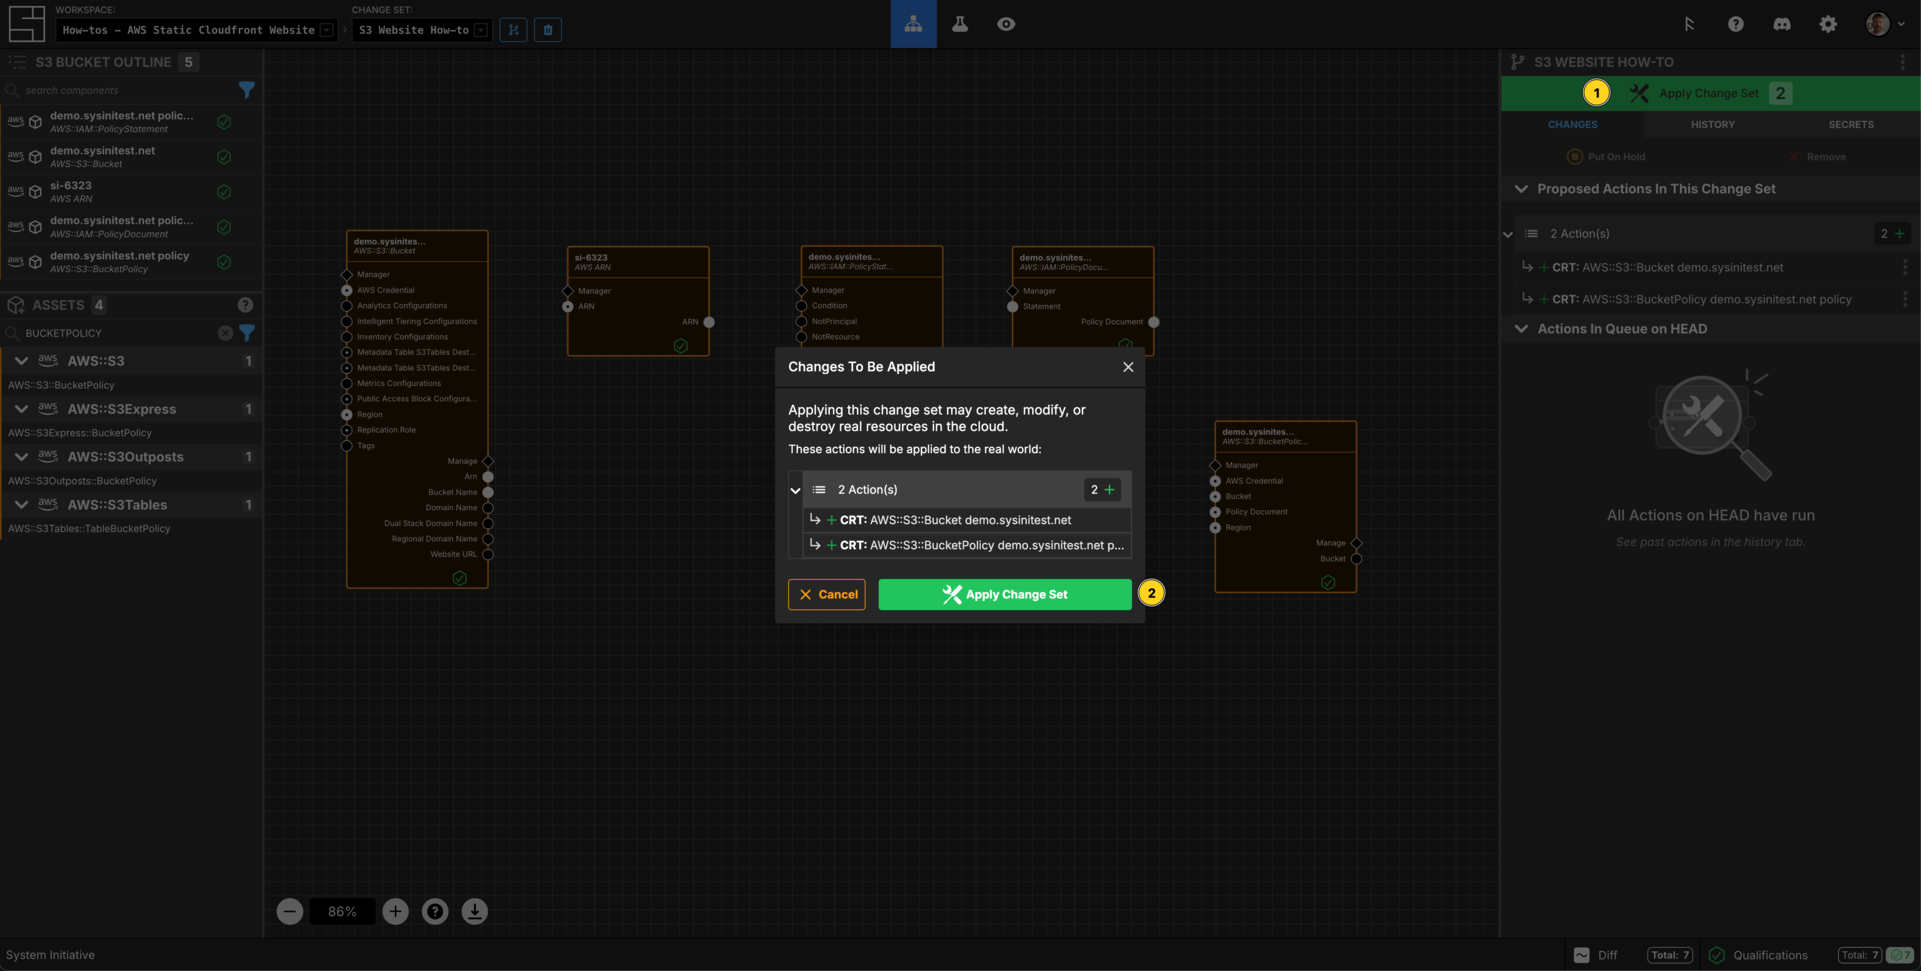
Press Escape or click anywhere on the canvas background to select the Workspace.
Click the Apply Change Set button to:
- Create an S3 Bucket, along with its public access controls and a website configuration.
- Configure an IAM and Bucket policy,
Open a New Changeset
Create a new changeset called Upload index.html to S3 Bucket.
Upload file to your S3 Bucket
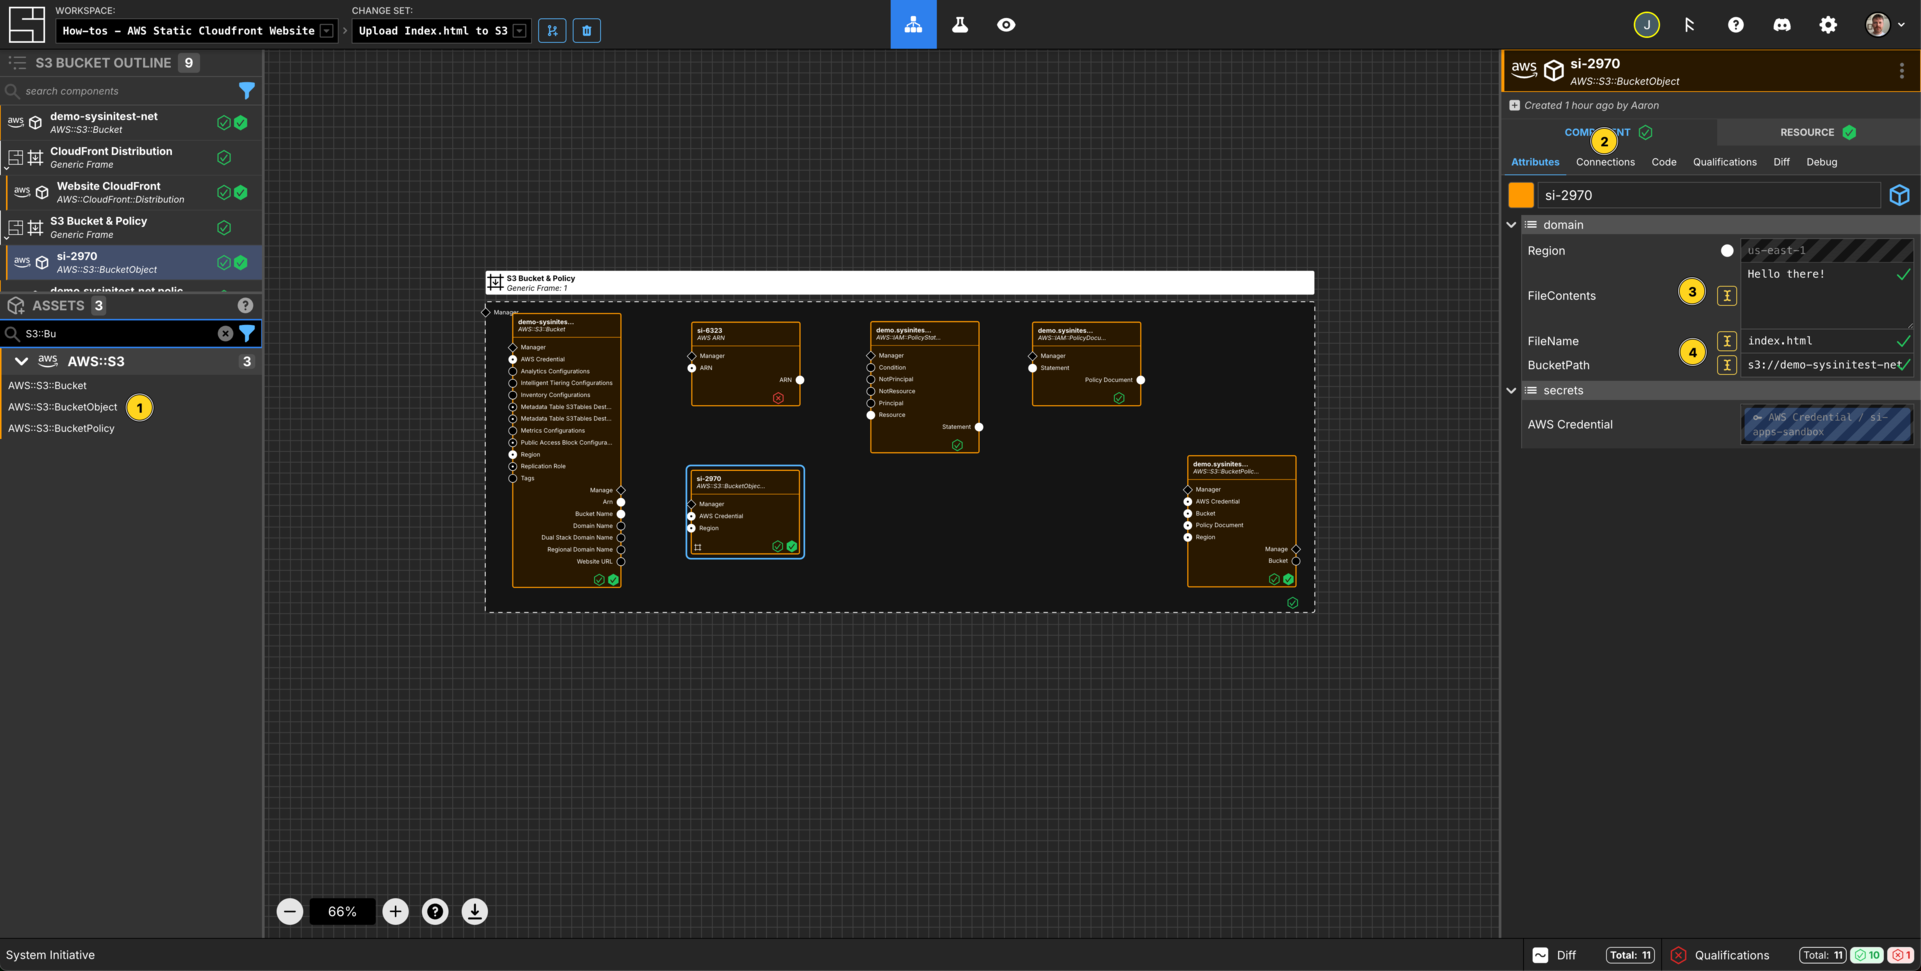
Add an AWS::S3::BucketObject Component to your canvas.
In the Connections menu connect the AWS Credential and Region.
Set the FileContents property to Hello there!.
Set the FileName to index.html.
Set the BucketPath to s3://demo-sysinitest-net.
In the Resource tab, Click Copy File to S3 Bucket.
Hit the escape button or click on the canvas, then Apply. Your file should now be uploaded to your S3 Bucket.
Open a New Changeset
Create a new changeset called S3 Website CloudFront How-to.
Create a CloudFront Distribution
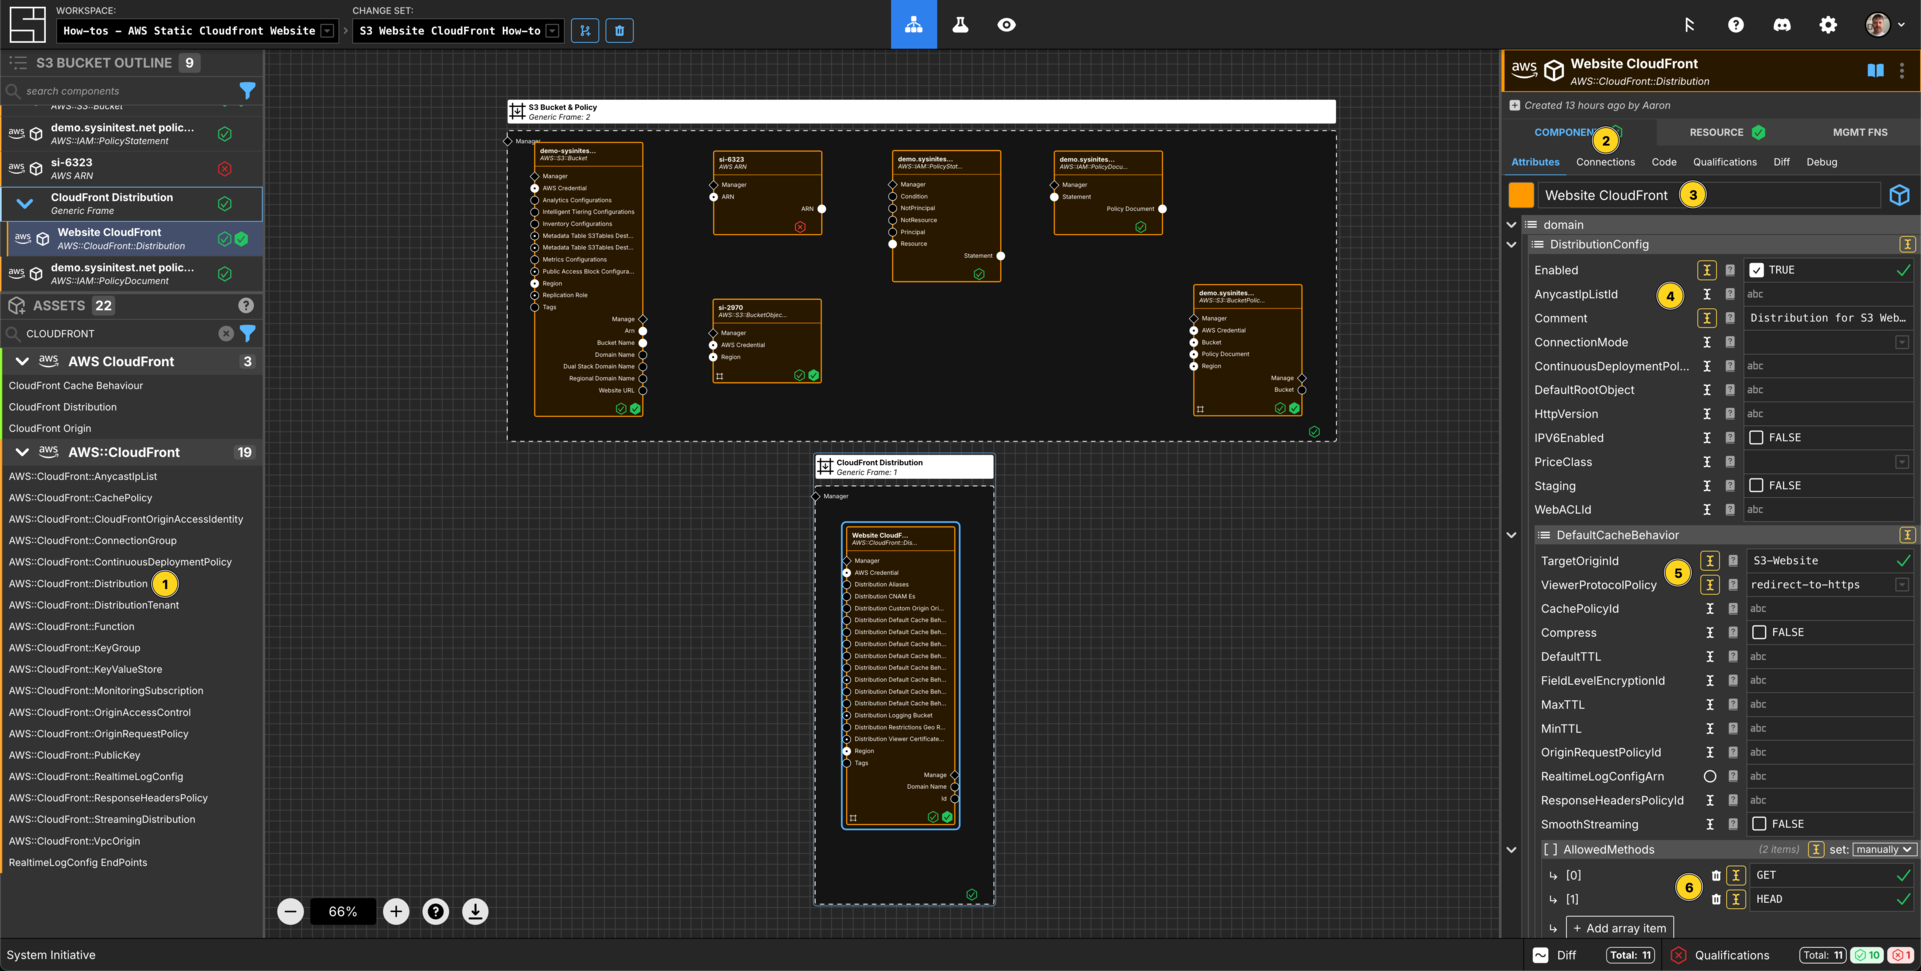
Add a AWS::CloudFront::Distribution component to the canvas.
In the Connections menu, connect the Region and AWS Credential.
Set the Component name to be Website CloudFront.
Set the Enabled to TRUE.
Add a Comment of Distribution for S3 Website.
In DefaultCacheBehaviour Set TargetOriginId to be S3-Website.
Set ViewerProtocolPolicy to be redirect-to-https.
Add 2 array items to AllowedMethods and set them to be GET & HEAD.
Add 2 array items to CachedMethods and set them to be GET & HEAD.
In Forwarded Values set QueryString to TRUE.
Set Cookies Forward propery to all.
In Origins OriginsItem[0] Set DomainName to be demo-sysinitest-net.s3-website-us-east-1.amazonaws.com.
Set Id to S3-Website.
Set ConnectionAttempts to 3.
Set ConnectionTimeout to 10.
In CustomOriginConfig Set HTTPPort to be 80.
Set HTTPSPort to be 443.
Set OriginKeepaliveTimeout to 5.
Set OriginProtocolPolicy to http-only.
Set OriginReadTimeout to 30.
Create 4 array items within OriginSSLProtocols.
Set each array item to have one of the following values SSLv3, TLSv1, TLSv1.1, TLSv1.2.
In ViewerCertificate Set CloudFrontDefaultCertificate to be TRUE.
Set MinimumProtocolVersion to be TLSv1.2_2021.
Apply your Change Set
Press Escape or click anywhere on the canvas background to select the Workspace.
Click the Apply Change Set button to:
- Create a CloudFront Distribution
Check your website
You can now visit your website on your specified S3 Bucket by visiting the DomainName that you specified in AWS::CloudFront::Distribution plus /index.html, for example demo-sysinitest-net.s3-website-us-east-1.amazonaws.com/index.html.
Explore your resources
Review the completed AWS resources by clicking the Resource sub-panel for each of your new resources.
Clean Up
Create a new Change Set called Clean up How-to
Select the Credential and Region components, and the S3 Bucket view in your DEFAULT view and delete.
Click Apply Change Set.
All your new resources should be deleted from your AWS account.
Vocabulary
In this guide bits of System Initiative Vocabulary will be shown with a capital letter. All definitions for these can be found here: System Initative - Vocabulary