How to build a highly available AWS EC2 application infrastructure
This how-to assumes:
- Basic familiarity with System Initiative
- You have completed the build an AWS VPC with System Initiative tutorial (and not deleted the resulting resources)
It will teach you how to create a highly available application architecture and manage it with System Initiative.
We will cover:
- The creation an EC2 Launch Template and AutoScaling group, with a simple Python application
- An AWS Application Load Balancer
- The networking required to allow the application instances to serve traffic to the application
Setup
All activities in this how-to happen within a configured VPC, AWS Region and AWS Credential.
Start in a Change Set named EC2 HA How-to.
Walkthrough
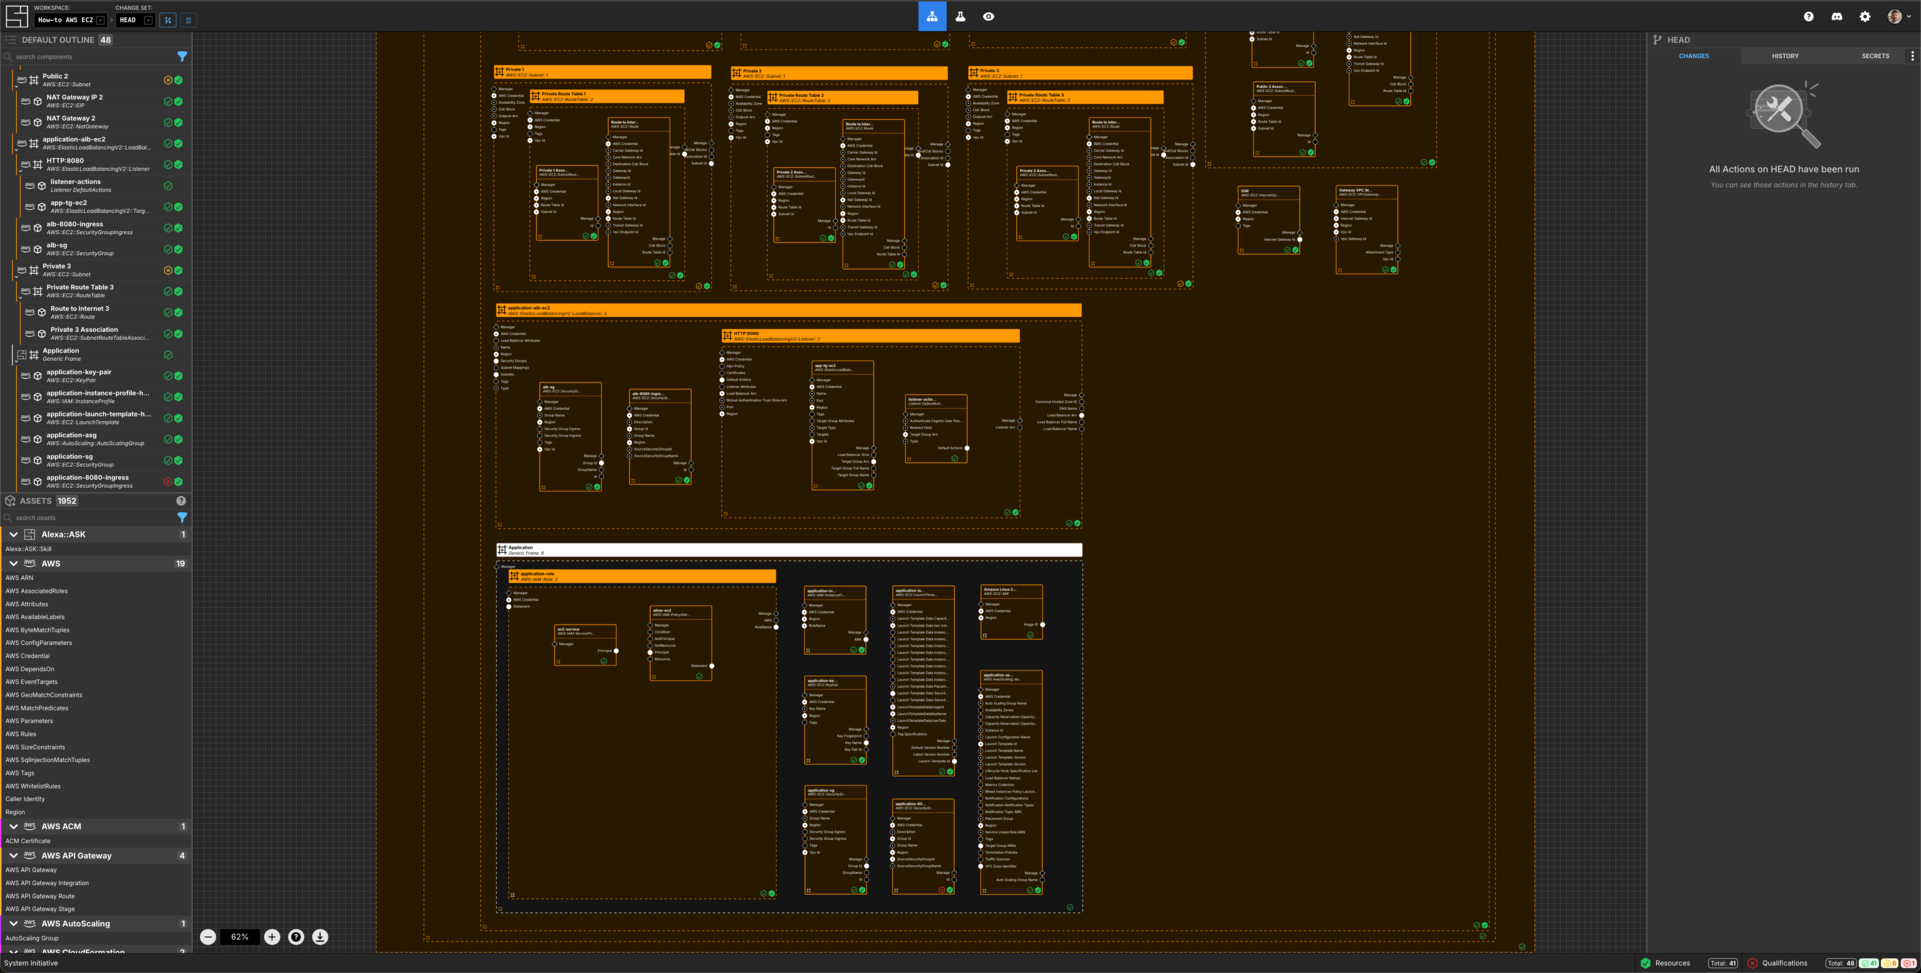
What it will look like
When you are through with this guide, you should have Components that look like this in your Diagram:
Create a Loadbalancer Component
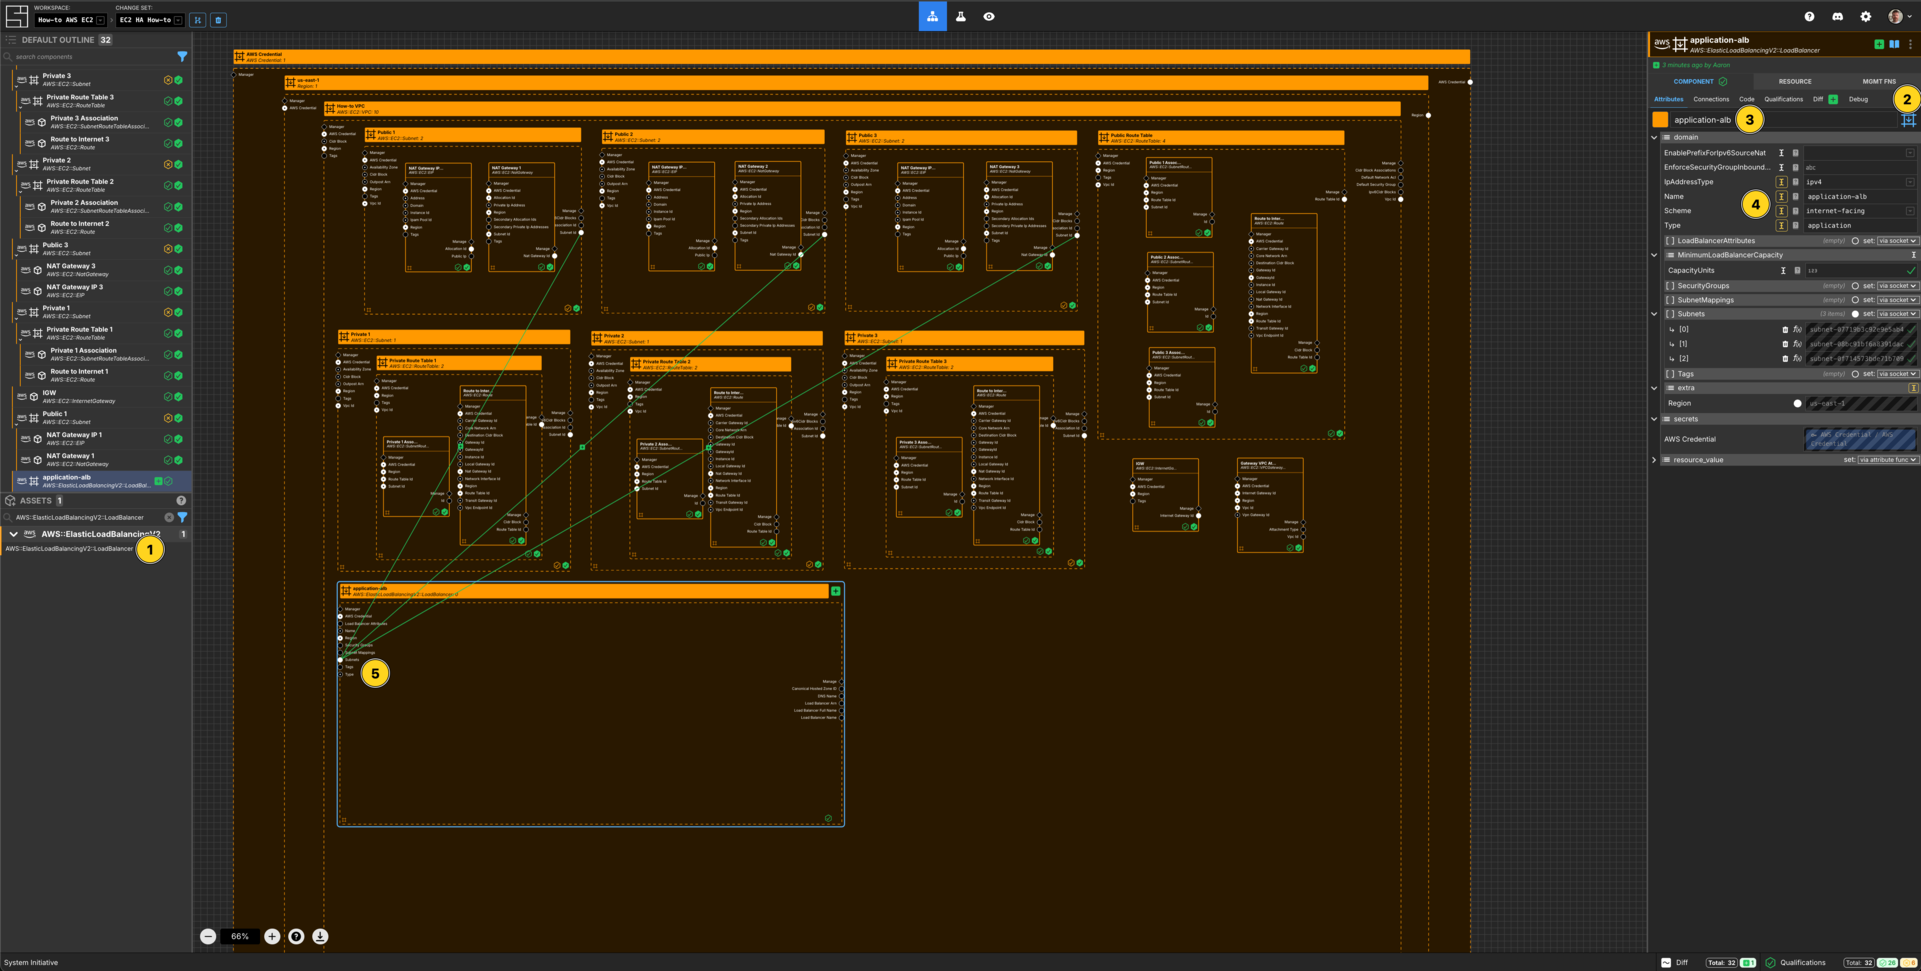
Add a AWS::ElasticLoadBalancingV2::LoadBalancer to your VPC How-to vpc frame.
Set the Component type to Down Frame.
Set the Component name to application-alb.
Set the IpAddressType to ipv4.
Set the Name to application-alb.
Set the Scheme to internet-facing.
Set the Type to application.
Connect the Subnet Id Output Socket of each of the public subnet Components to the Subnets Input Socket of the application-alb Component.
Create an EC2 security group Component for the Loadbalancer
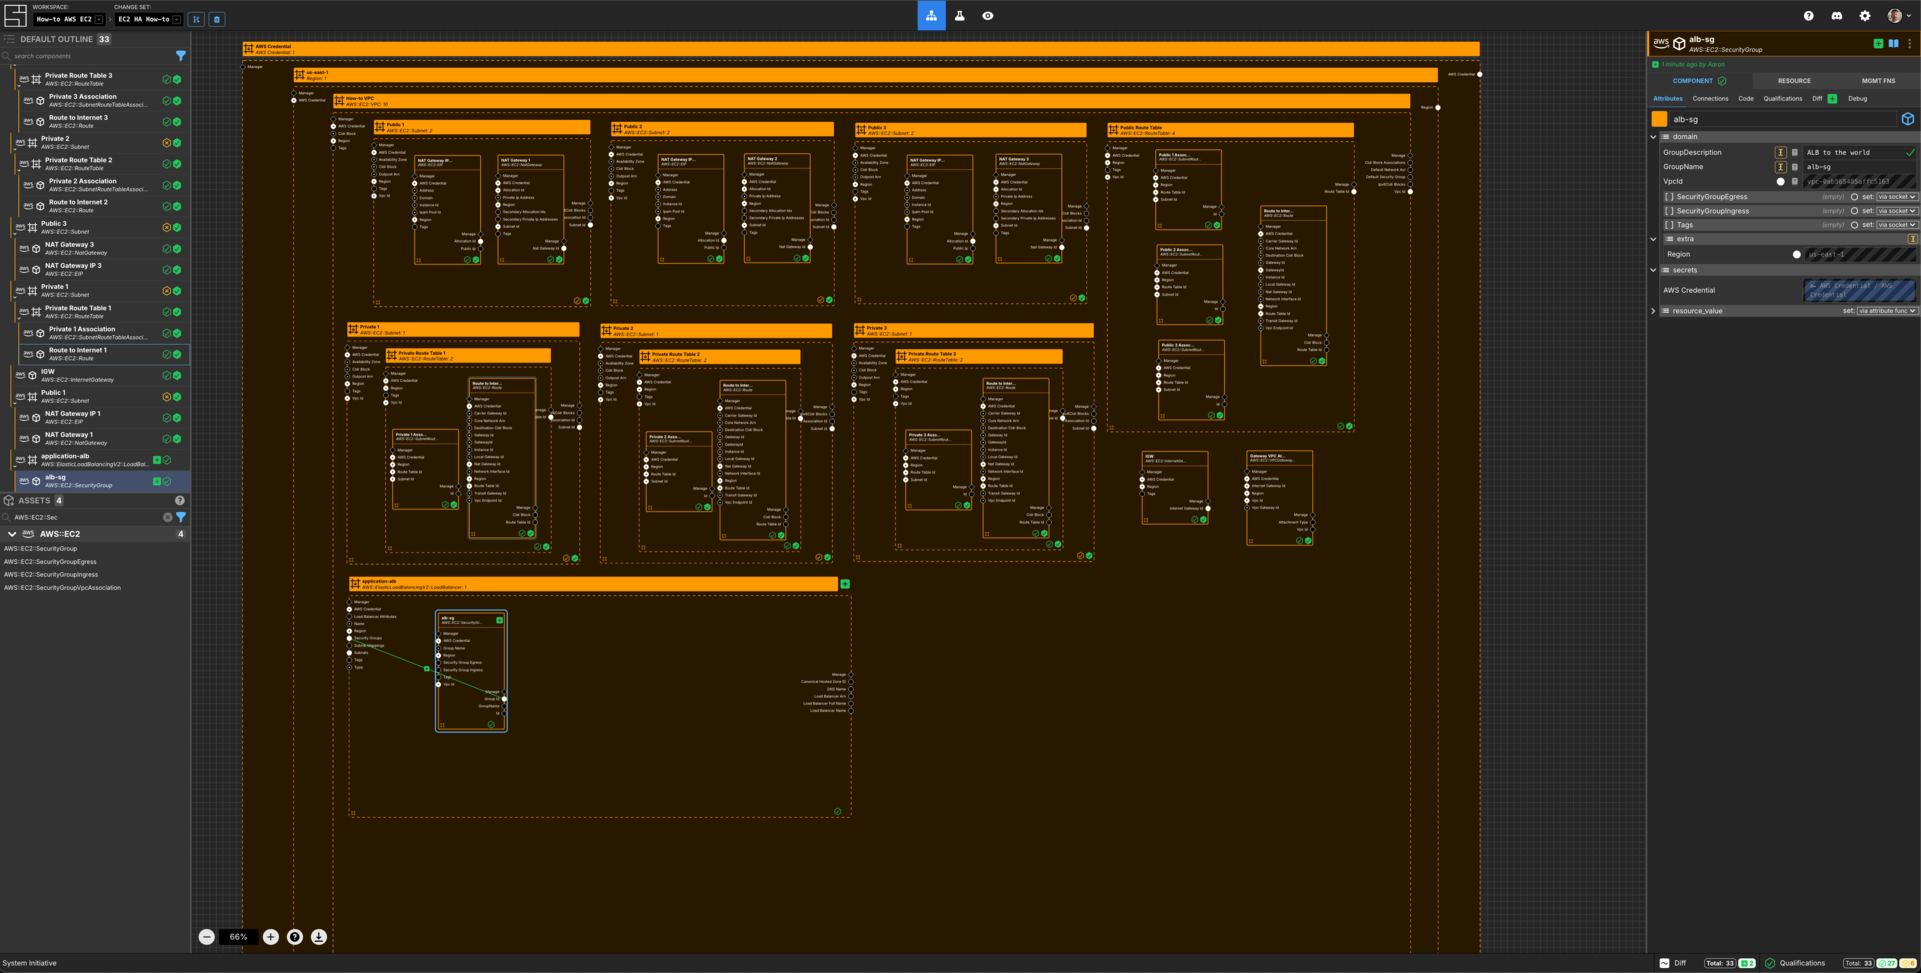
Add a AWS::EC2::SecurityGroup to your VPC How-to vpc frame.
Set the Component name to alb-sg.
Set the GroupDescription to be ALB to the world
Set the GroupName to alb-sg.
Connect the Group Id Output Socket of alb-sg Component to the Security Groups Input Socket of the application-alb frame.
Create an EC2 Ingress Rule Component
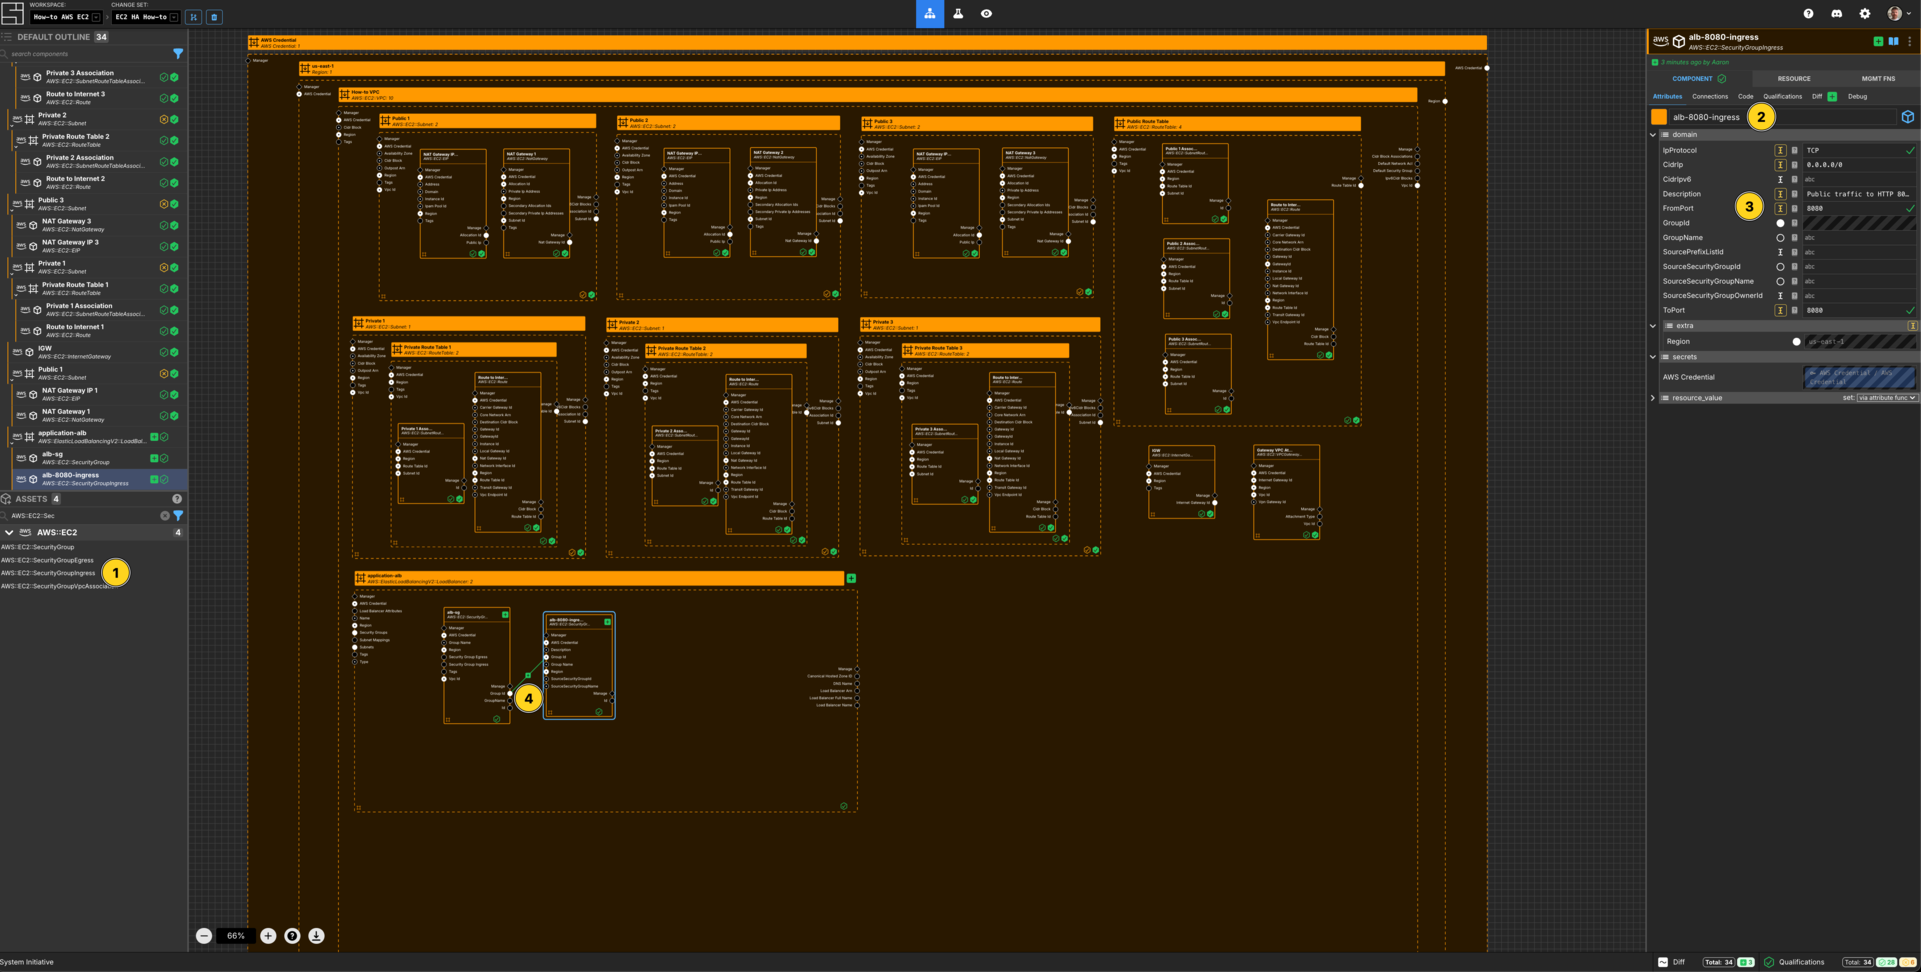
Add a AWS::EC2::SecurityGroupIngress Component to your application-alb loadbalancer frame.
Set the Component name to alb-80-ingress.
Set the IpProtocol to TCP.
Set CidrIp to be 0.0.0.0/0.
Set the Description to Public traffic to HTTP 8080.
Set FromPort to be 80.
Set ToPort to be 80.
Connect the Group Id Output Socket of alb-sg Component to the Group Id Input Socket of this alb-8080-ingress Component.
Create a Listener Component
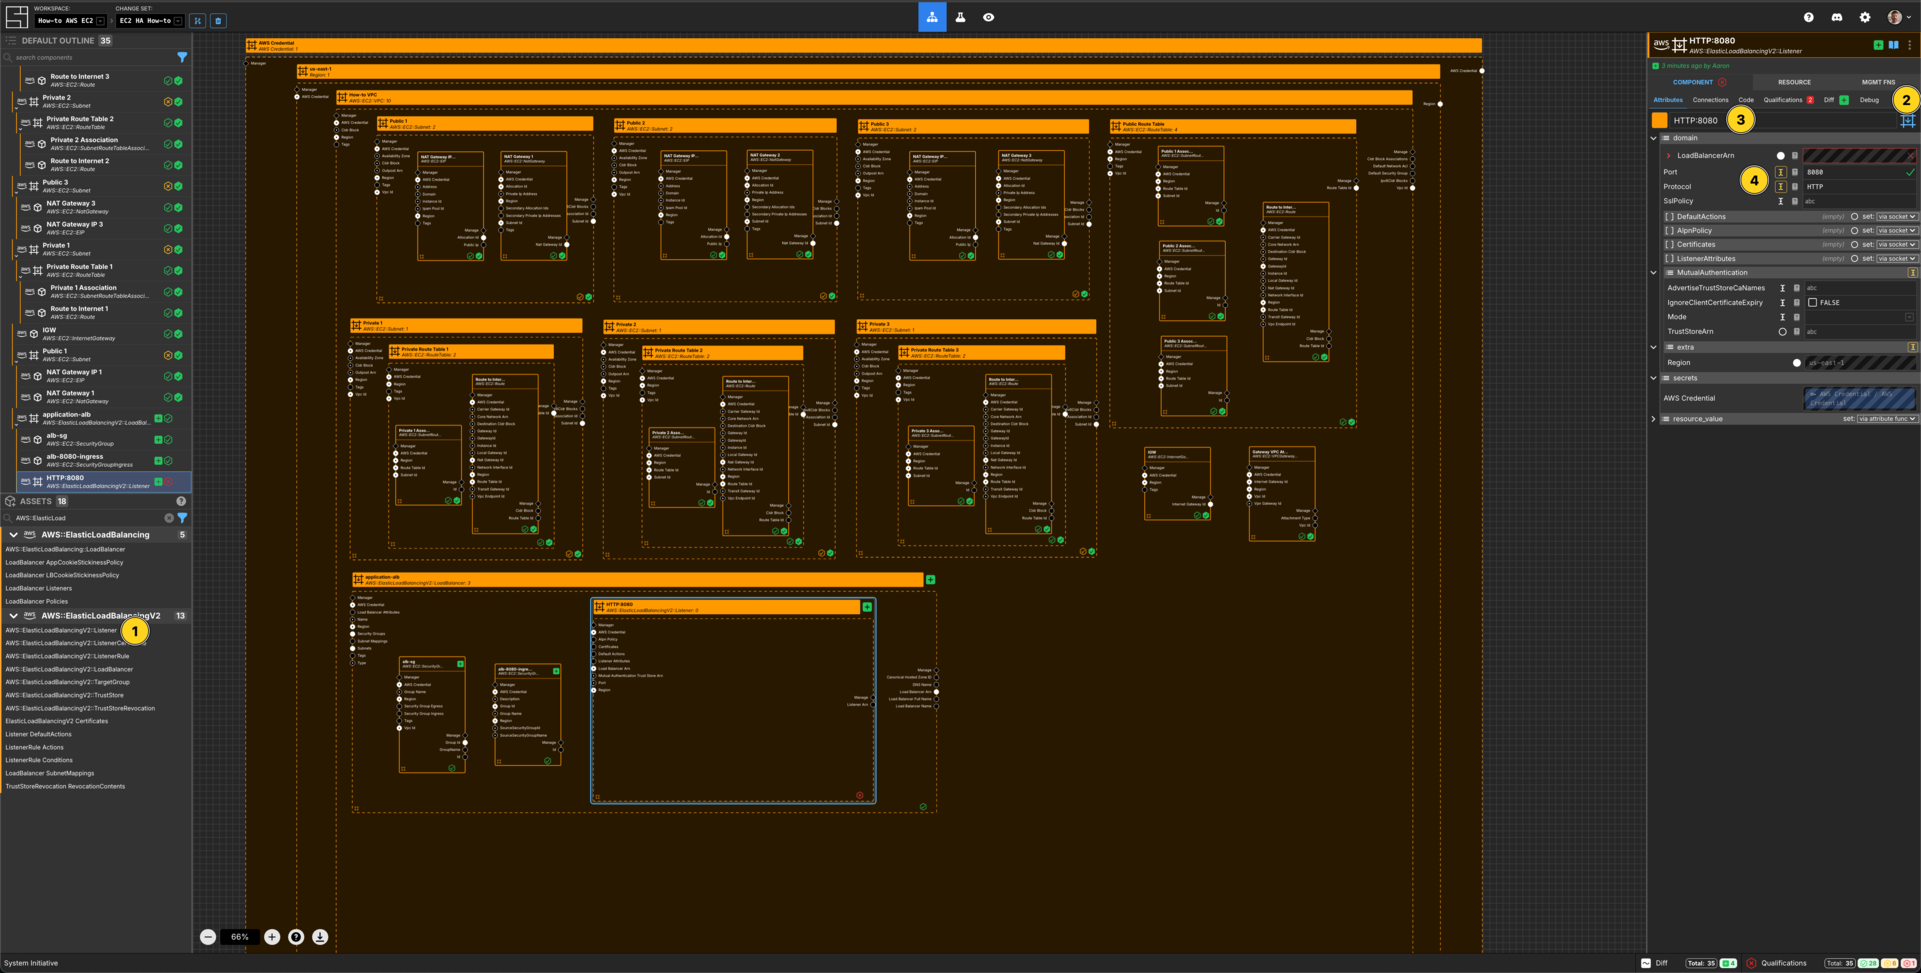
Add a AWS::ElasticLoadBalancingV2::Listener Component to your application-alb loadbalancer frame.
Set the Component type to Down Frame.
Set the Component name to HTTP:80.
Set the Port to be 80.
Set the Protocol to be HTTP.
Resize the frame to be large enough to fit another Component.
Create a Target Group
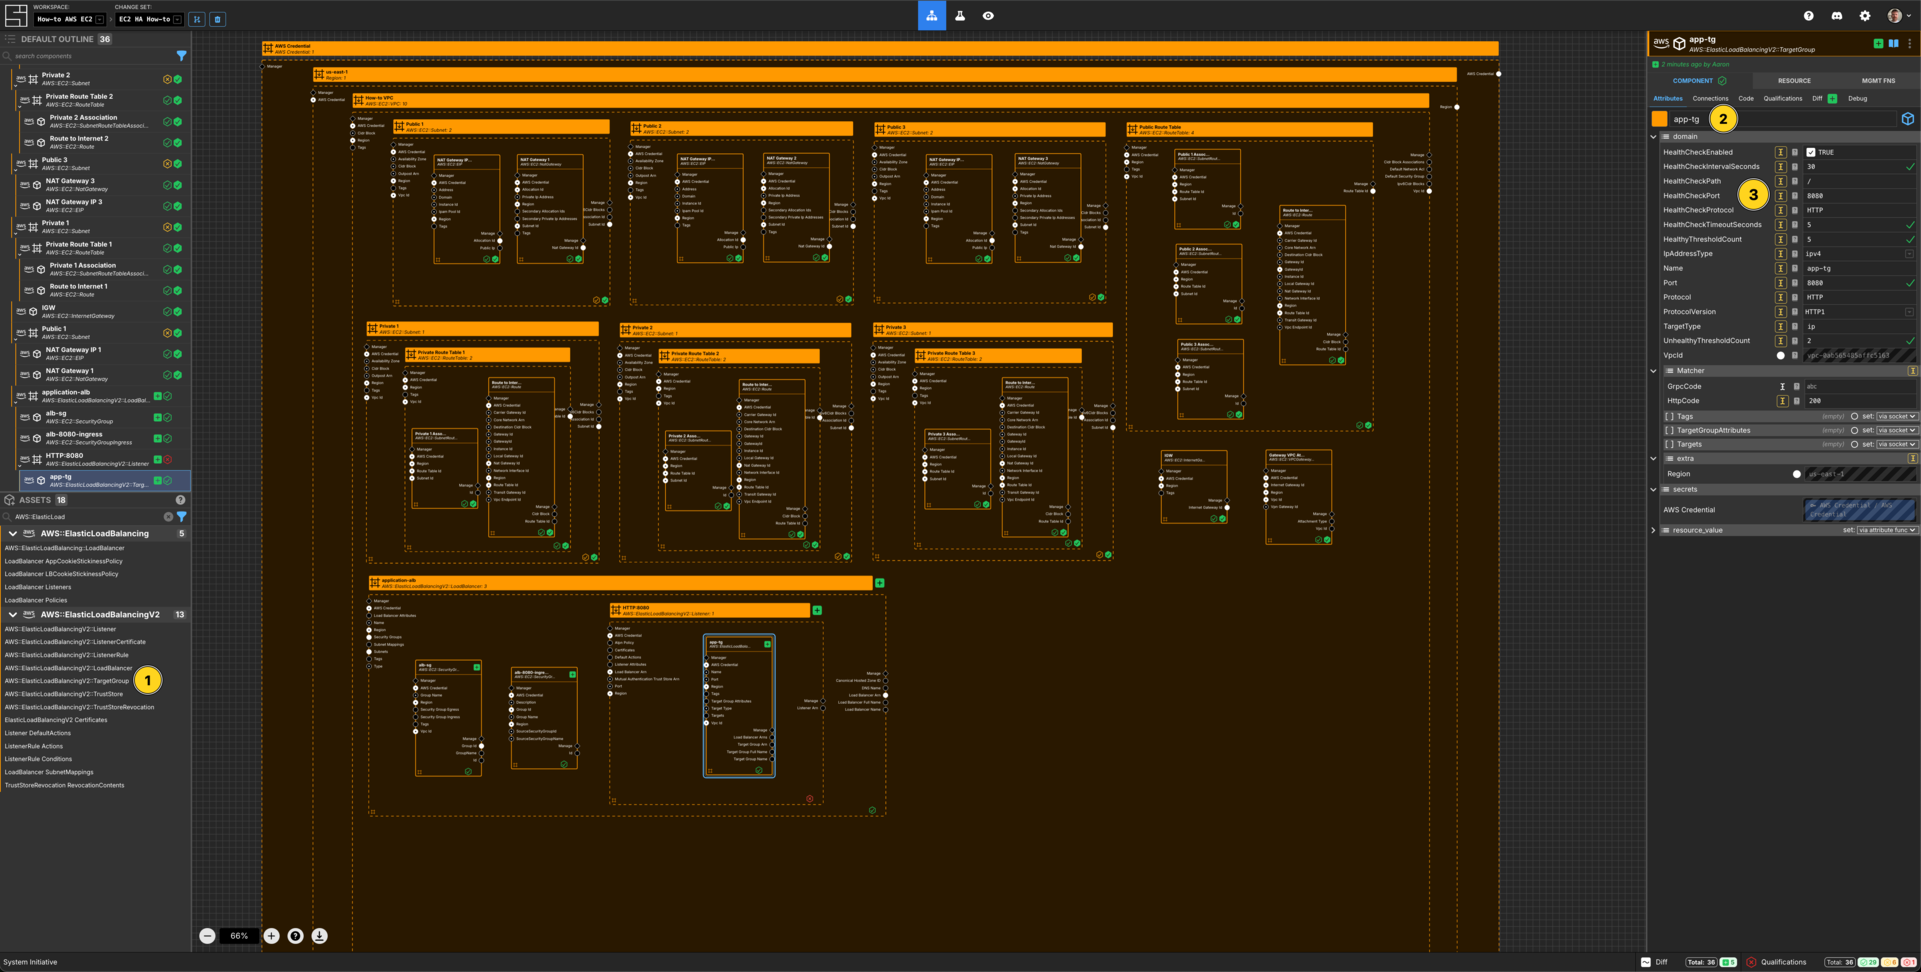
Add a AWS::ElasticLoadBalancingV2::TargetGroup Component to your Listener frame.
Set the Component name to app-tg.
Set HealthCheckEnabled to TRUE.
Set HealthCheckIntervalSeconds to 30 seconds.
Set HealthCheckPath to /.
Set HealthCheckPort to 8080.
Set HealthCheckProtocol to HTTP.
Set HealthCheckTimeoutSeconds to 5.
Set HealthyThresholdCount to 5.
Set IpAddressType to ipv4
Set Name to be app-tg.
Set Port to 8080.
Set Protocol to HTTP.
Set ProtocolVersion to HTTP1
Set TargetType to instance.
Set UnhealthyThresholdCount to be 2.
Set HttpCode to 200.
Create a Listener Default Action
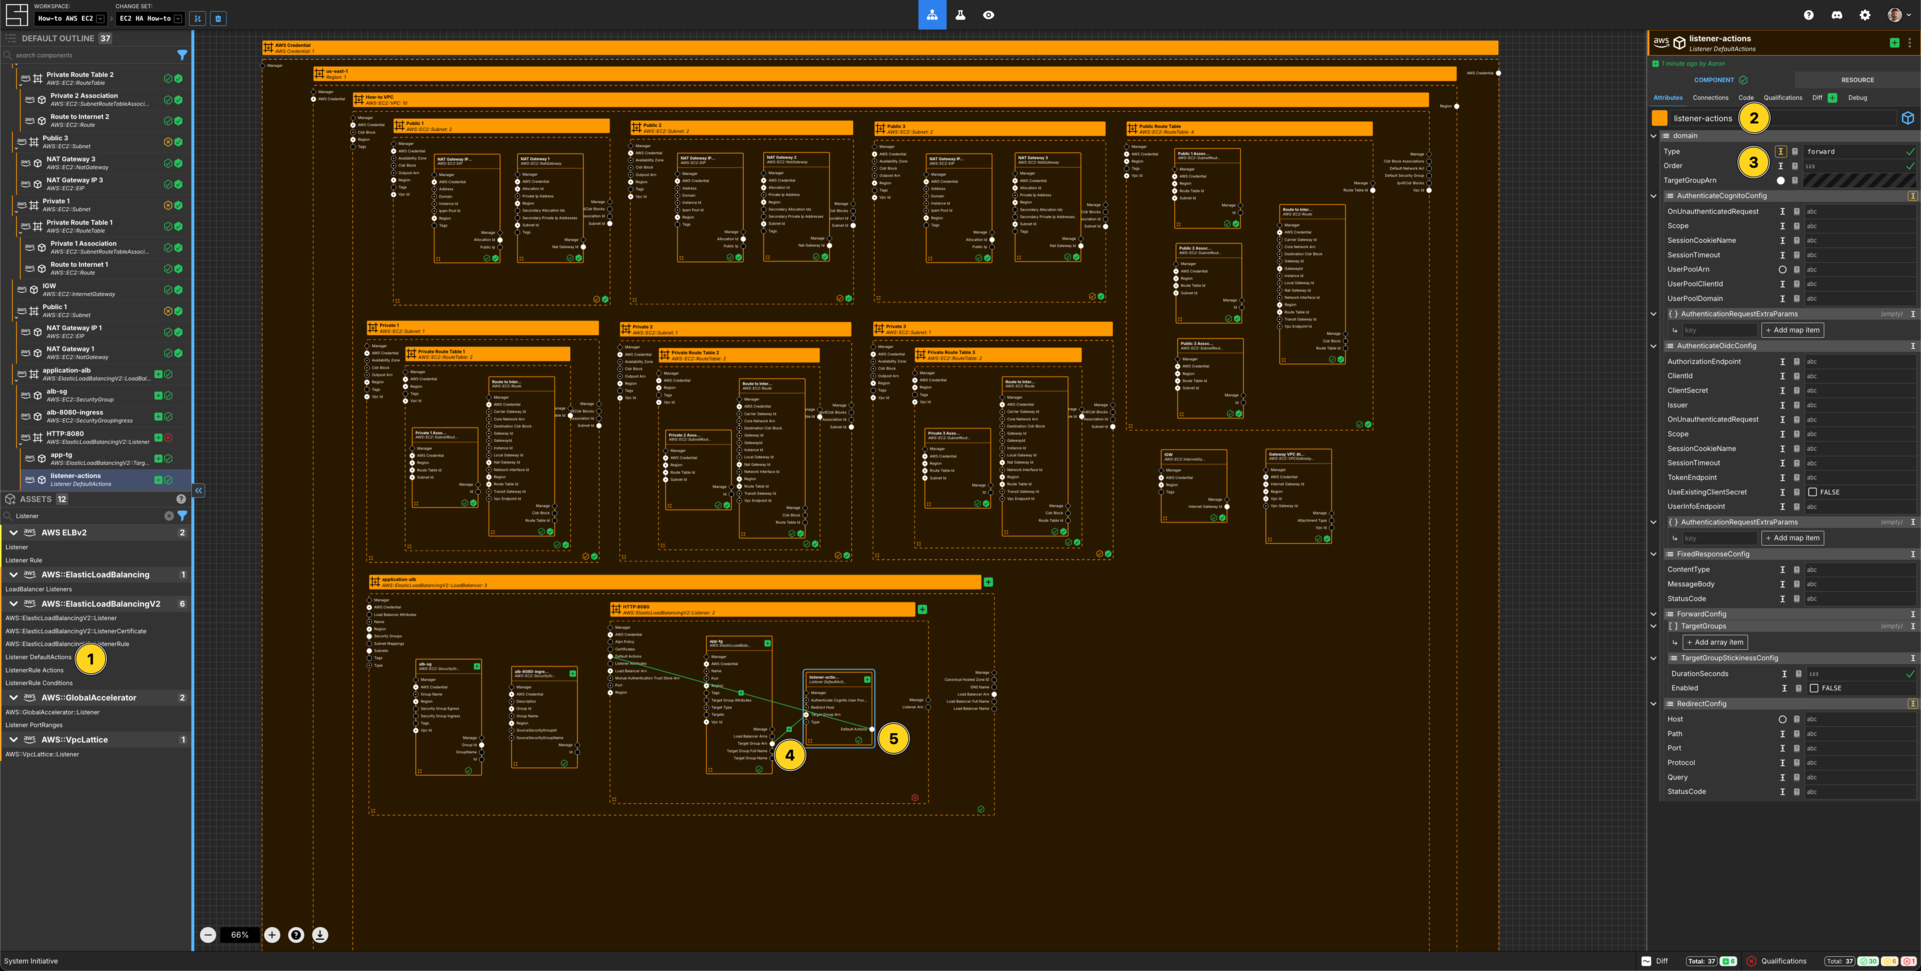
Add a Listener DefaultActions Component to your Listener frame.
Set the Component name to listener-actions.
Set Type to forward.
Connect the Target Group Arn Output Socket of the app-tg Component to the Target Group Arn Input Socket of the listener-actions Component.
Connect the Default Actions Output Socket of the listener-actions Component to the Default Actions Input Socket of the HTTP:8080 Listener Component.
Create a Generic Frame
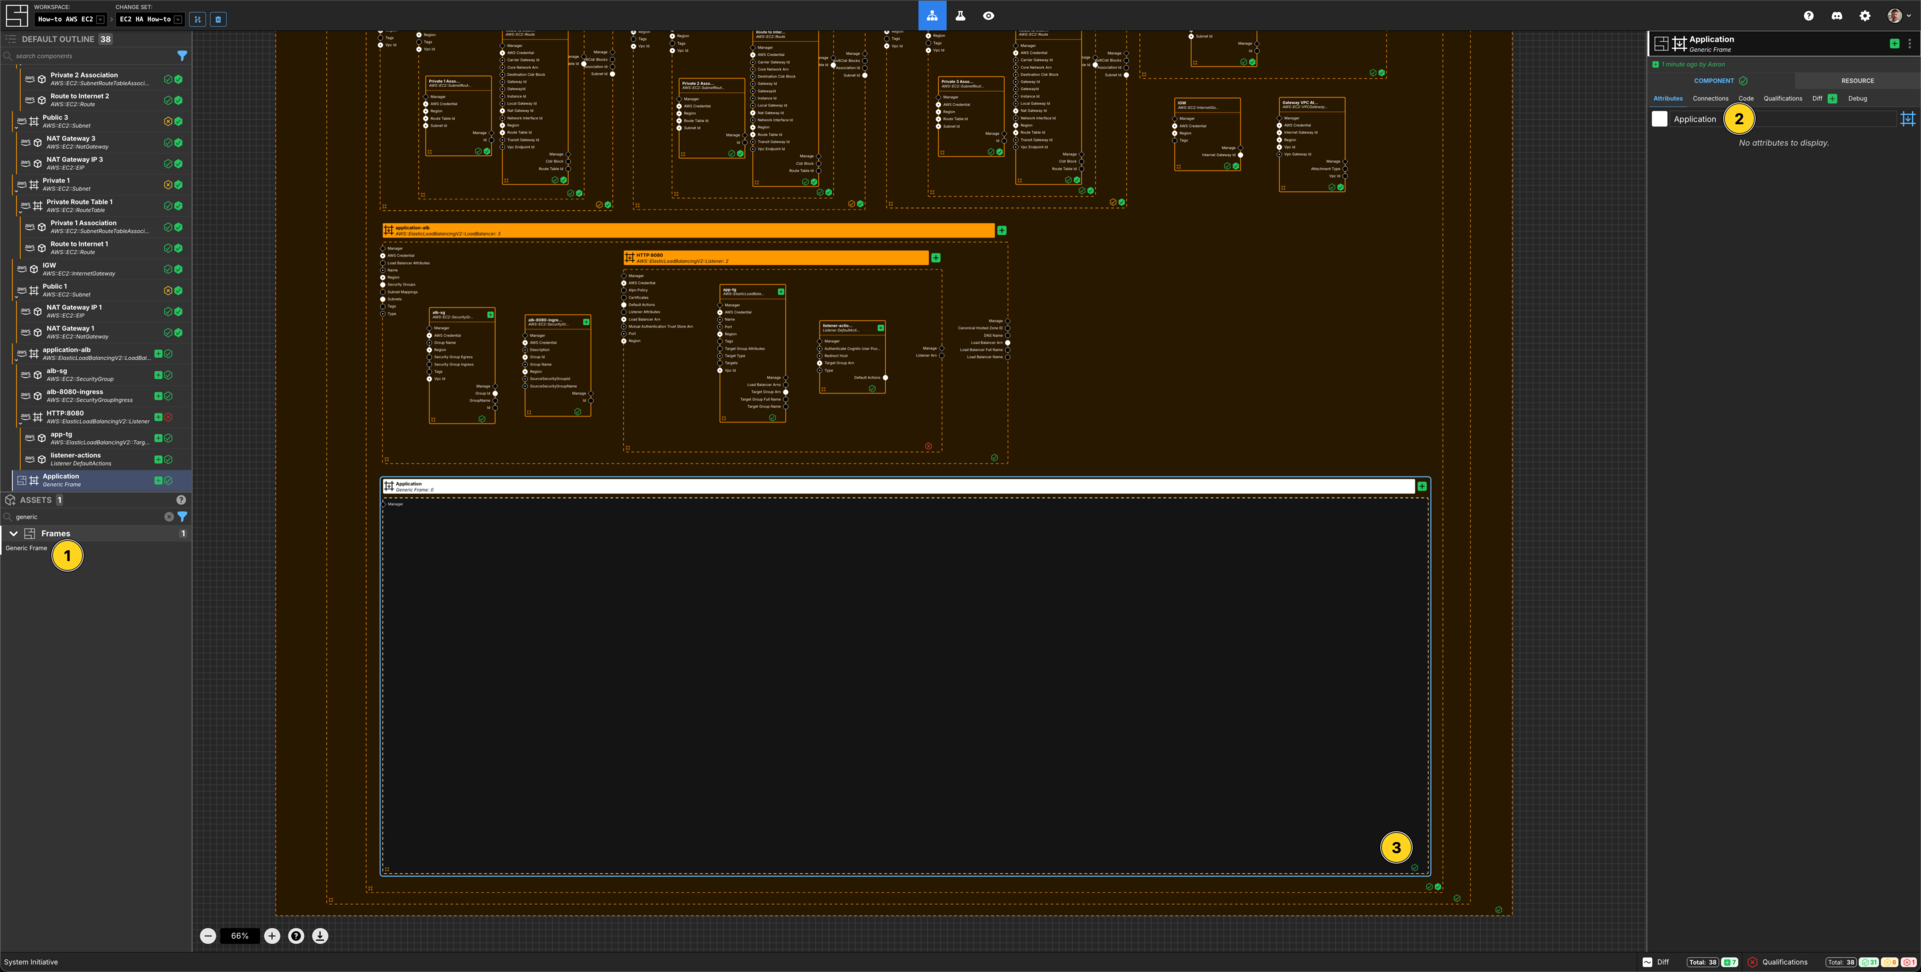
Add a Generic Frame Component to your VPC frame.
Set the Component name to be Application.
Resize the frame to hold many Components.
Create an IAM Role
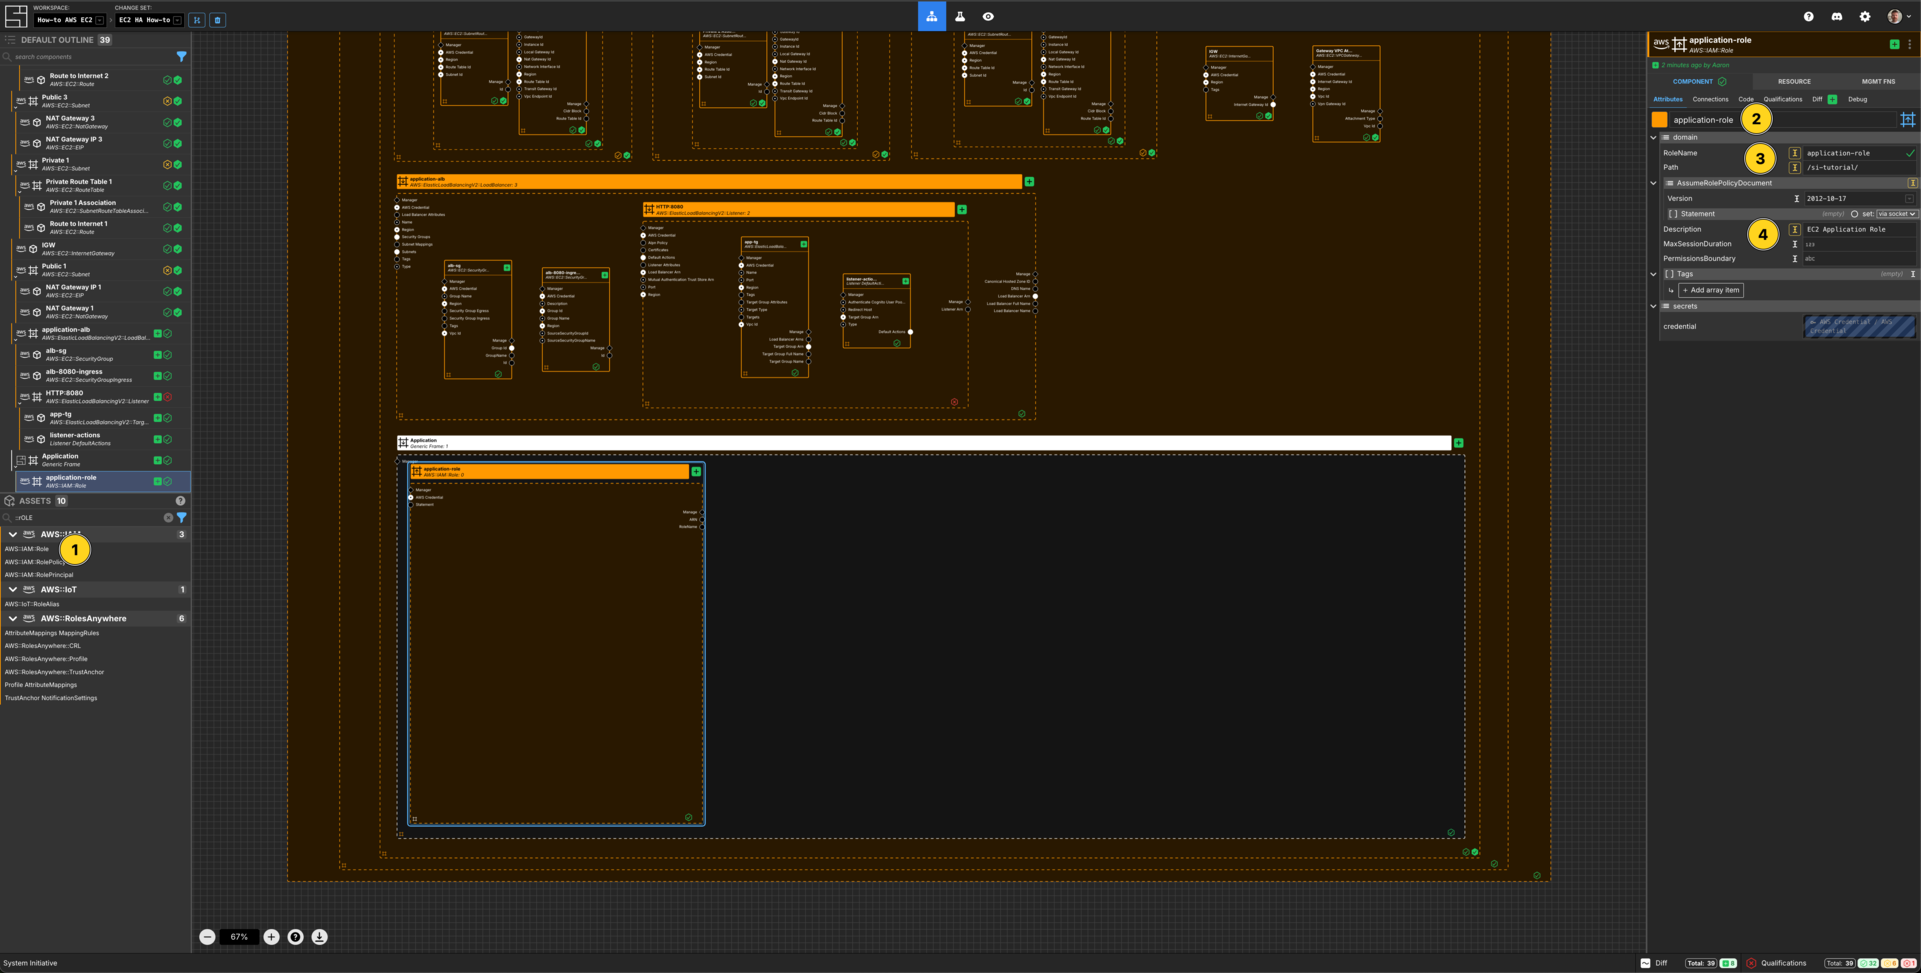
Add an AWS::IAM::Role Component to your Generic Application frame.
Set the Component name to application-role.
Set the RoleName to application-role.
Set the Path to /si-tutorial/.
Set the Description to EC2 Application Role.
Create an AWS IAM Policy Statement
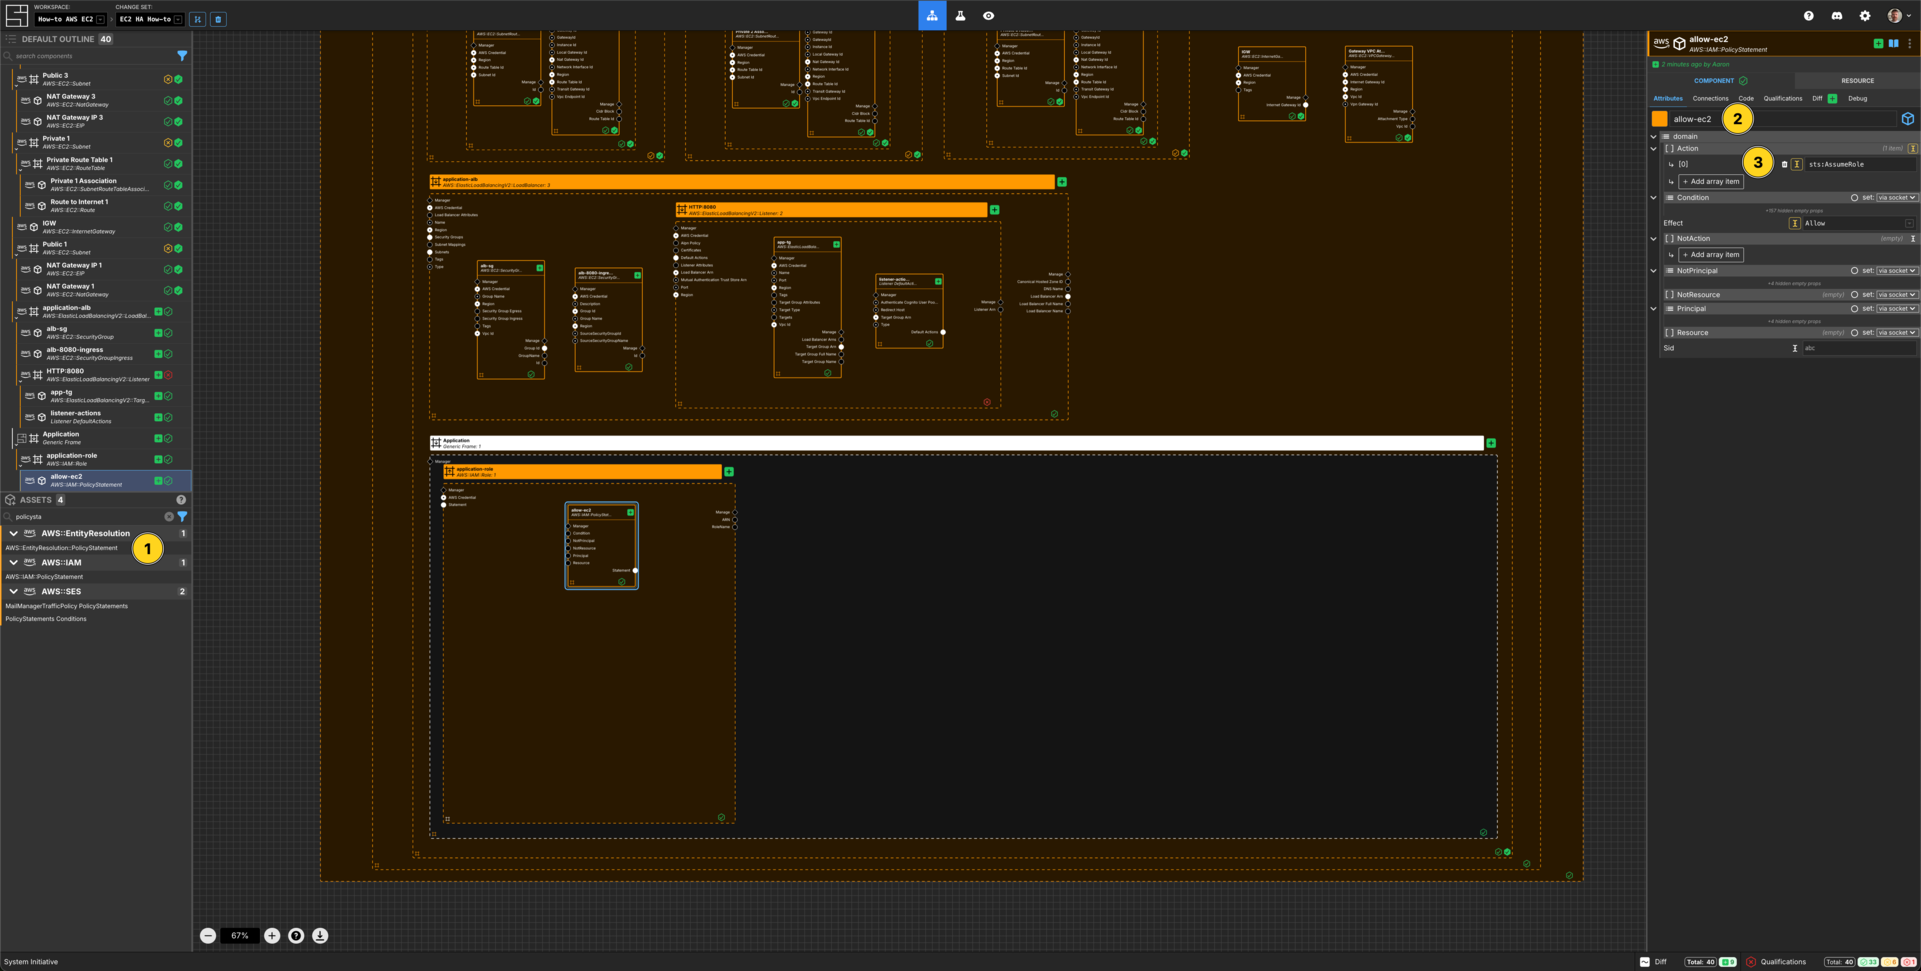
Add an AWS::IAM::PolicyStatement Component within the application-role AWS IAM Role frame.
Set the Component name to allow-ec2.
Add an array item to the Action array.
Set the [0] value for the Action array to sts:AssumeRole.
Set the Effect to Allow.
Create an AWS IAM AWS Service Principal
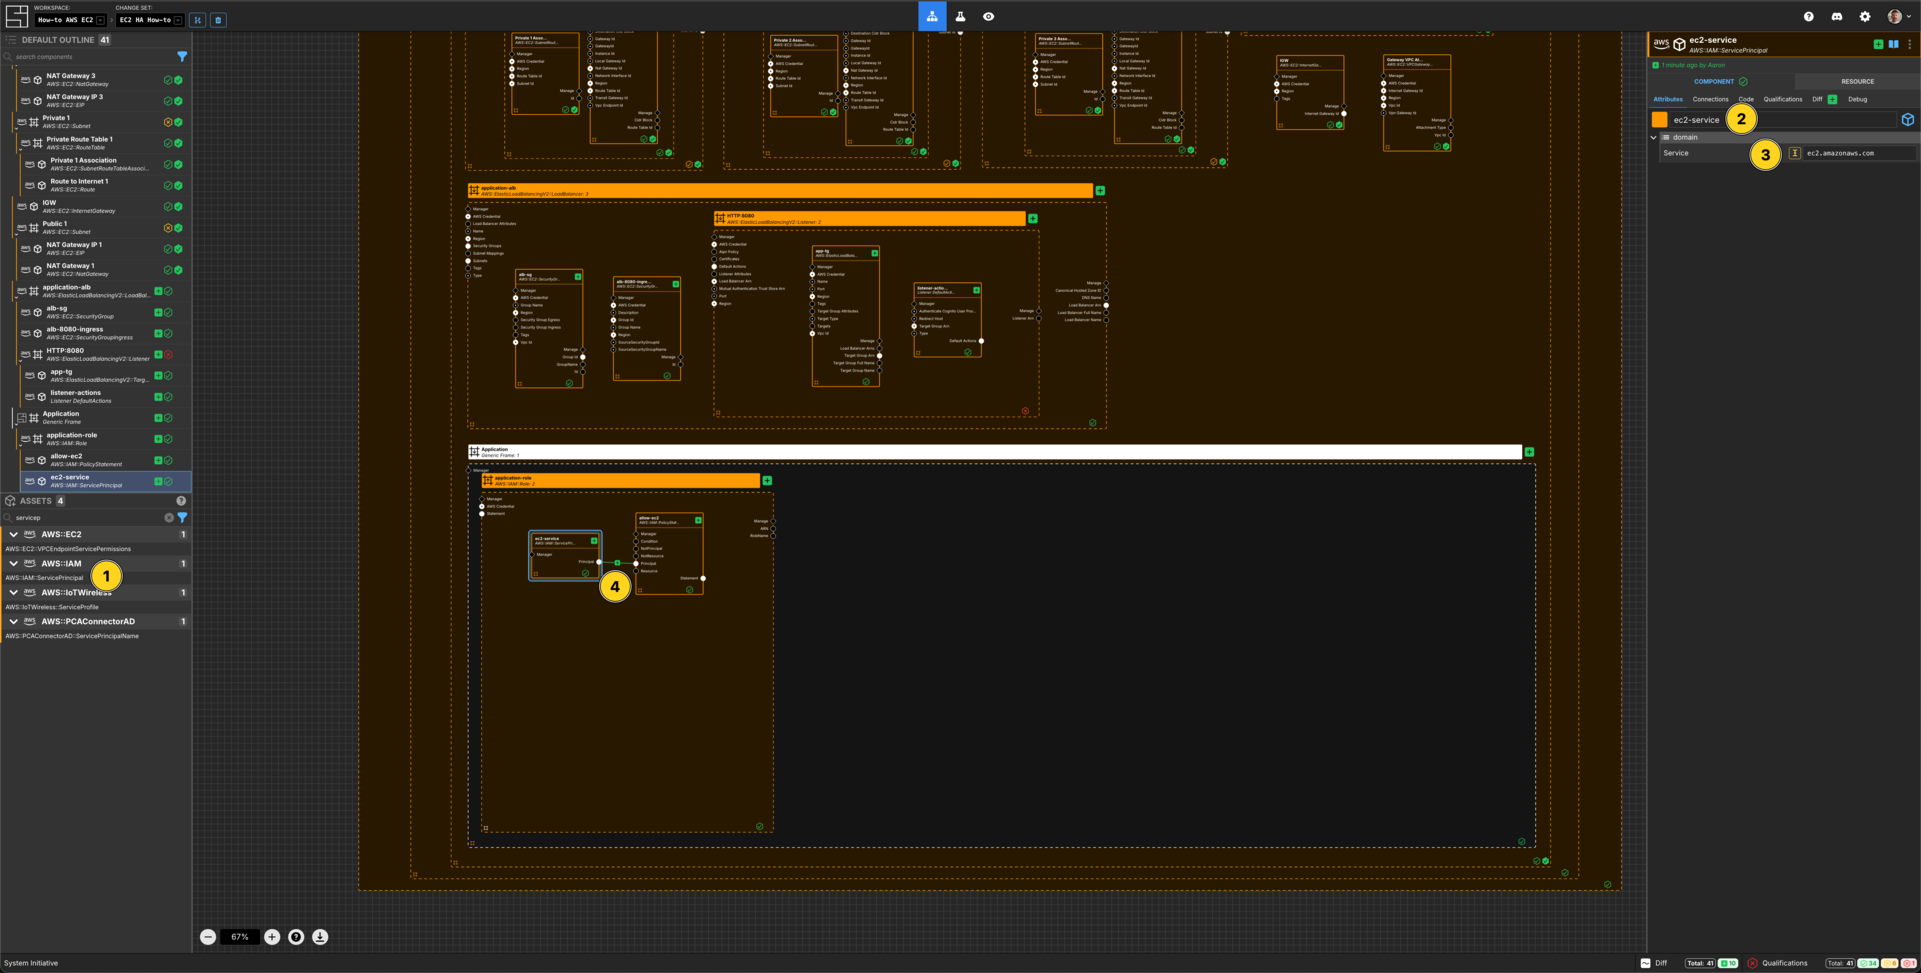
Add an AWS::IAM::ServicePrincipal Component within the application-role AWS IAM Role frame.
Set the Component name to ec2-service.
Set the Service to ec2.amazonaws.com.
Connect the Principal Output Socket of the ec2-service Service Principal to the Principal Input Socket of your allow-ec2 AWS Policy Statement.
Create an IAM Instance Profile
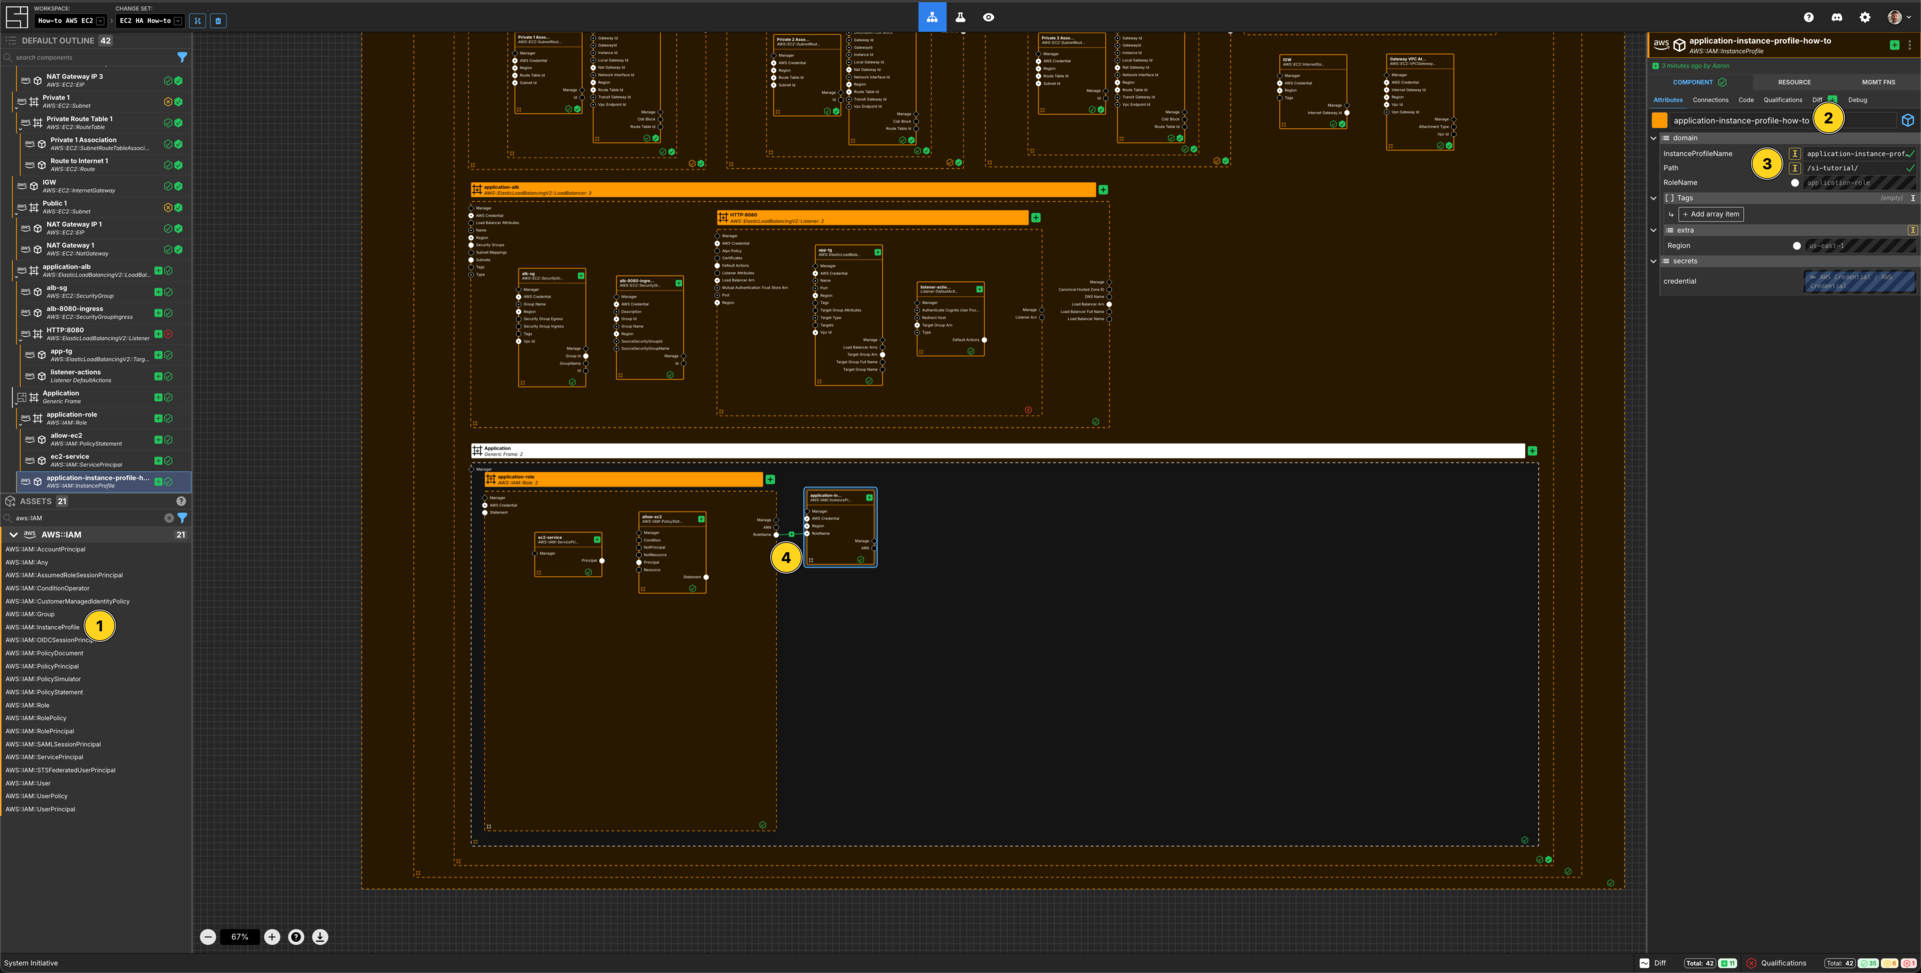
Add an AWS::IAM::InstanceProfile to your Generic Application frame.
Set the Component name to application-instance-profile-how-to.
Set the InstanceProfileName to application-instance-profile-how-to.
Set the Path to /si-tutorial/.
Connect the RoleName Output Socket of application-role IAM Role Component to the RoleName Input Socket of the application-instance-profile Instance Profile Component.
Create a Security Group Component for the Application
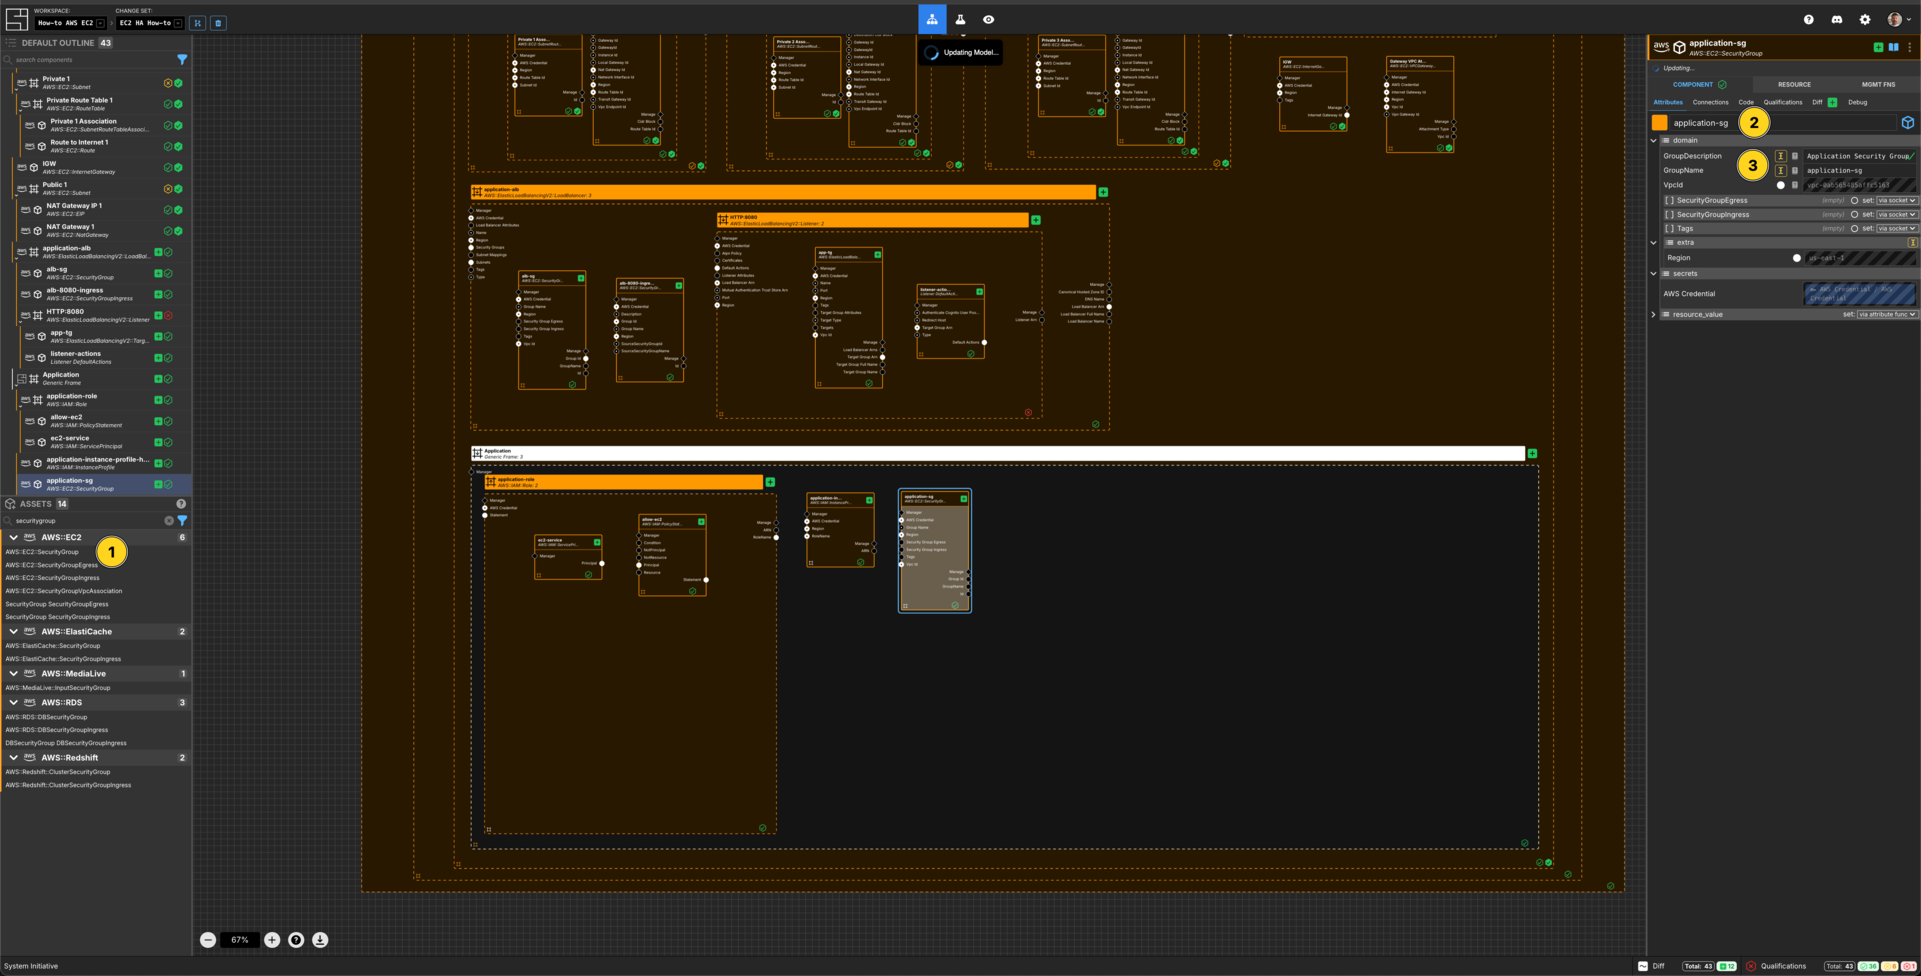
Add a AWS::EC2::SecurityGroup Component to your Generic Application frame.
Set the Component name to application-sg
Set the GroupDescription to be Application Security Group
Set the GroupName to application-sg.
Create an EC2 Ingress Rule Component
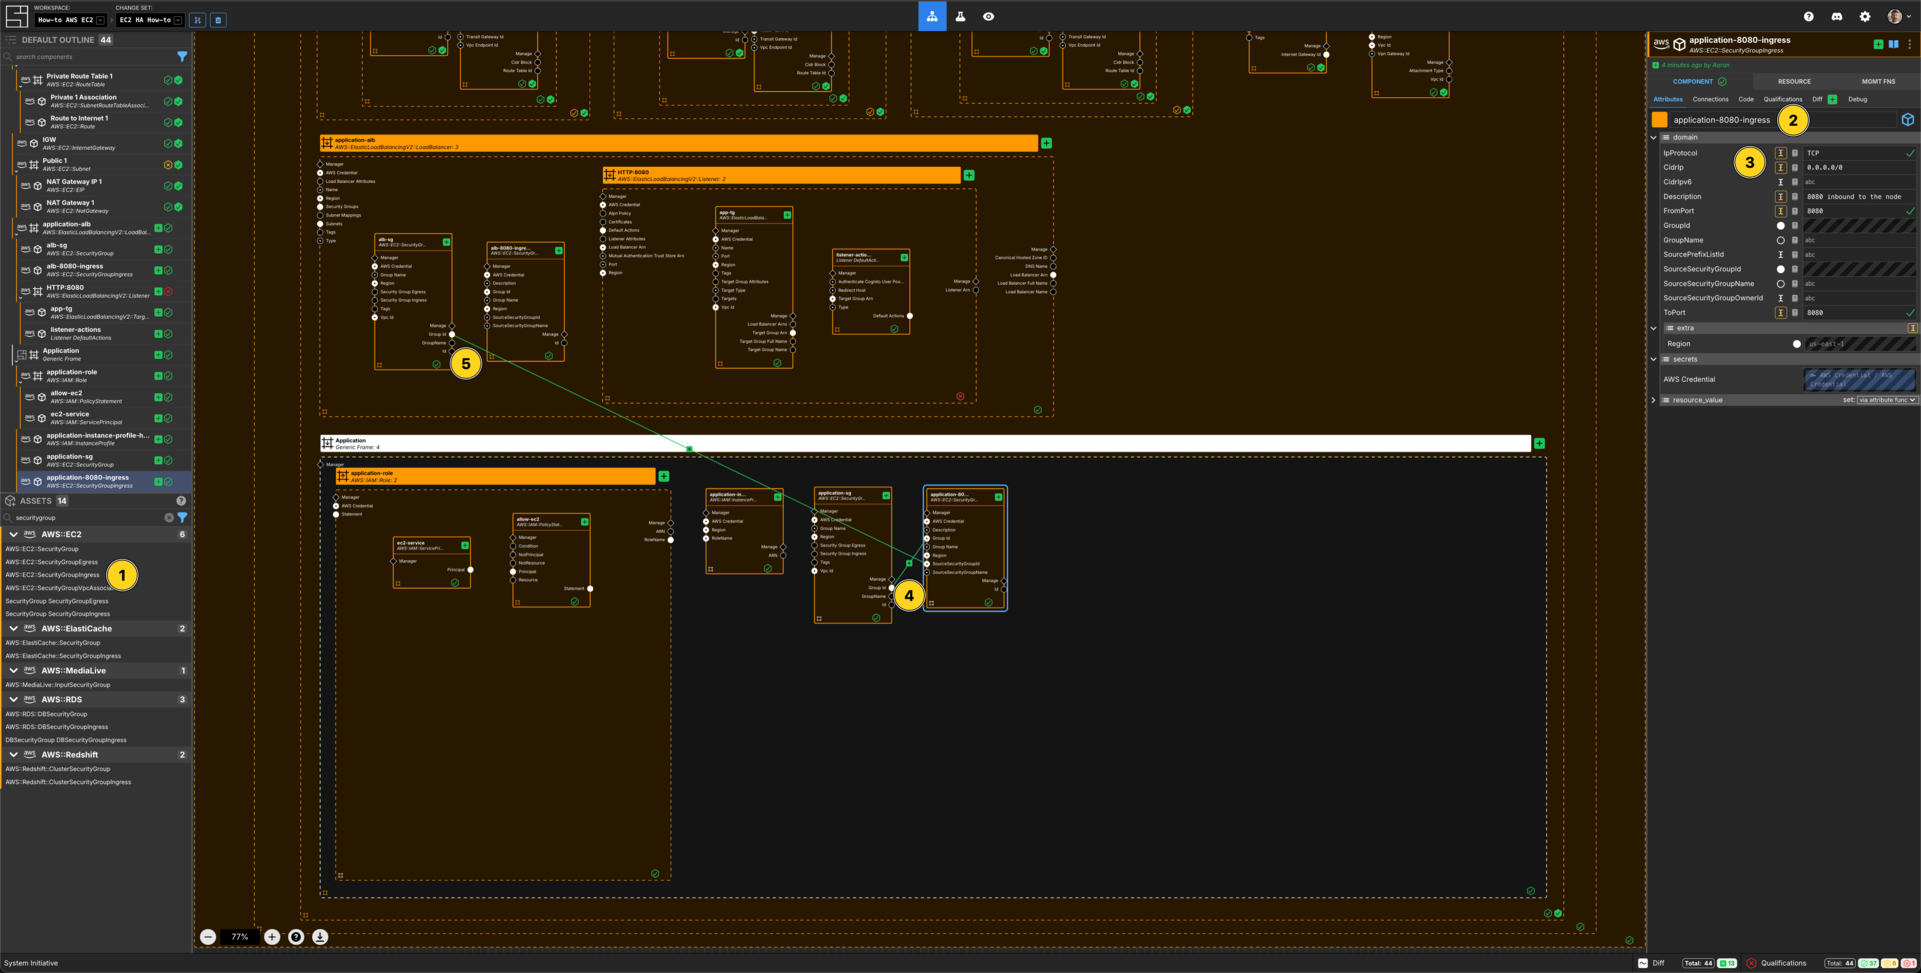
Add a AWS::EC2::SecurityGroupIngress to your Generic Application frame.
Set the Component name to be application-8080-ingress.
Set the IpProtocol to TCP.
Set the Description to be 8080 inbound to the node.
Set the FromPort to 8080.
Set the ToPort to 8080.
Connect the Group Id Output Socket of application-sg Component to the Group Id Input Socket of this application-8080-ingress Component.
Connect the Group Id Output Socket of alb-sg Component to the SourceSecurityGroupId Input Socket of this application-8080-ingress Component.
Create a Key Pair Component
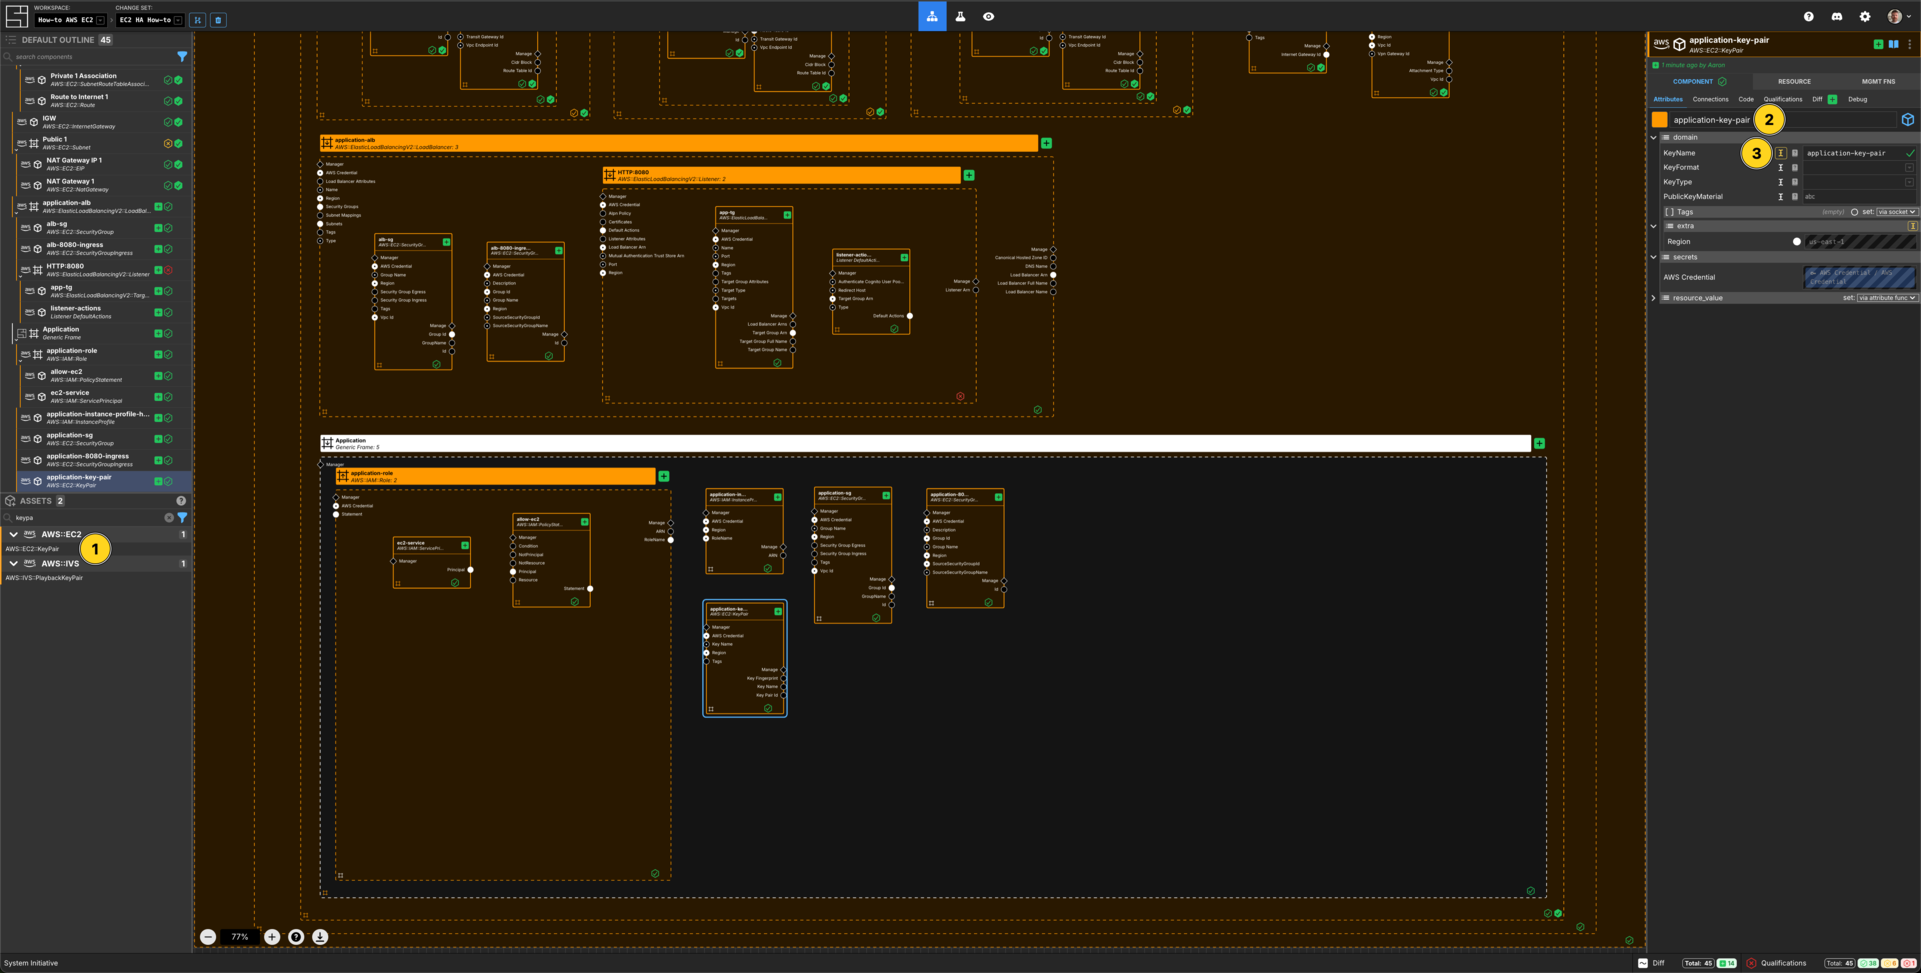
Add a AWS::EC2::KeyPair Component to your Generic Application frame.
Set the Component name to application-key-pair.
Set the KeyName to application-key-pair.
Create an AMI Component
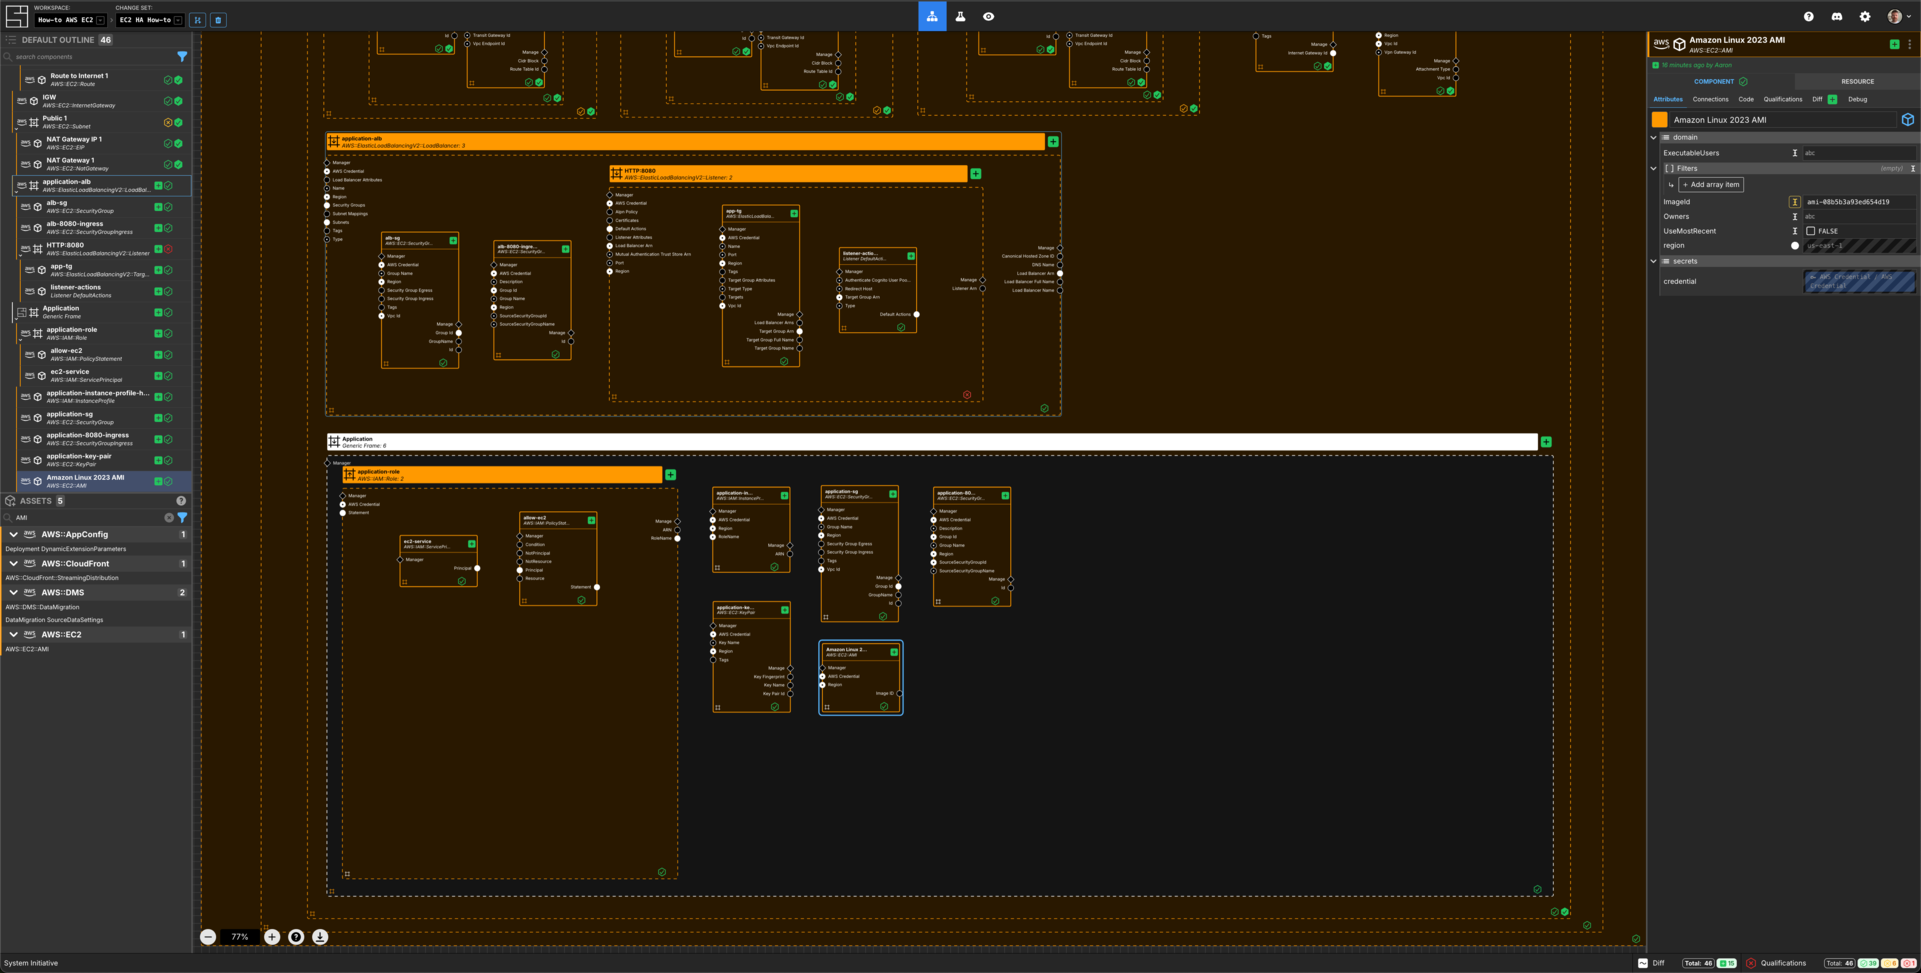
Add an AWS::EC2::AMI to your Generic Application frame.
Set the Component name to be Amazon Linux 2023 AMI.
Set the ImageId to be ami-08b5b3a93ed654d19.
Create a Launch Template Component
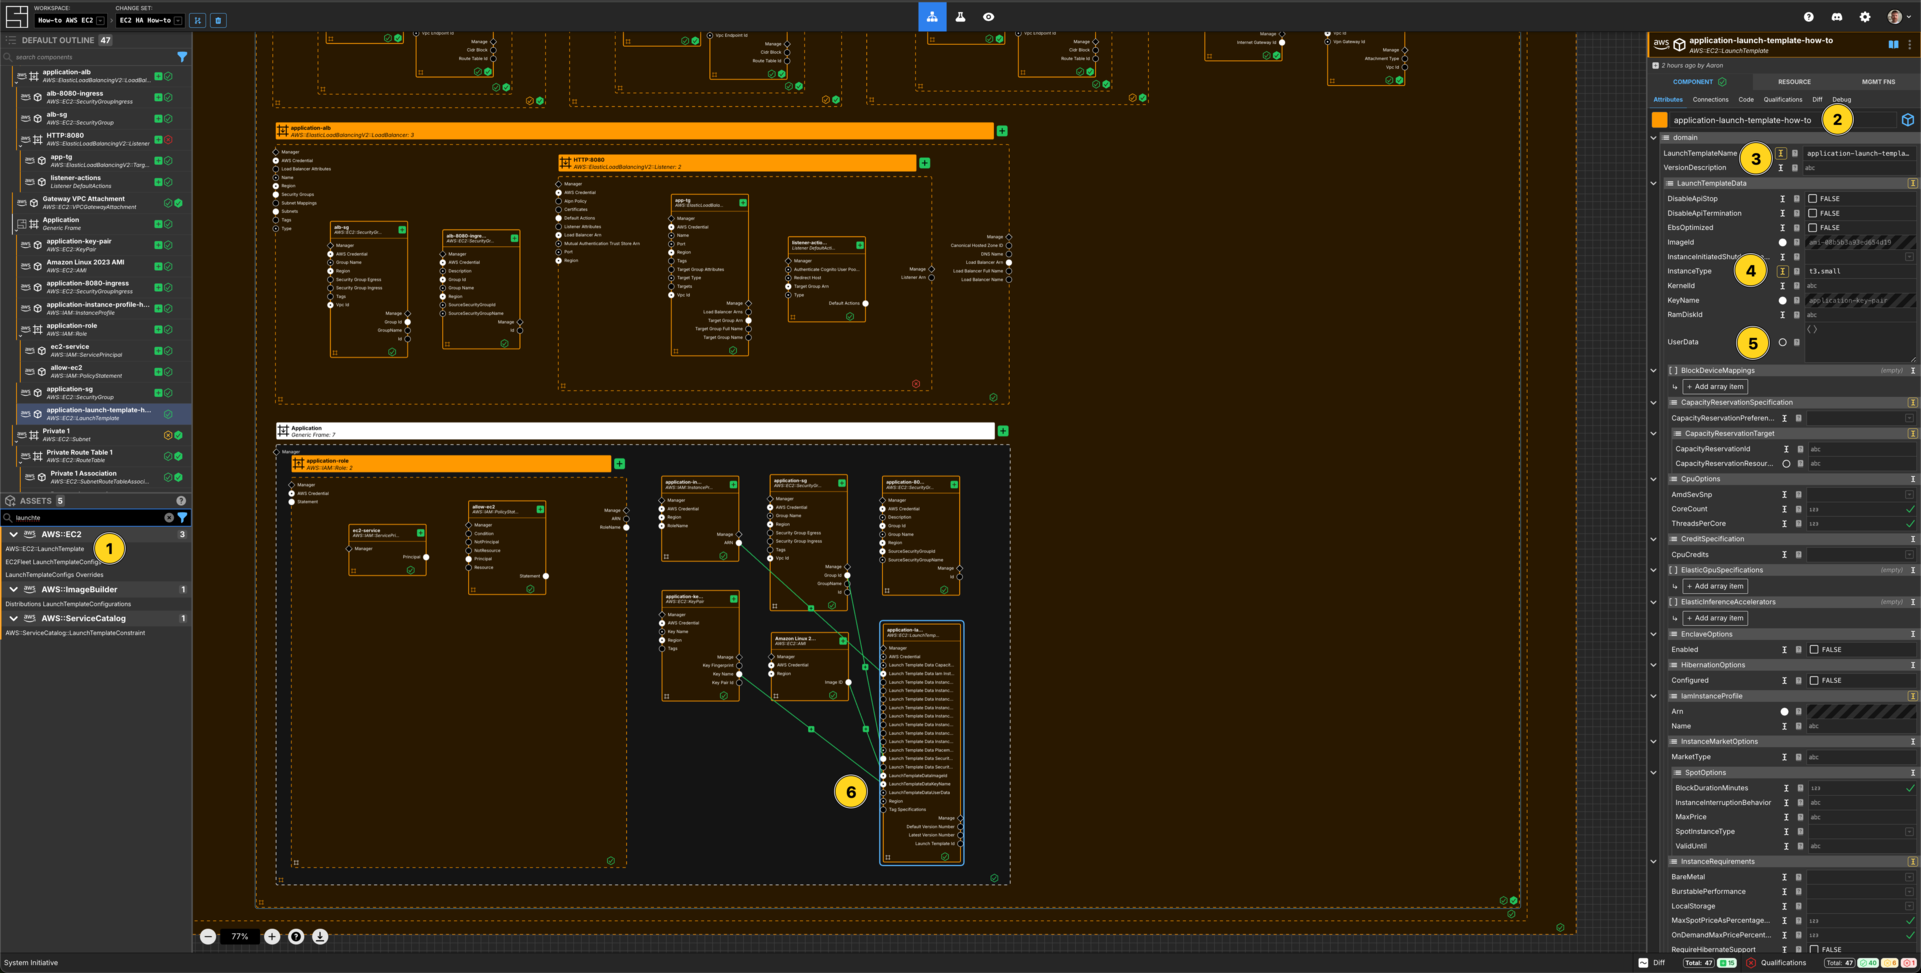
Add a AWS::EC2::LaunchTemplate Component to your Generic Application frame.
Set the Component name to application-launch-template-how-to.
Set the LaunchTemplateName to application-launch-template-how-to.
Set the InstanceType to be t3.small
Set the UserData to be a base64 encoded version of the following code snippet:
#!/bin/bash
# Update the system
yum update -y

# Install Python 3 and pip
yum install -y python3 python3-pip

# Install Git
yum install -y git

# Create a directory for the application
mkdir -p /opt/flask-app
cd /opt/flask-app

# Create the application file
cat <<EOT > app.py
from flask import Flask
import requests
import os

app = Flask(__name__)

def get_instance_id():
    try:
        instance_id = requests.get("http://169.254.169.254/latest/meta-data/instance-id", timeout=2).text
    except requests.exceptions.RequestException:
        instance_id = "Unknown (not running on EC2)"
    return instance_id

@app.route('/')
def hello():
    instance_id = get_instance_id()
    return f"""
    <h1>Hello from EC2!</h1>
    <p>This response is served by instance: {instance_id}</p>
    <p>Refresh the page to see load balancing in action.</p>
    """

@app.route('/health')
def health_check():
    return "OK", 200


if __name__ == '__main__':
    app.run(host='0.0.0.0', port=int(os.environ.get('PORT', 8080)))
EOT

# Install the Python dependencies
pip3 install --ignore-installed requests Flask

# Create a systemd service file for the Flask app
cat <<EOT > /etc/systemd/system/flask-app.service
[Unit]
Description=Flask App
After=network.target

[Service]
User=root
WorkingDirectory=/opt/flask-app
ExecStart=/usr/bin/python3 /opt/flask-app/app.py
Restart=always

[Install]
WantedBy=multi-user.target
EOT

# Reload systemd, enable and start the Flask app service
systemctl daemon-reload
systemctl enable flask-app
systemctl start flask-app
Connect the Group ID Output Socket of application-sg Component to the Launch Template Data Security Group Ids Input Socket of this application-launch-template Component.
Connect the Key Name Output Socket of application-key-pair-how-to Component to the LaunchTemplateDataKeyName Input Socket of this application-launch-template Component.
Connect the ARN Output Socket of application-instance-profile Component to the Launch Template Data Iam Instance Profile Arn Input Socket of this application-launch-template Component.
Connect the Image ID Output Socket of Amazon Linux 2023 AMI Component to the LaunchTemplateDataImageId Input Socket of this application-launch-template Component.
Create an AutoScaling Group Component
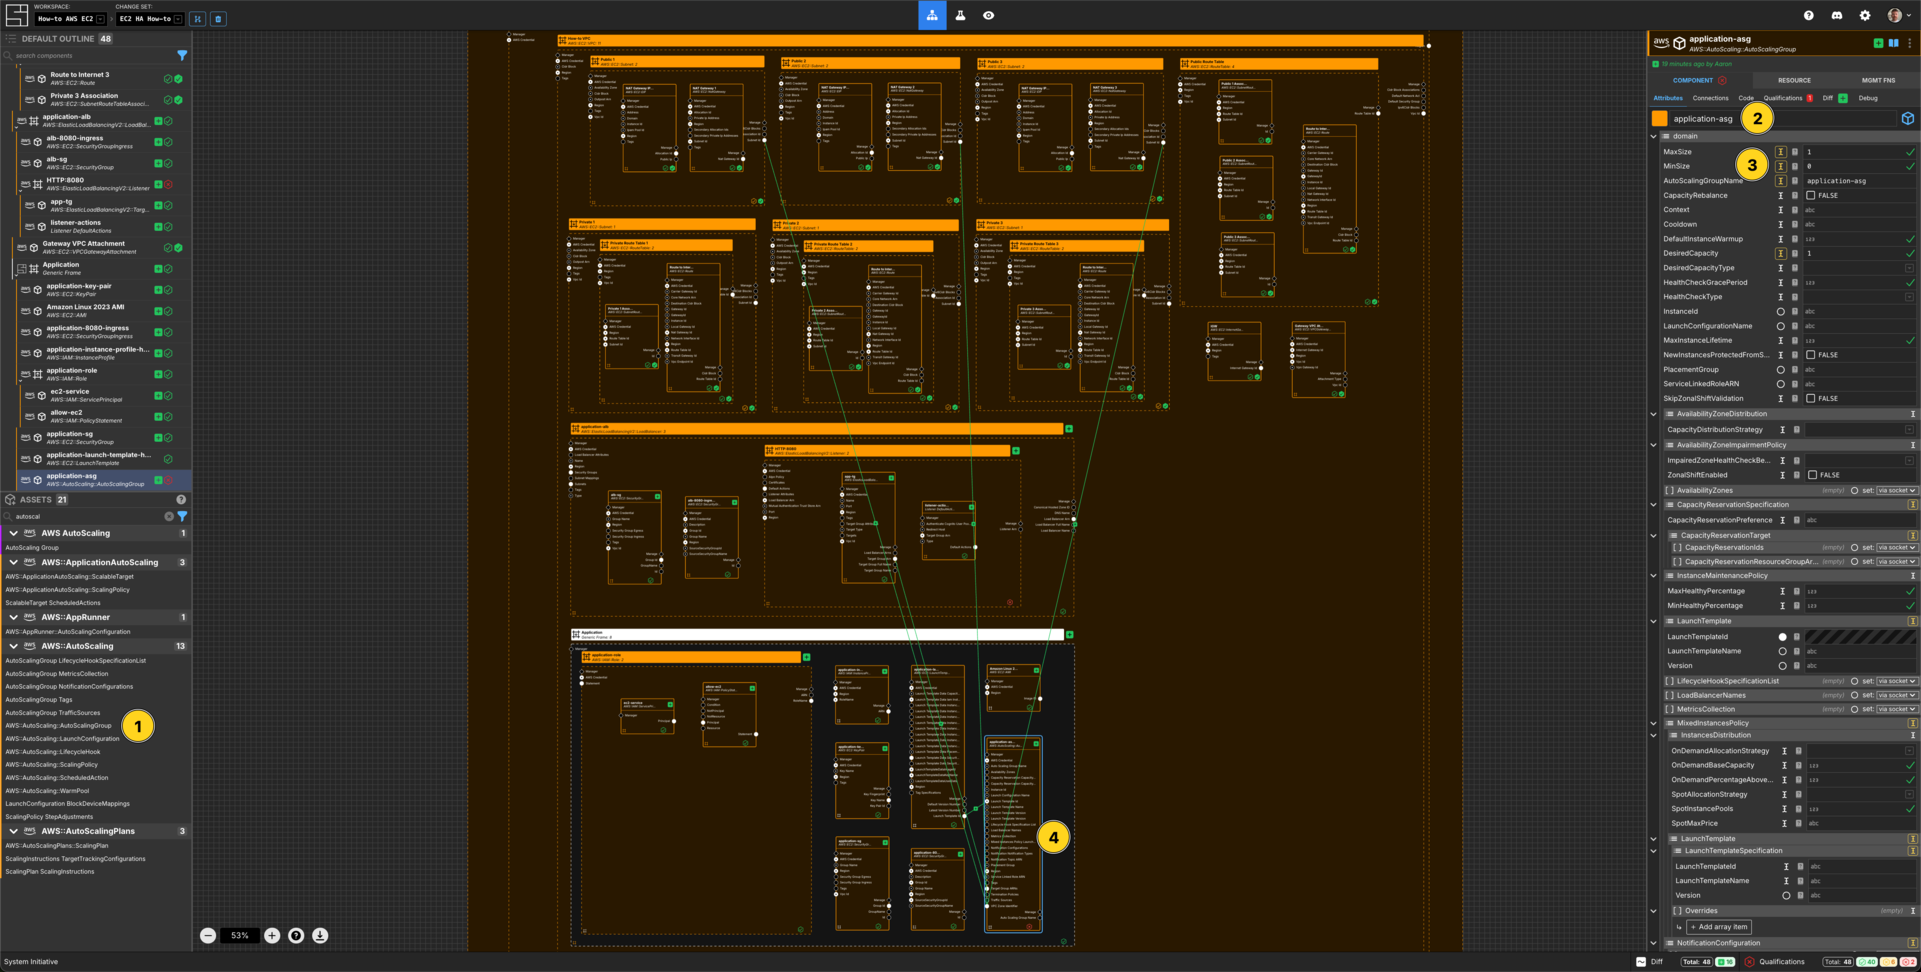
Add an AWS::AutoScaling::AutoScalingGroup Component to the Generic Application frame.
Set the Component name to application-asg.
Set MaxSize to be 1.
Set MinSize to be 0.
Set AutoScalingGroupName to be application-asg.
Set DesiredCapacity to be 1.
Set LaunchTemplate Version to 1.
Connect the Launch Template Id Output Socket of application-launch-template Component to the Launch Template Id Input Socket of this application-asg Component.
Connect the Subnet Id Output Socket of each of the Public subnet Components to the VPC Zone Identifier Input Socket of this application-asg Component.
Connect the Target Group Arn Output Socket of the app-tg Target Group to the Target Group ARN Input Socket of this application-asg Component.
Apply your Change Set
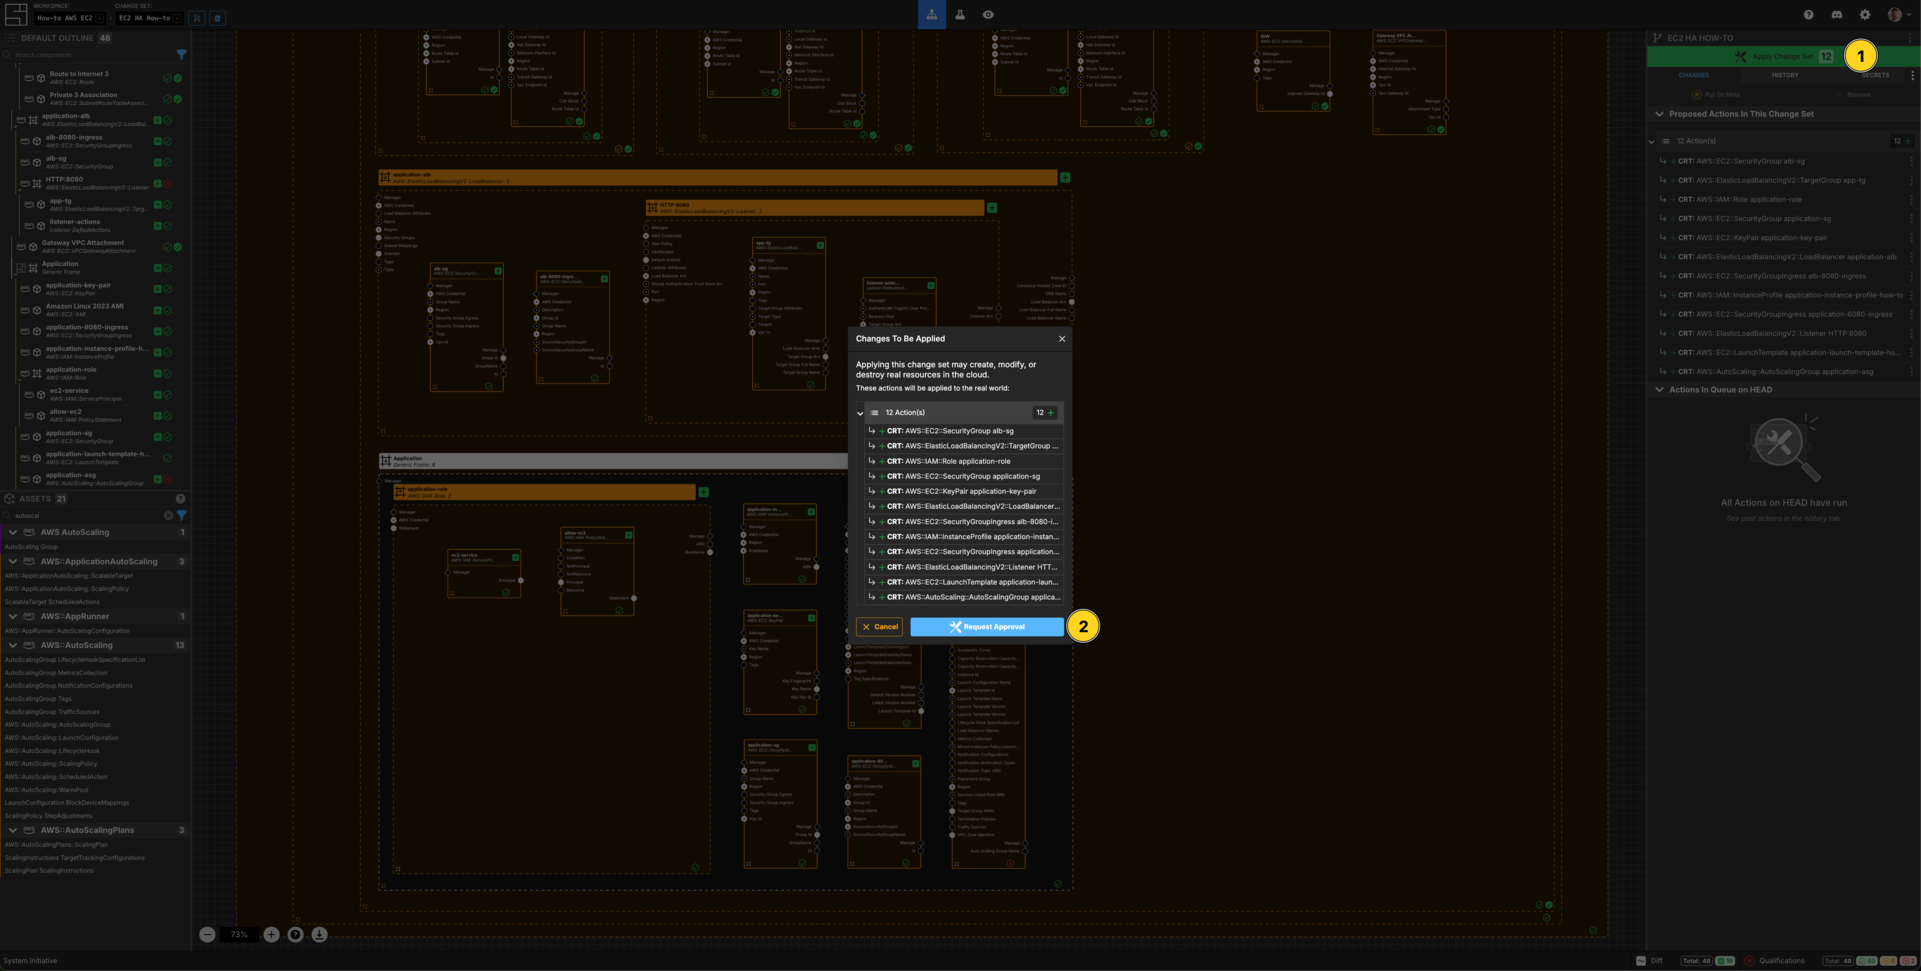
Press Escape or click anywhere on the canvas background to select the Workspace.
Click the Apply Change Set button to:
- Create a Key Pair
- Create 2 Security Groups and associated ingress rules
- Create an application load balancer, a listener and a target group
- Create an IAM Role and IAM Instance Profile
- Create a Launch Template and an AutoScaling Group (that will create an instance)
Explore your resources
Review the completed AWS resources by clicking the Resource sub-panel for each of your new resources.
Clean Up
Create a new Change Set called Clean up How-to
Delete your VPC How-to VPC frame. All of the Components inside will be marked for deletion.
Click Apply Change Set.
All your new resources should be deleted from your AWS account.
Vocabulary
In this guide bits of System Initiative Vocabulary will be shown with a capital letter. All definitions for these can be found here: System Initative - Vocabulary