How to deploy an AWS ECR hosted image in AWS ECS
This how-to assumes:
- Basic familiarity with System Initiative
- Are familiar with AWS ECR and AWS ECS
- Have docker cli installed locally
- You have completed the build an AWS VPC with System Initiative tutorial (and not deleted the resulting resources)
It will teach you how to deploy an AWS ECR Repository, build and push a docker container to it, then deploy that application on AWS ECS with System Initiative.
We will cover:
- The creation of an ECR Repository
- The creation of an ECS cluster with a deployed service
- An AWS Application Load Balancer
- The networking required to allow the ECS service to service traffic to the load balancer
Setup
All activities in this how-to happen within an AWS Credential, Region and VPC.
Start in a Change Set named ECR Infrastructure How-to.
Walkthrough
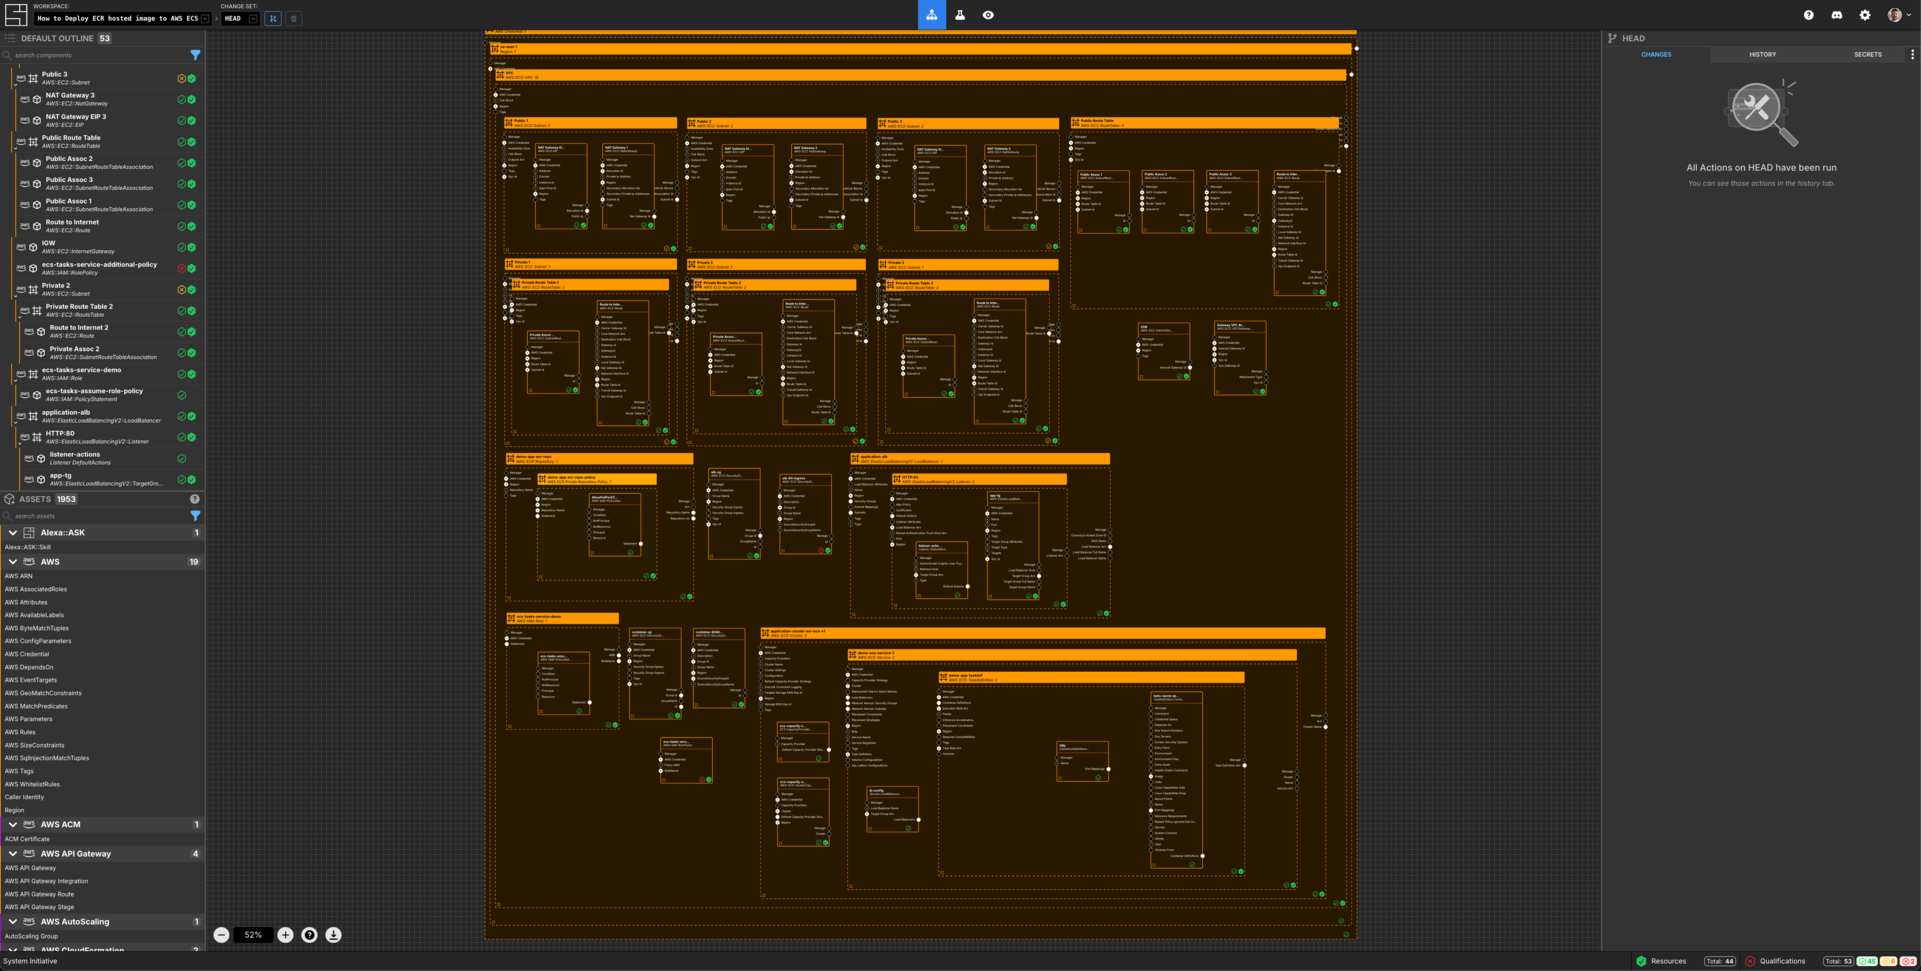
What it will look like
When you are through with this guide, you should have Components that look like this in your Diagram:
Create an ECR Repository
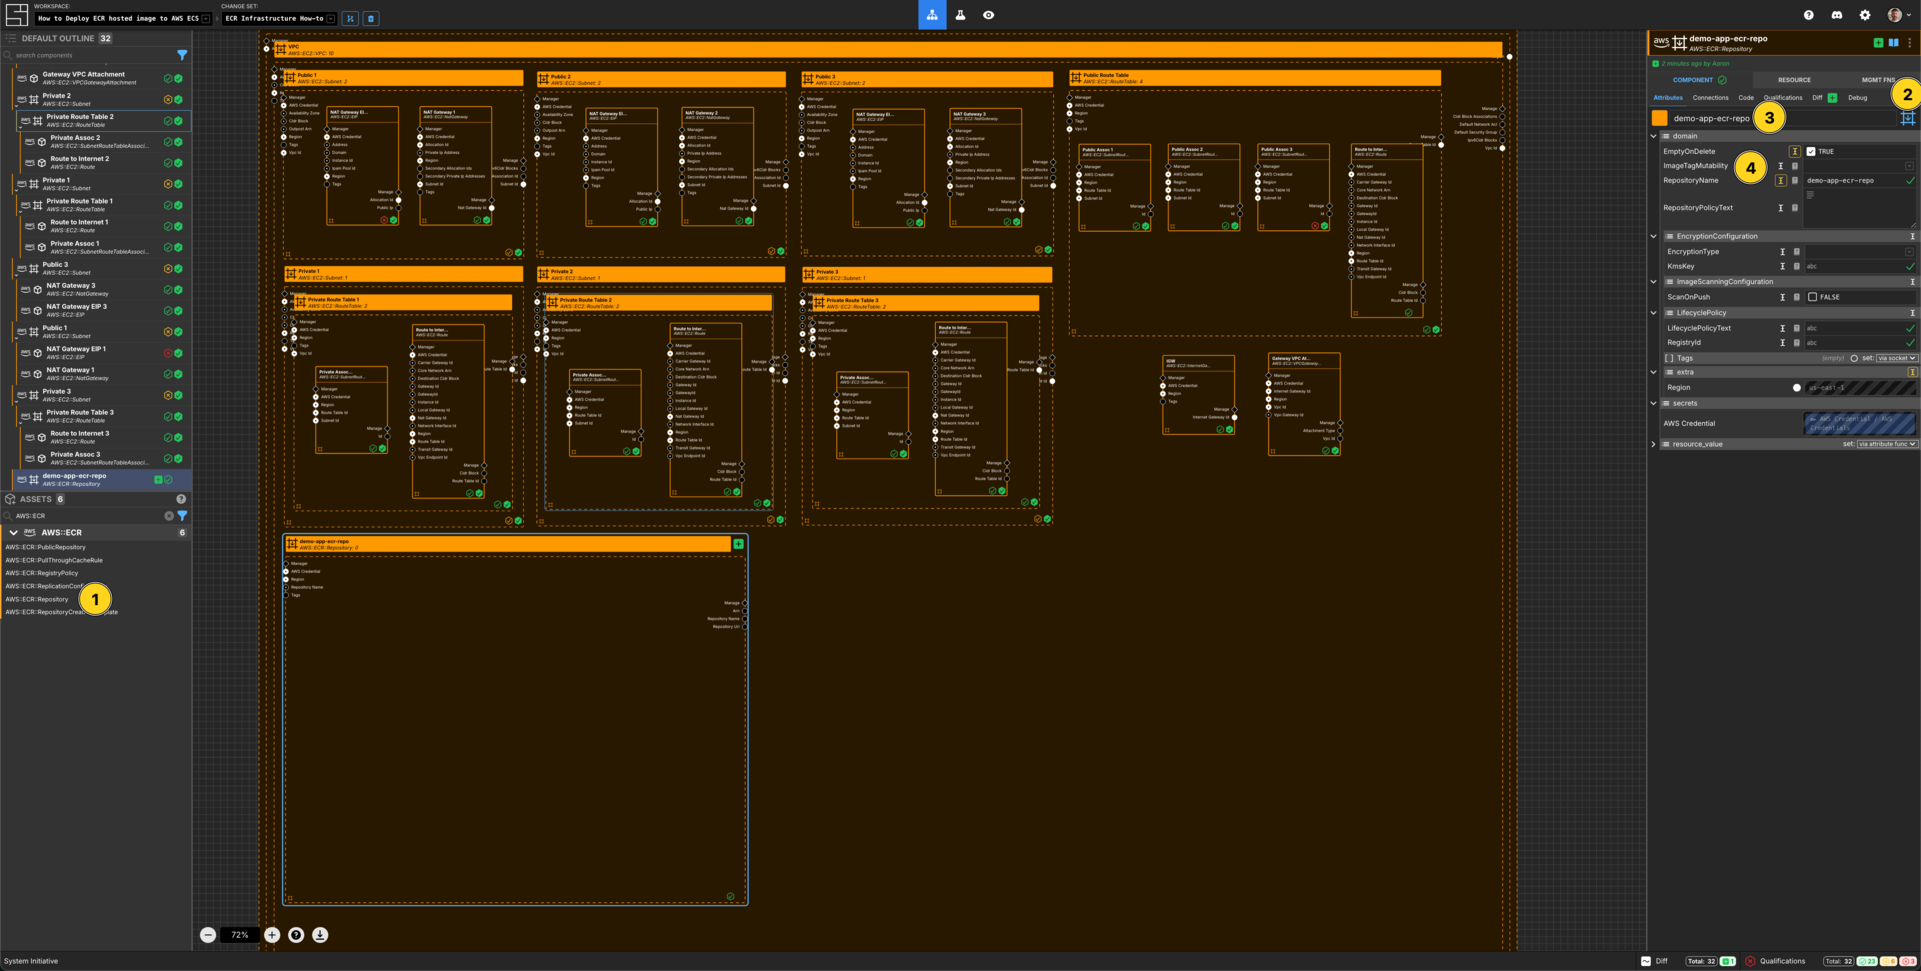
Add a AWS::ECR::Repository Component to your VPC frame.
Set the Component type to Down Frame.
Set the Component name to be demo-app-ecr-repo.
Set the RepositoryName to be demo-app-ecr-repo.
Set EmptyOnDelete to be TRUE.
Create an ECR Repository Policy
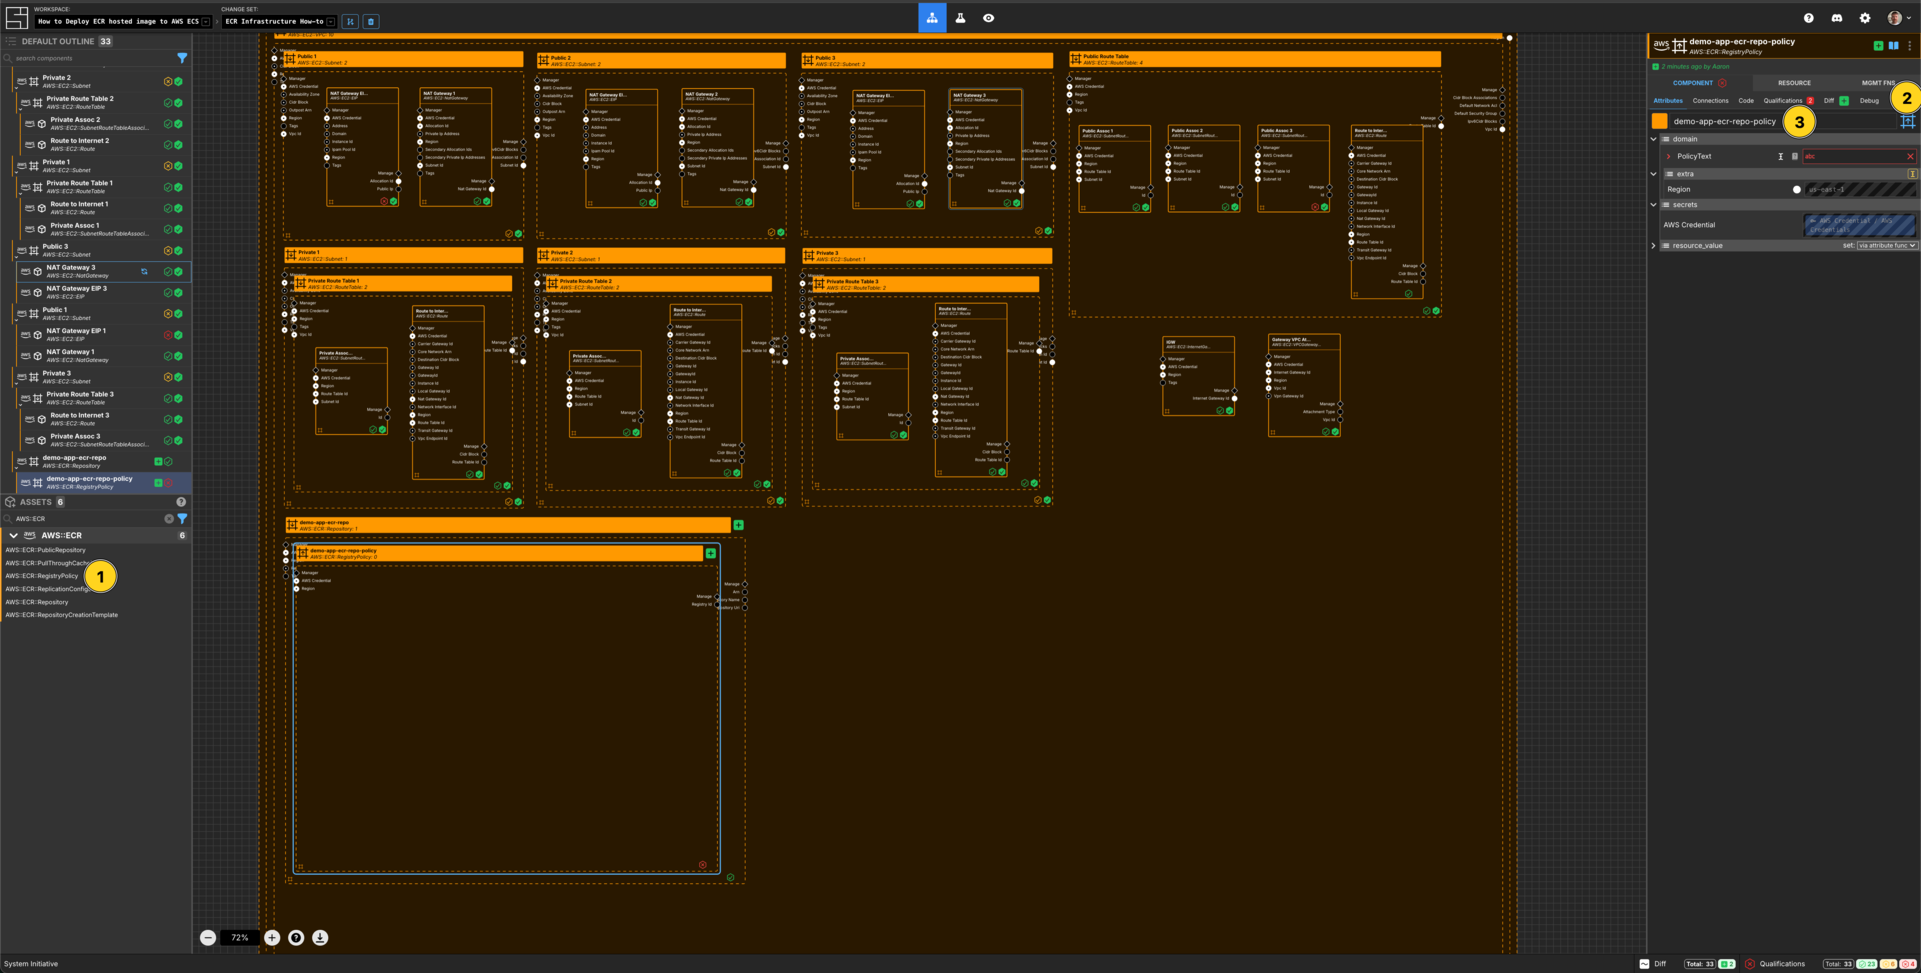
Add a AWS ECR Private Repository Policy Component to your demo-app-ecr-repo frame.
Set the Component type to be Up Frame.
Set the Component name to be demo-app-ecr-repo-policy
Create an IAM Policy Statement
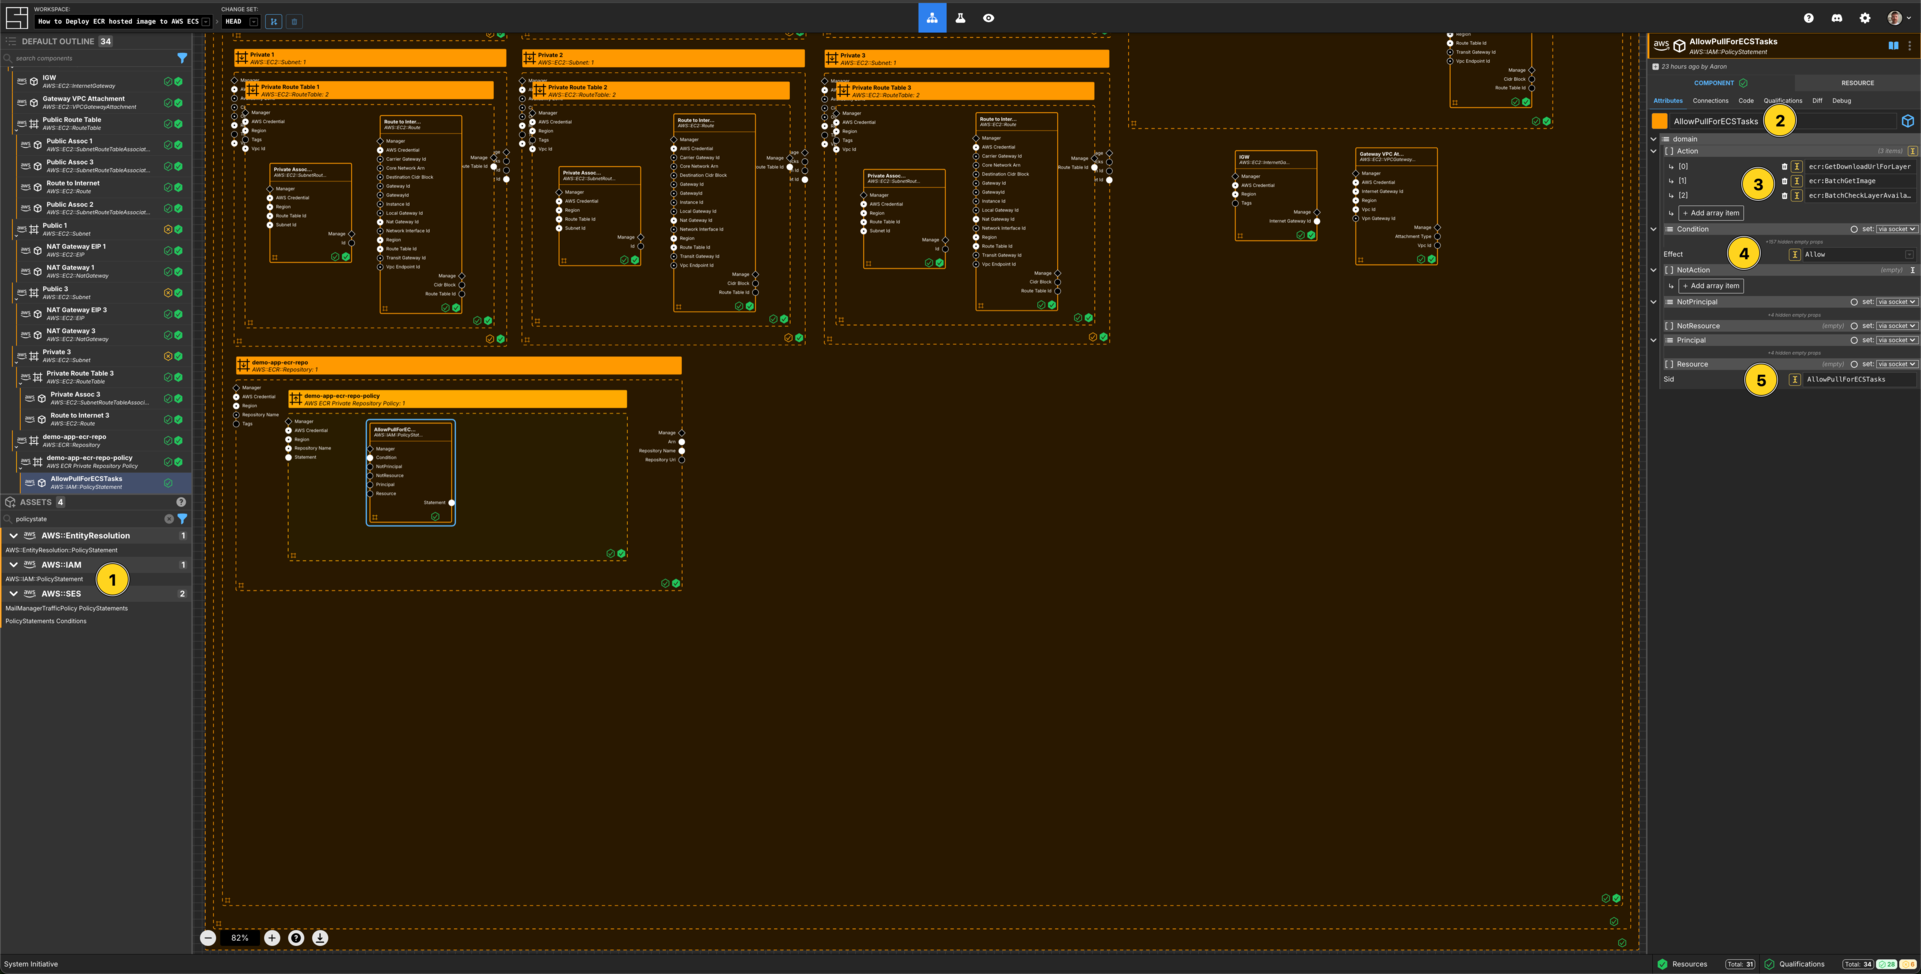
Add an AWS::IAM::PolicyStatement to the demo-app-ecr-repo-policy frame.
Set the Component name to be AllowPullForECSTasks
Add 3 array items to Action
Set the values to be:
ecr:GetDownloadUrlForLayerecr:BatchGetImageecr:BatchCheckLayerAvailability
Set Effect to be Allow
Set the Sid to be AllowPullForECSTasks
Apply your ECR Infrastructure Change Set
Press Escape or click anywhere on the canvas background to select the Workspace.
Click the Apply Change Set button to:
- Create a Private ECR Repository
- Create an ECR Registry Policy
Build & Push Docker Image
The demo application to deploy in ECS is infrastructureascode/hello-world. This is a very simple app that returns Hello, World! message at the / path and has a /metrics and a /health endpoint.
Firstly, docker pull this container locally:
docker pull infrastructureascode/hello-worldGo to the Resource tab of the demo-app-repo Component and select Resource Data. This data includes the repositoryUri.
Next, docker tag the image for the ECR container created:
docker tag infrastructureascode/hello-world 'repositoryUri':latestNote: the use of repositoryUri. Ensure the correct data from the Resource Data is added to this command.
Next, docker login to the ECR repository, similar to the following:
aws ecr get-login-password --region us-east-1 | docker login --username AWS
--password-stdin 573113295293.dkr.ecr.us-east-1.amazonaws.com
Note: You must be authenticated to the correct AWS account to run this command. You can find the accountId from the repositoryUri.
Lastly, docker push the image:
docker push 'repositoryUri':latestCreate a new Change Set
Create a new Change Set called ECS Infra.
Create a Loadbalancer Component
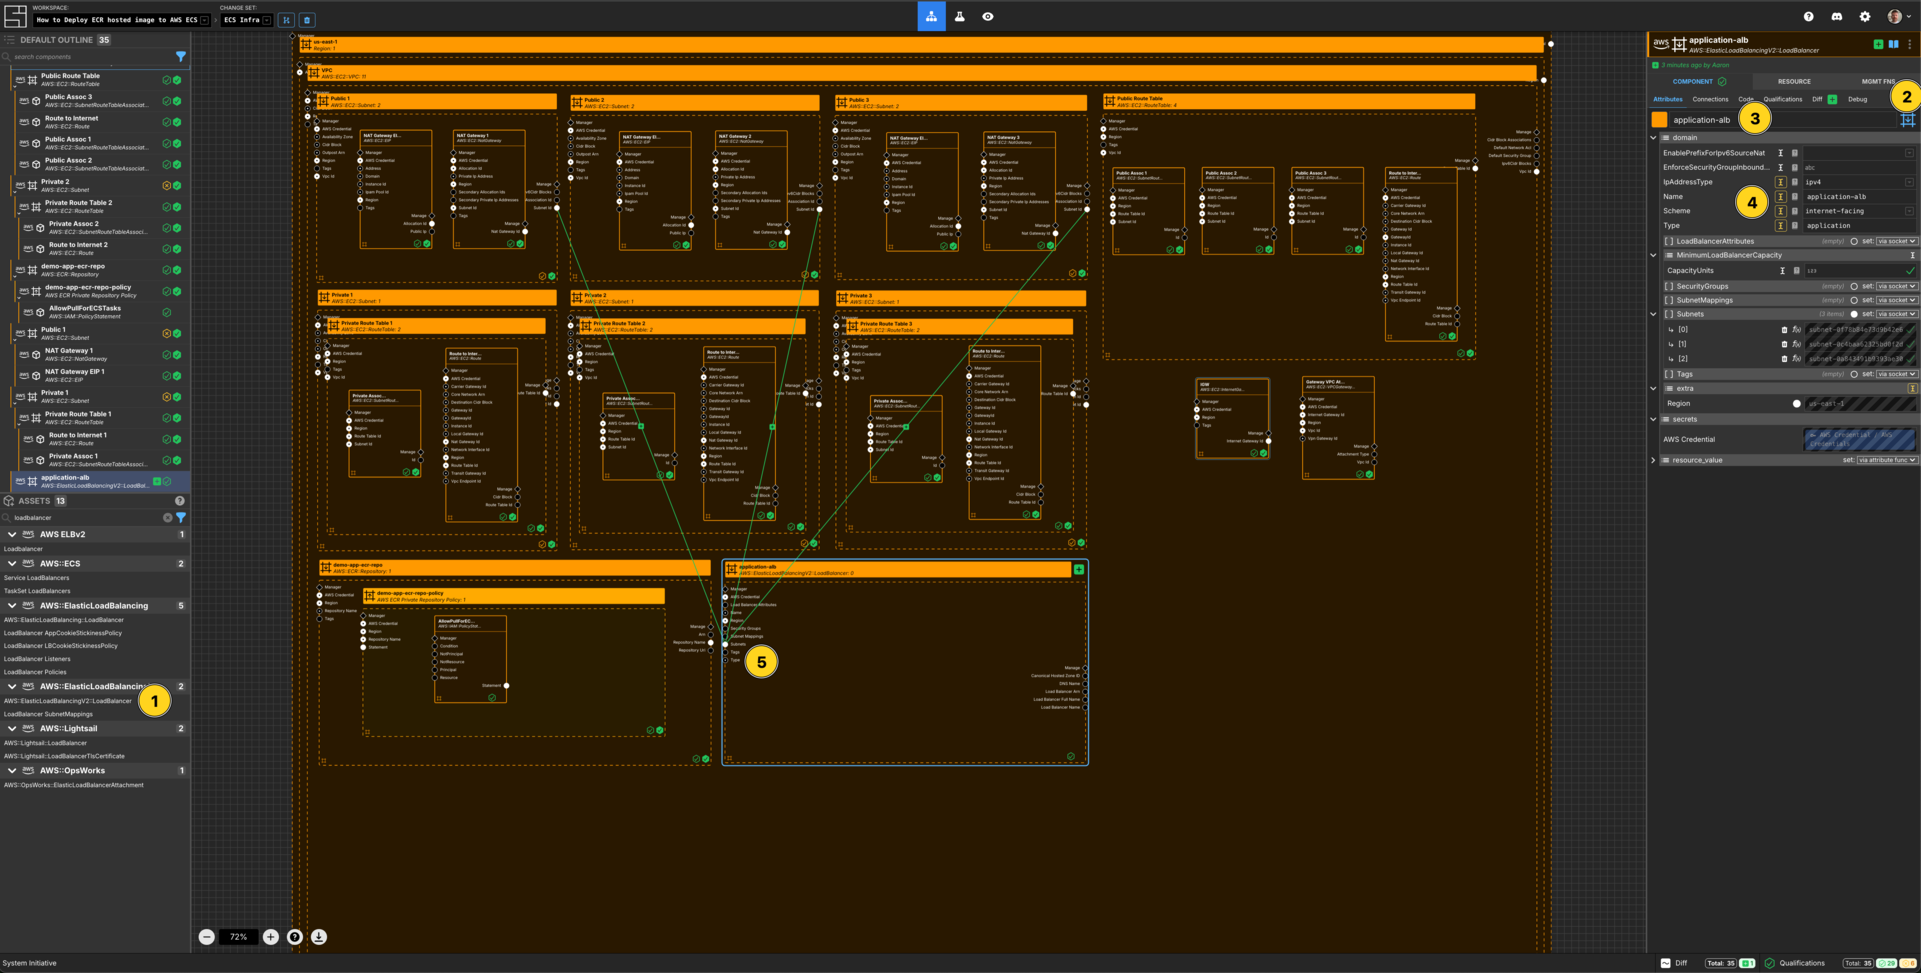
Add a AWS::ElasticLoadBalancingV2::LoadBalancer to your VPC frame.
Set the Component type to Down Frame.
Set the Component name to application-alb.
Set the IpAddressType to ipv4.
Set the Name to application-alb.
Set the Scheme to internet-facing.
Set the Type to application.
Connect the Subnet Id Output Socket of each of the public subnet Components to the Subnets Input Socket of the application-alb Component.
Create a Security Group Component for the Loadbalancer
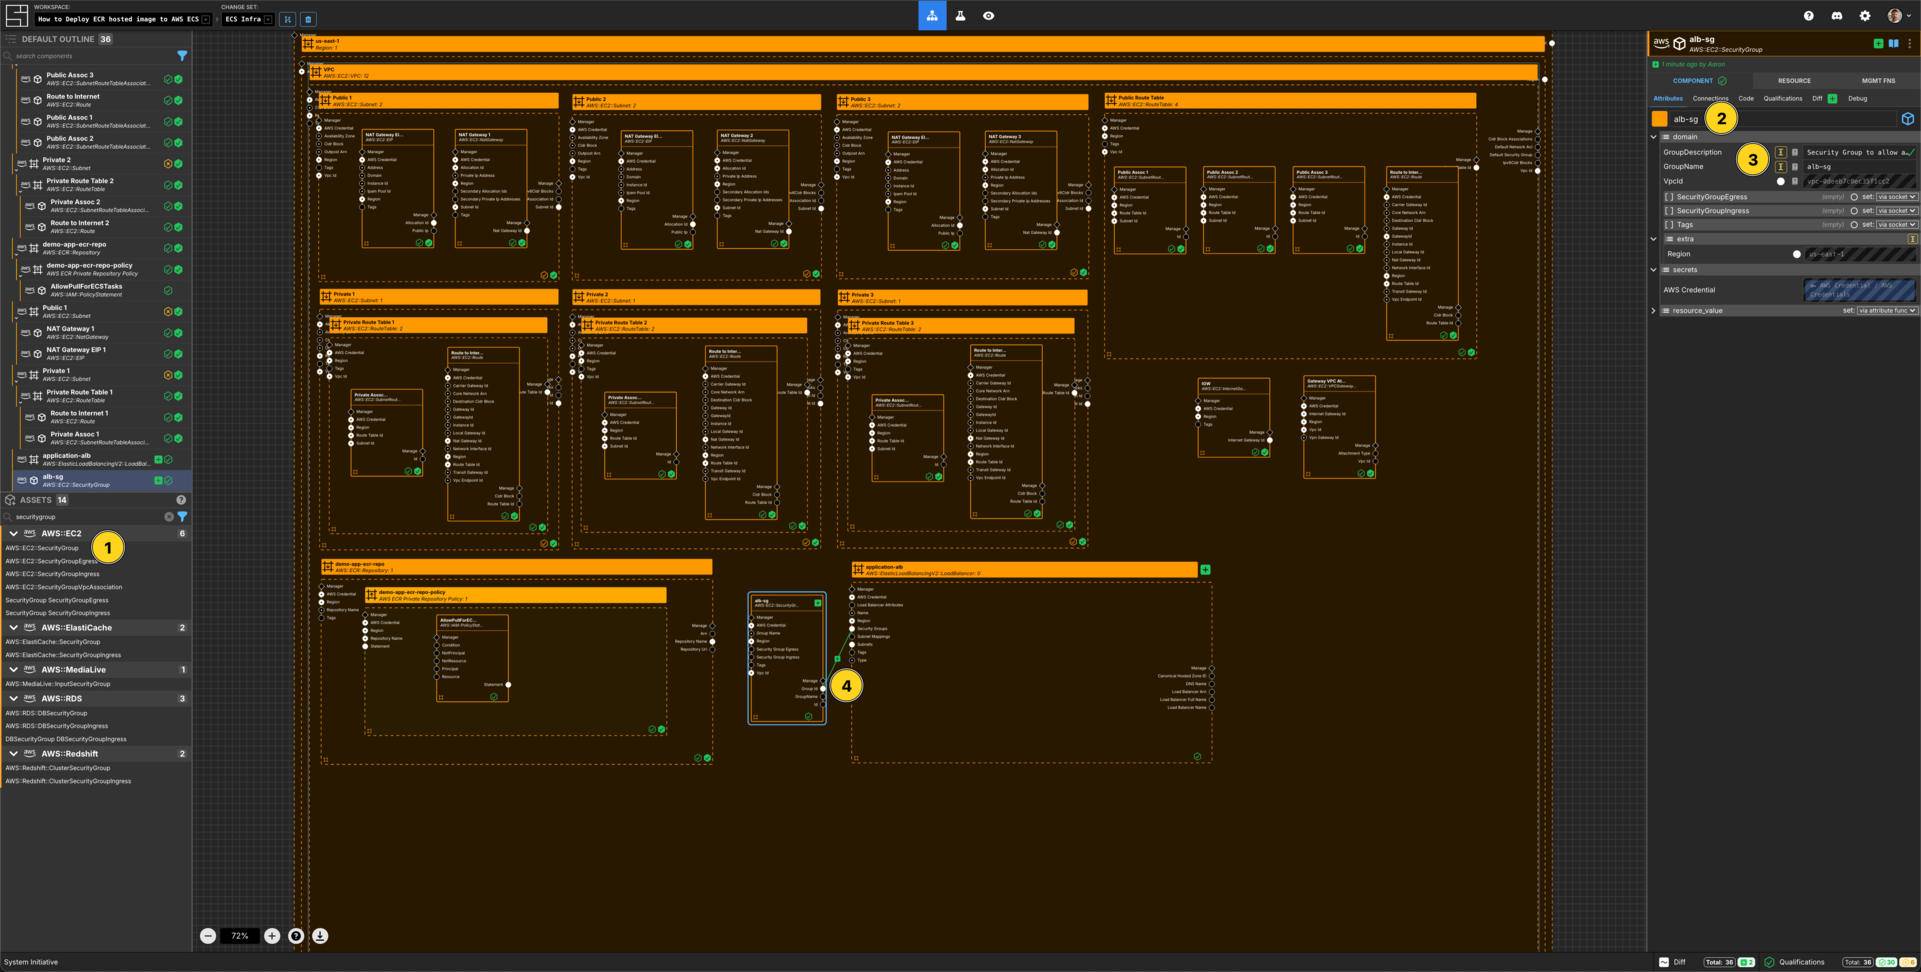
Add a AWS::EC2::SecurityGroup to your VPC frame.
Set the Component name to alb-sg.
Set the GroupDescription to be Security Group to allow access to the Loadbalancer
Set the GroupName to alb-sg.
Connect the Group Id Output Socket of alb-sg Component to the Security Groups Input Socket of the application-alb frame.
Create a Security Group Ingress Rule Component
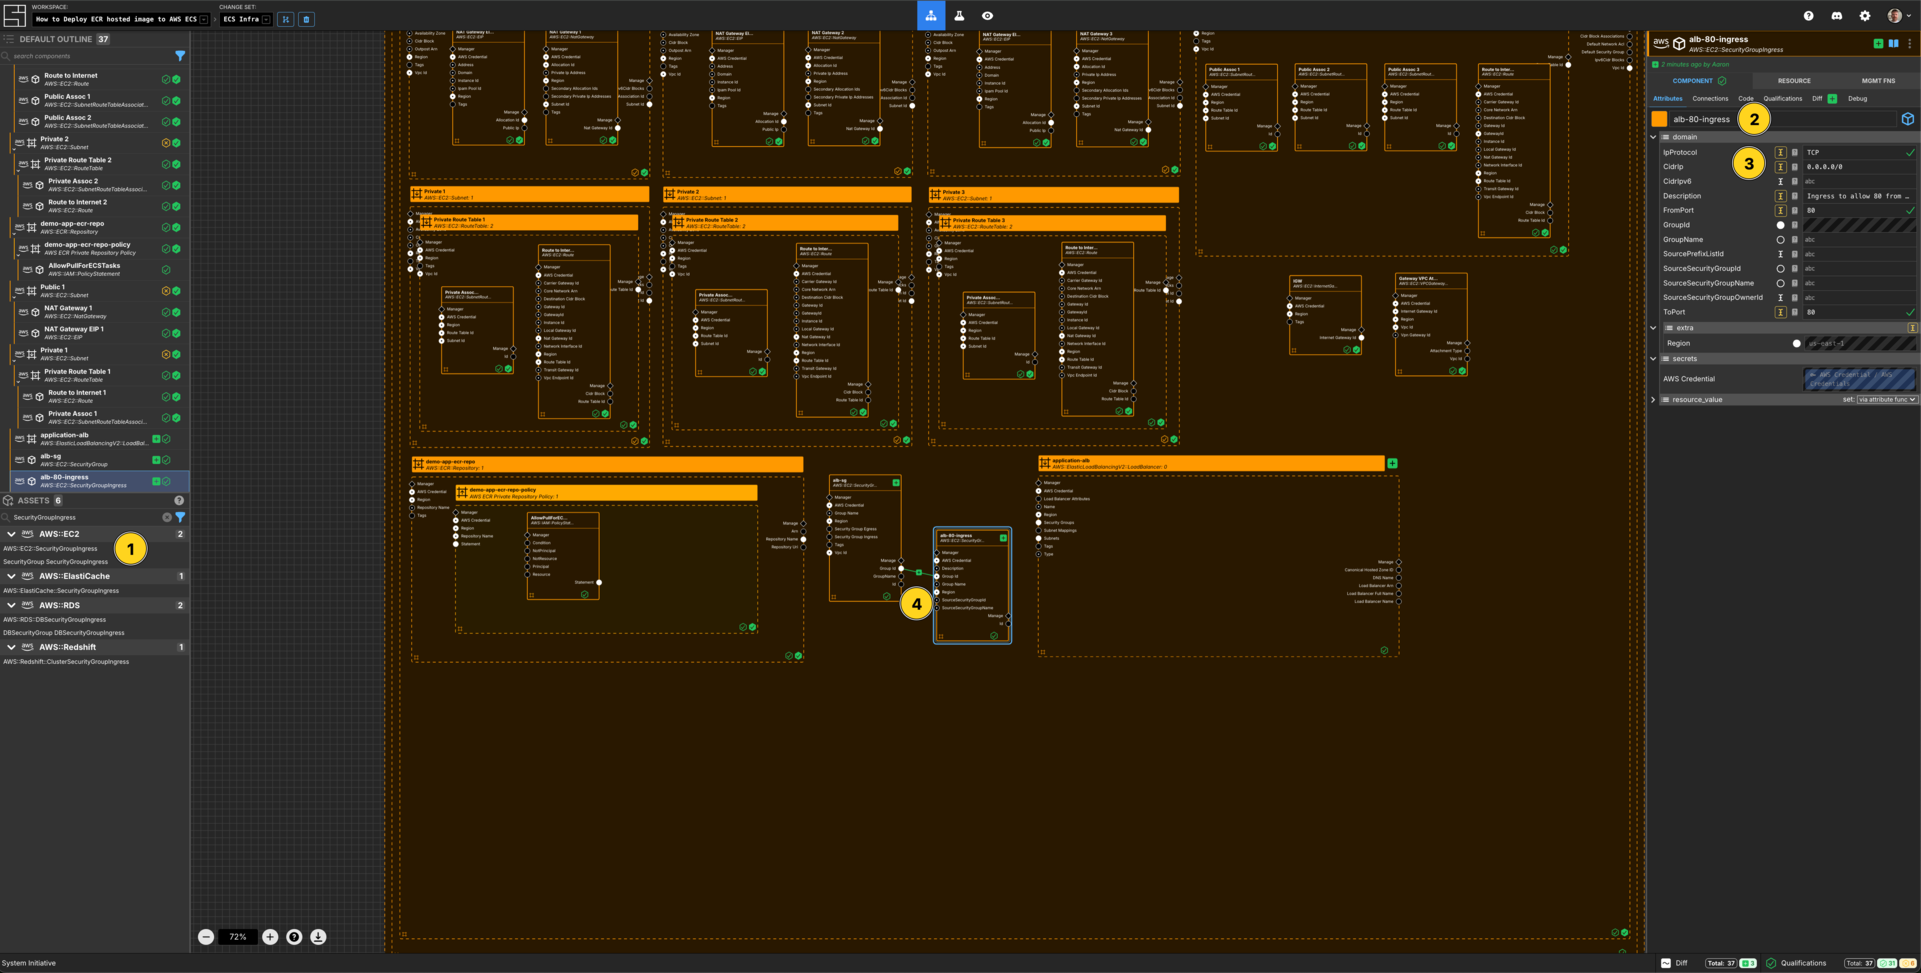
Add a AWS::EC2::SecurityGroupIngress Component to your VPC frame.
Set the Component name to alb-80-ingress.
Set the IpProtocol to TCP.
Set CidrIp to be 0.0.0.0/0.
Set the Description to Ingress to allow 80 from the world.
Set FromPort to be 80.
Set ToPort to be 80.
Connect the Group Id Output Socket of alb-sg Component to the Group Id Input Socket of this alb-80-ingress Component.
Create a Listener Component
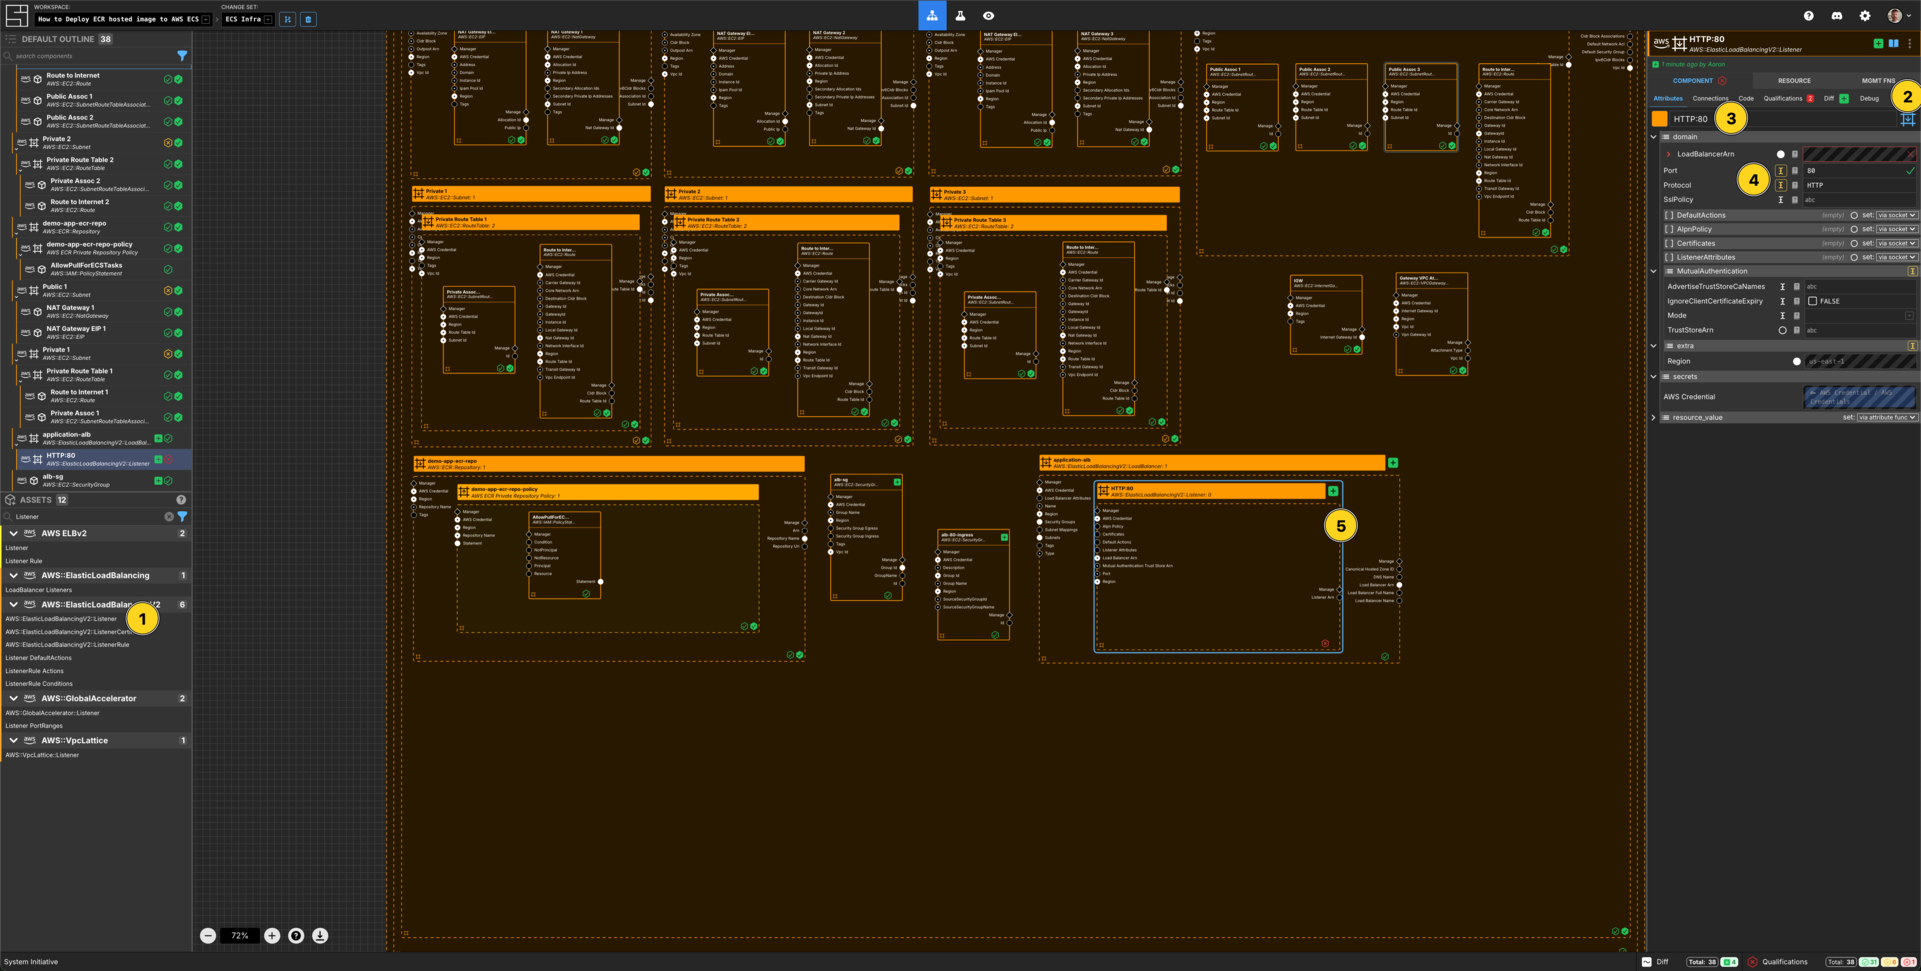
Add a AWS::ElasticLoadBalancingV2::Listener Component to your application-alb loadbalancer frame.
Set the Component type to Down Frame.
Set the Component name to HTTP:80.
Set the Port to be 80.
Set the Protocol to be HTTP.
Resize the frame to be large enough to fit another Component.
Create a Target Group
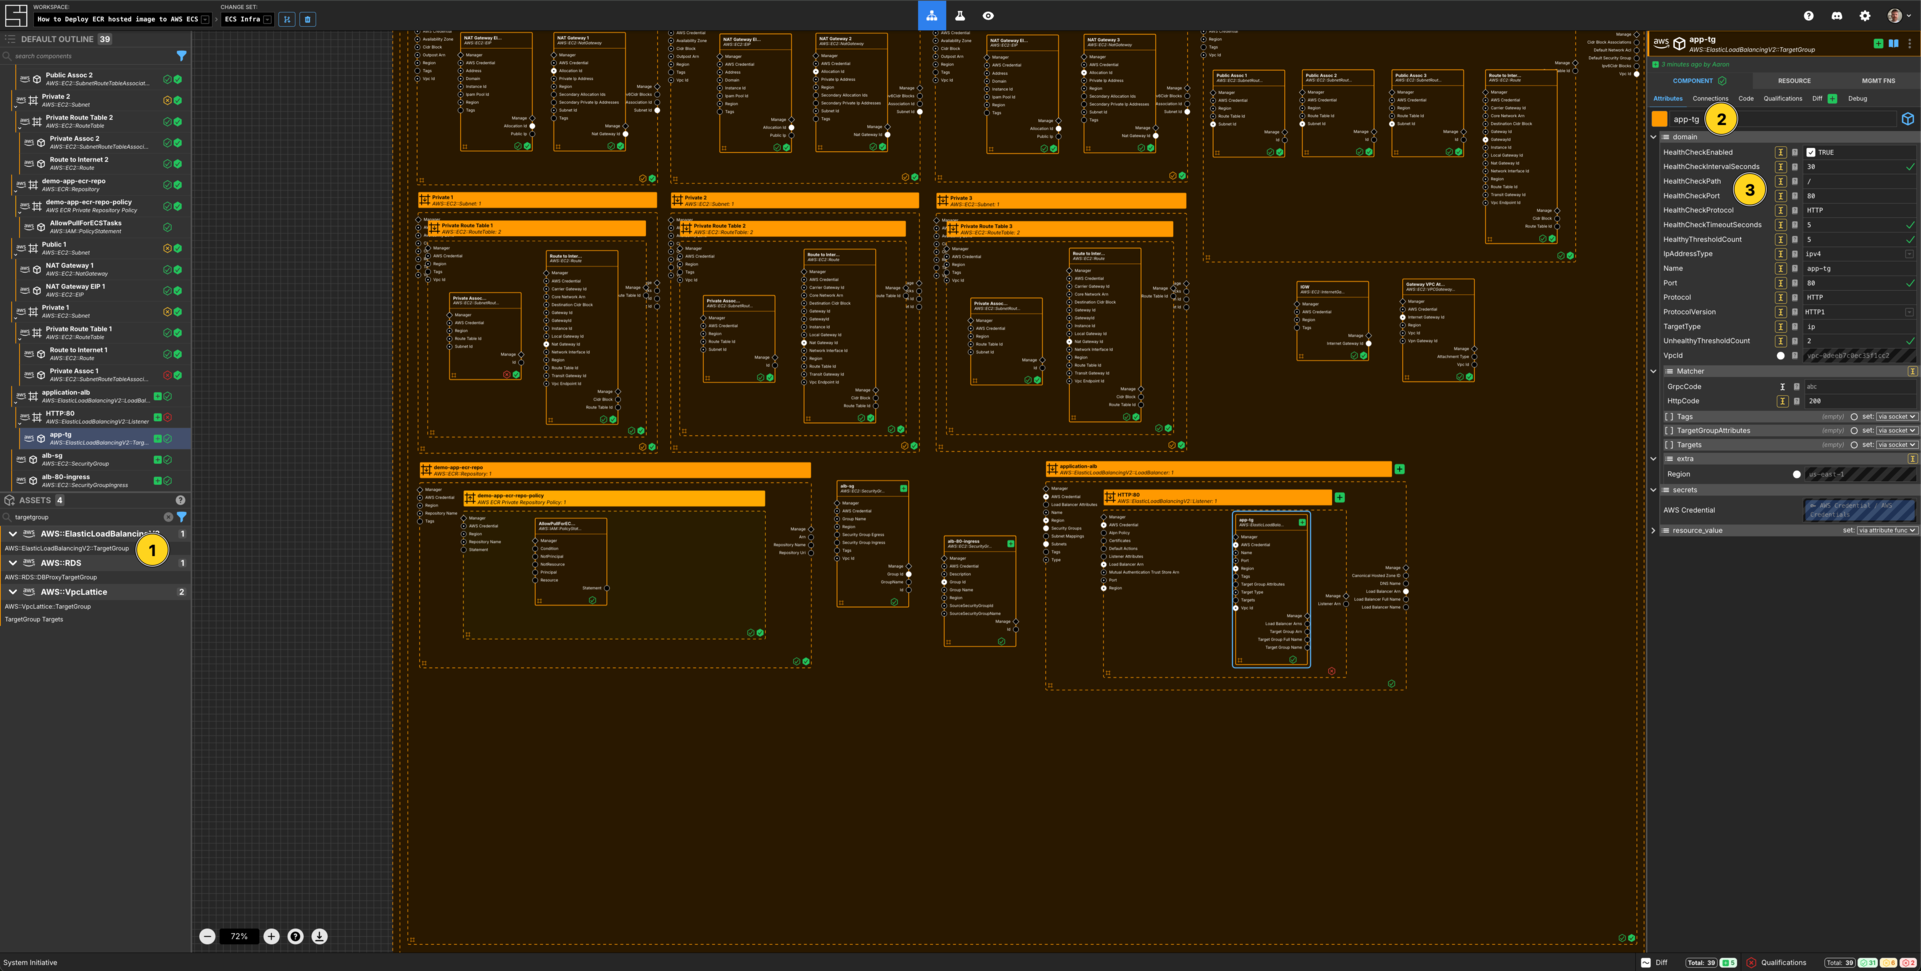
Add a AWS::ElasticLoadBalancingV2::TargetGroup Component to your Listener frame.
Set the Component name to app-tg.
Set HealthCheckEnabled to TRUE.
Set HealthCheckIntervalSeconds to 30 seconds.
Set HealthCheckPath to /.
Set HealthCheckPort to 8080.
Set HealthCheckProtocol to HTTP.
Set HealthCheckTimeoutSeconds to 5.
Set HealthyThresholdCount to 5.
Set IpAddressType to ipv4
Set Name to be app-tg.
Set Port to 8080.
Set Protocol to HTTP.
Set ProtocolVersion to HTTP1
Set TargetType to ip.
Set UnhealthyThresholdCount to be 2.
Set HttpCode to 200.
Create a Listener Default Action
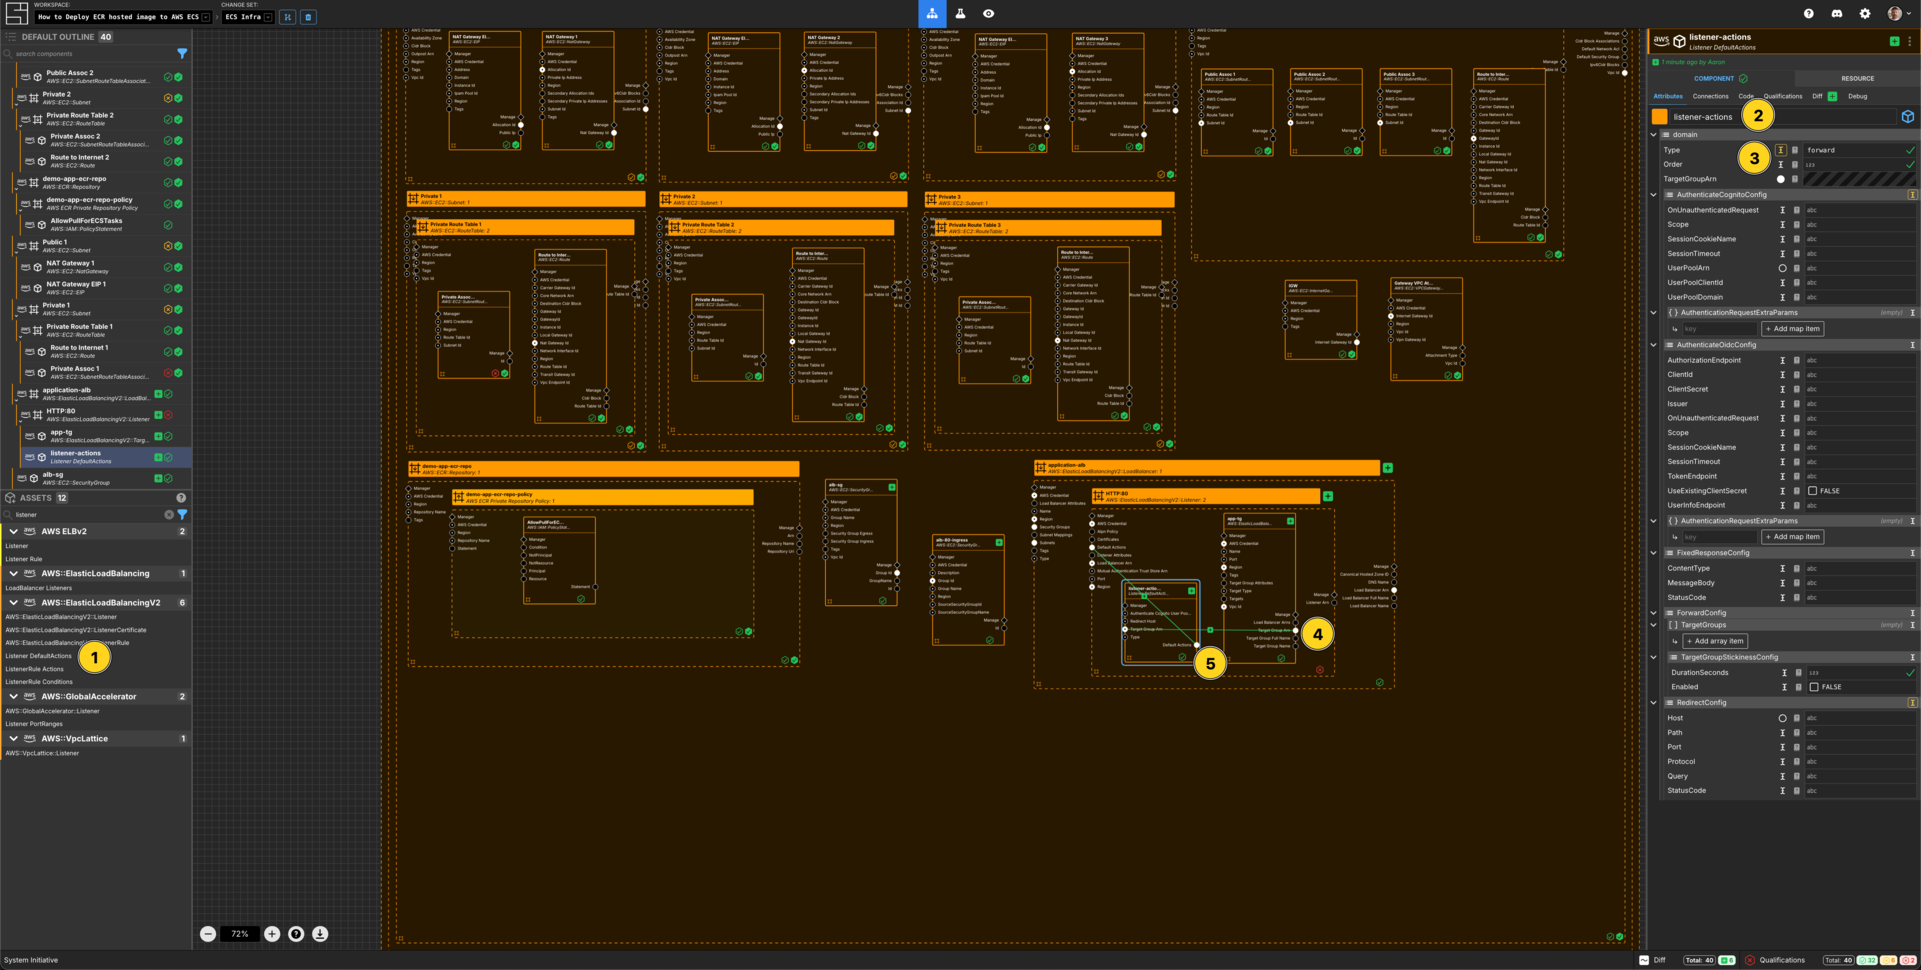
Add a Listener DefaultActions Component to your Listener frame.
Set the Component name to listener-actions.
Set Type to forward.
Connect the Target Group Arn Output Socket of the app-tg Component to the Target Group Arn Input Socket of the listener-actions Component.
Connect the Default Actions Output Socket of the listener-actions Component to the Default Actions Input Socket of the HTTP:80 Listener Component.
Create an IAM Role
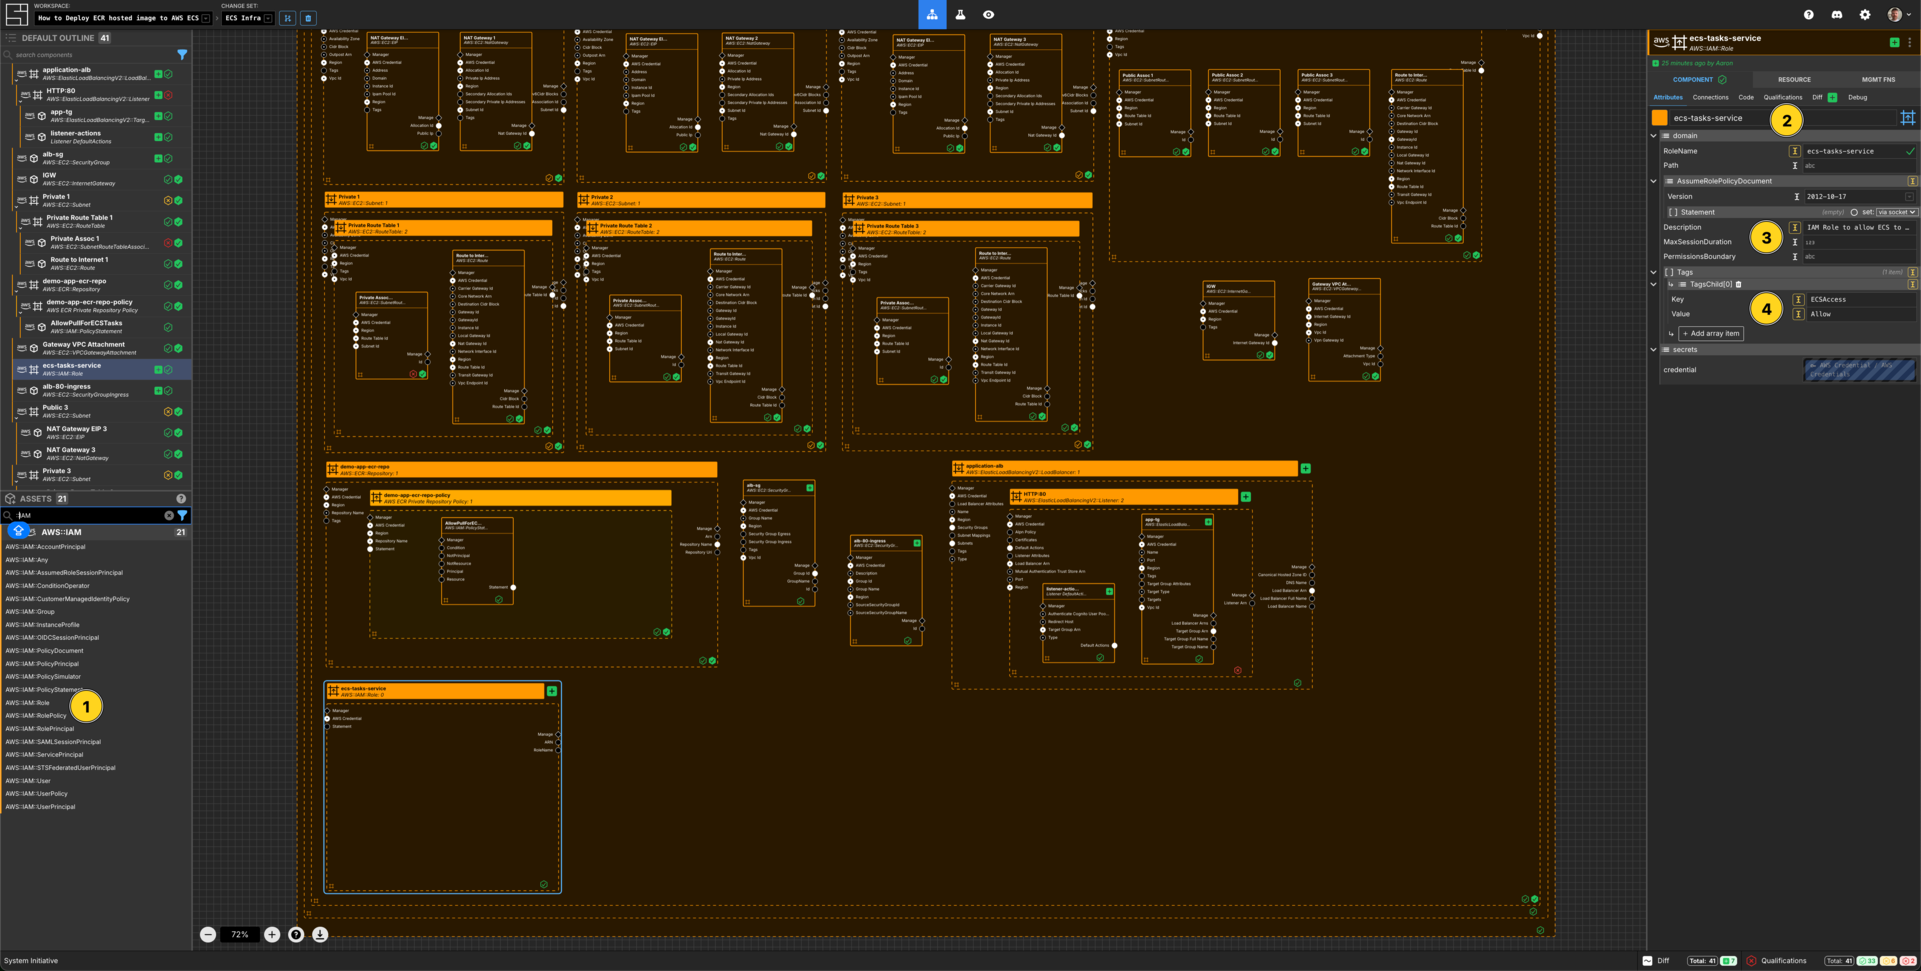
Add an AWS::IAM::Role Component to your VPC frame.
Set the Component name to ecs-tasks-service.
Set the RoleName to ecs-tasks-service.
Set the Description to IAM Role to allow ECS to spawn tasks.
Add an array item to Tags.
Set the Key to be ECSAccess
Set the Value to be Allow
Create an AWS IAM Policy Statement
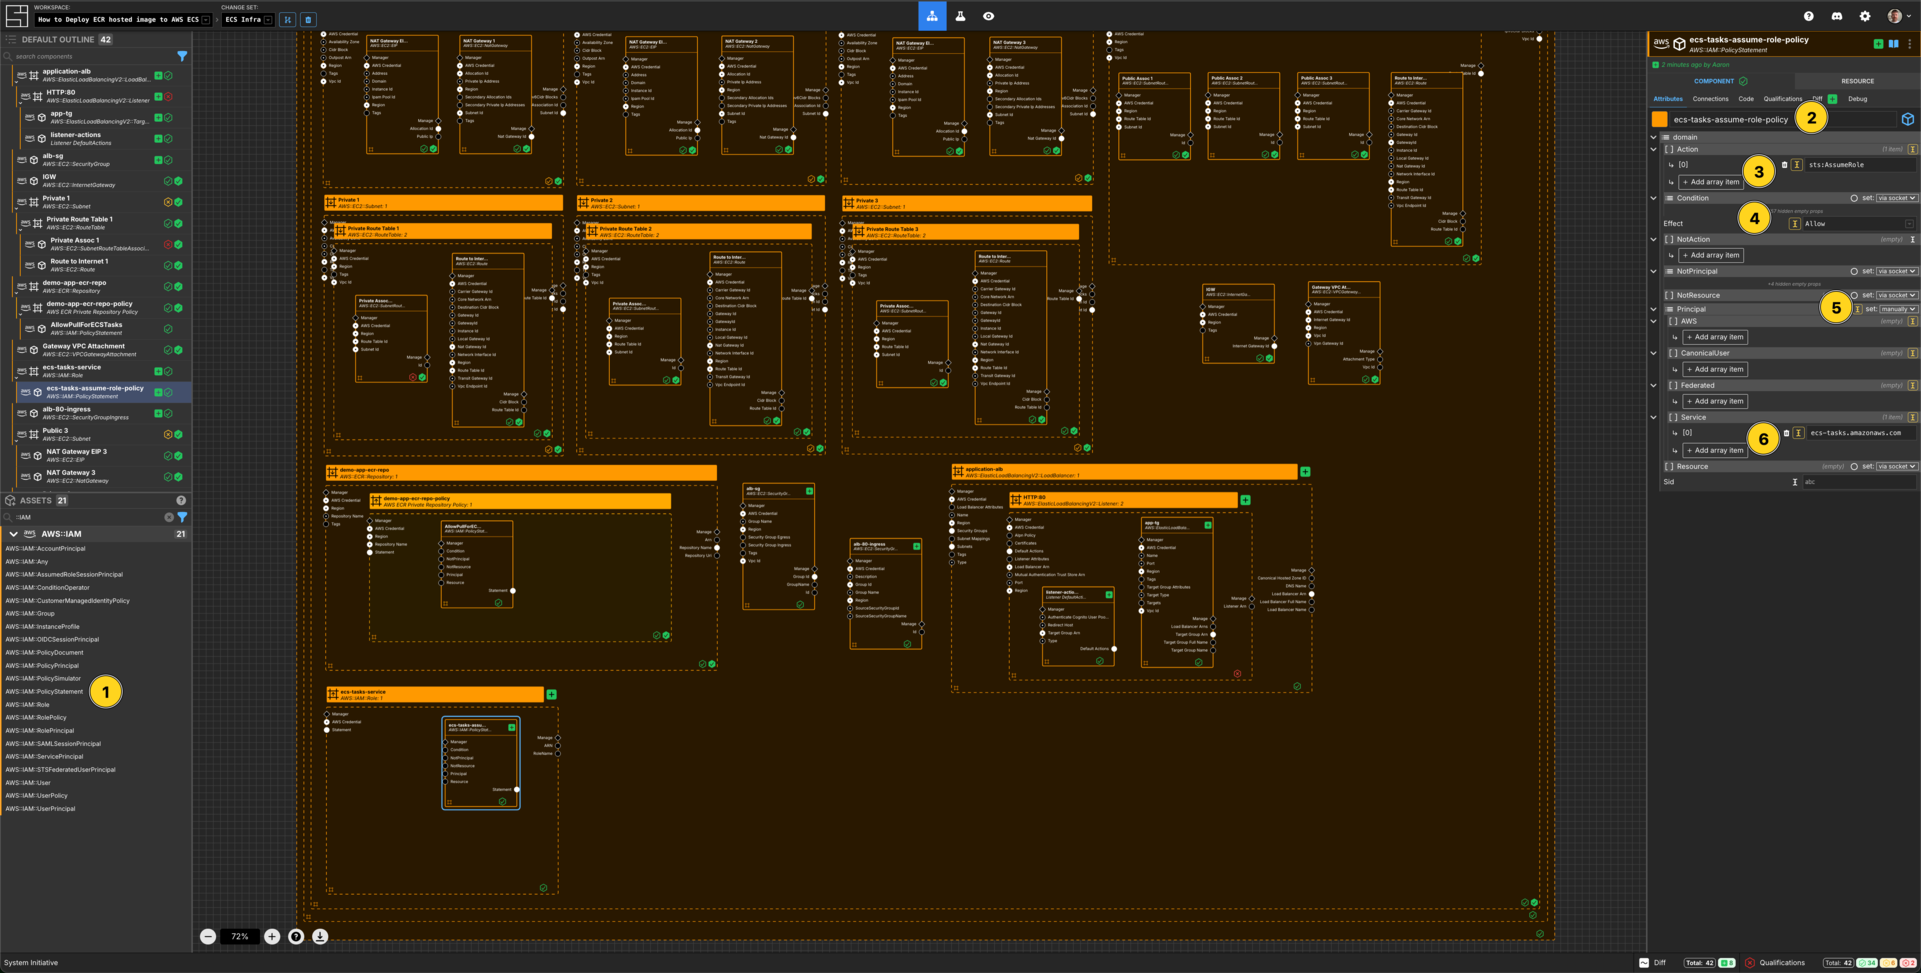
Add an AWS::IAM::PolicyStatement within the ecs-tasks-service AWS IAM Role frame.
Set the Component name to ecs-tasks-assume-role-policy.
Add an array item to the Action array.
Set the [0] value for the Action array to sts:AssumeRole.
Set the Effect to Allow.
Set the Principal to be set manually.
Add an array item to the Service section.
Set the value to be ecs-tasks.amazonaws.com.
Create a Security Group Component for the Application
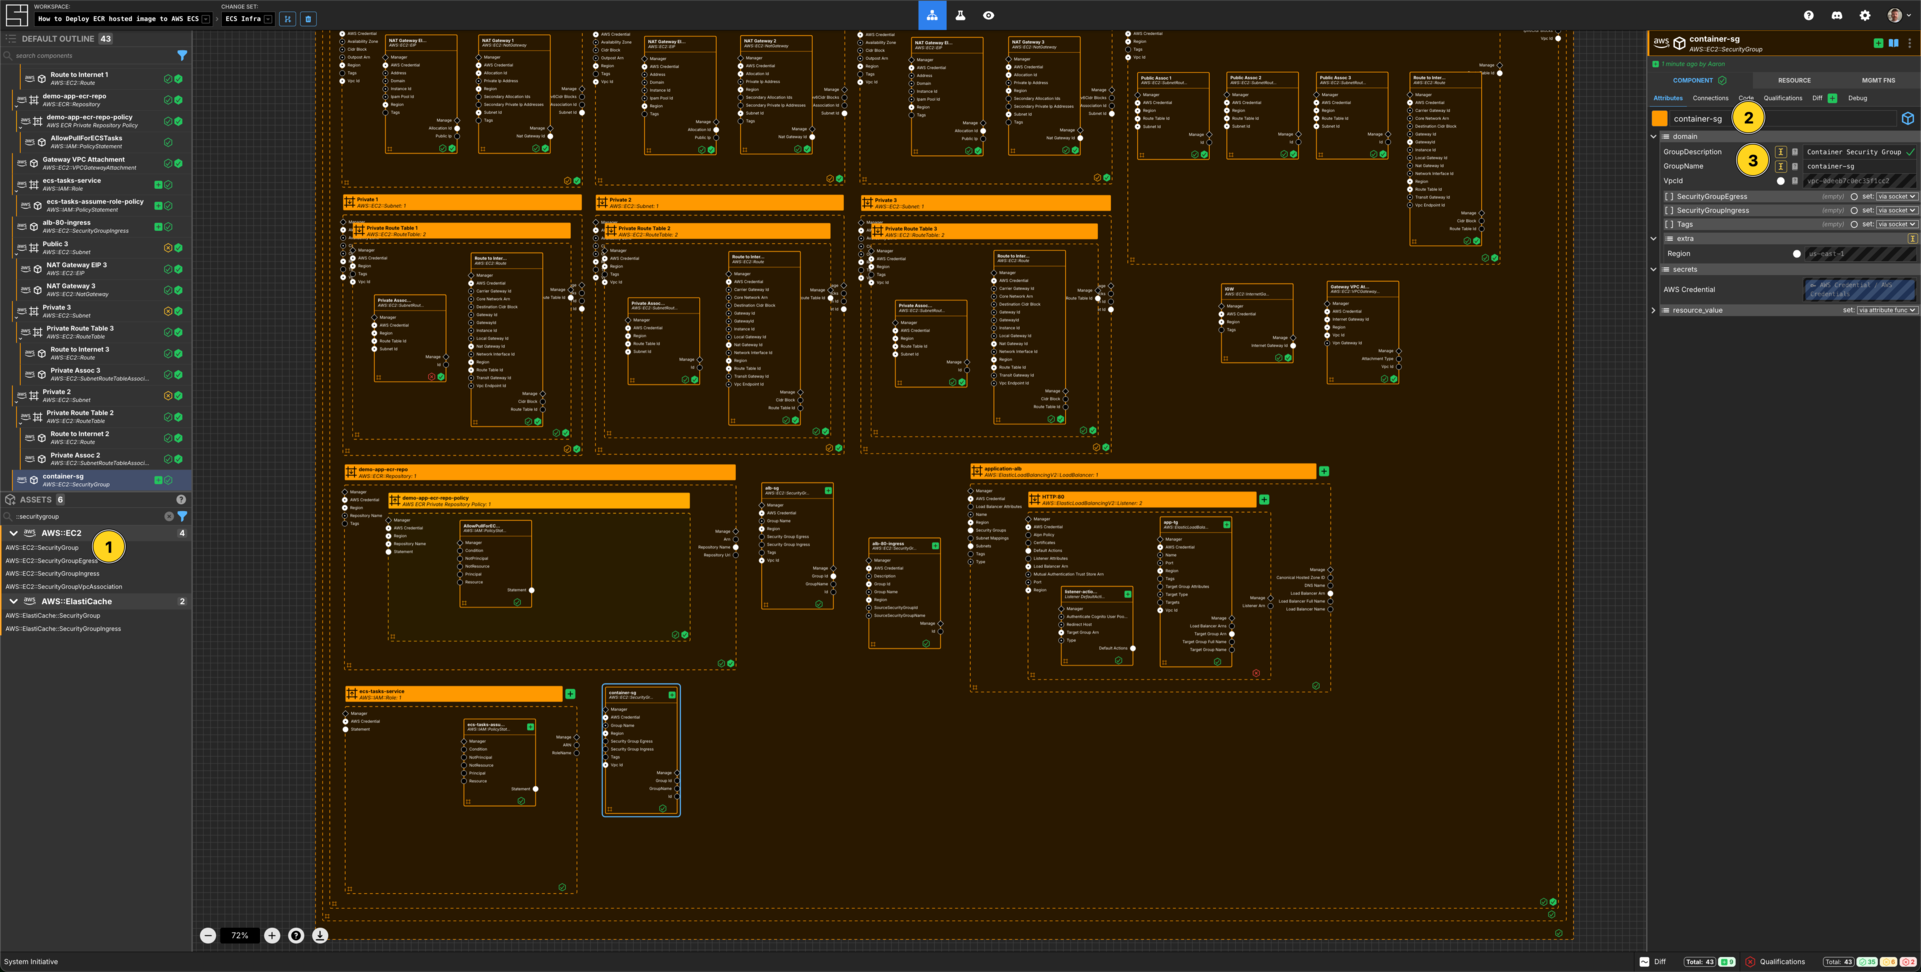
Add a AWS::EC2::SecurityGroup to your VPC frame.
Set the Component name to container-sg
Set the GroupDescription to be Container Security Group
Set the GroupName to container-sg.
Create an Ingress Rule Component for the Application
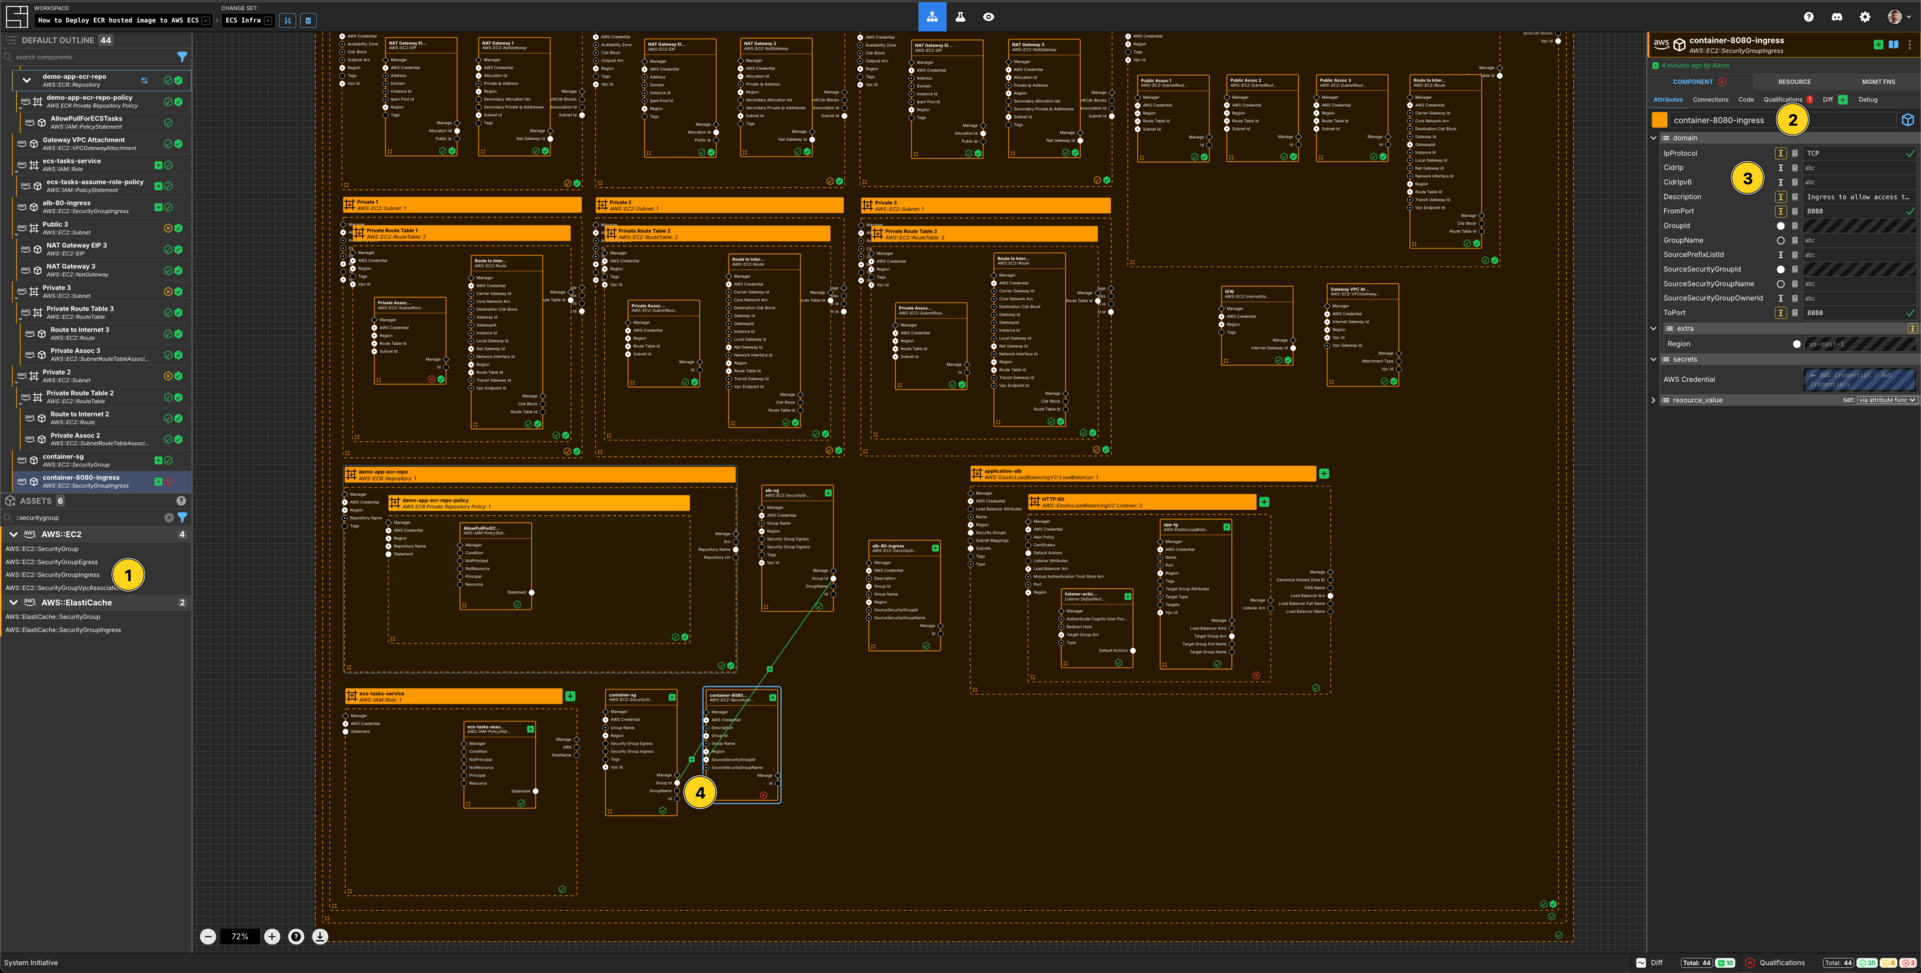
Add a AWS::EC2::SecurityGroupIngress to your VPC frame.
Set the Component name to be container-8080-ingress.
Set the IpProtocol to TCP.
Set the Description to be Ingress to allow access to port 8080.
Set FromPort to be 8080.
Set ToPort to be 8080.
Connect the Group Id Output Socket of container-sg Component to the Group Id Input Socket of thiscontainer-8080-ingress Component.
Connect the Group Id Output Socket of alb-sg Component to the SourceSecurityGroupId Input Socket of this container-8080-ingress Component.
Create an ECS Cluster
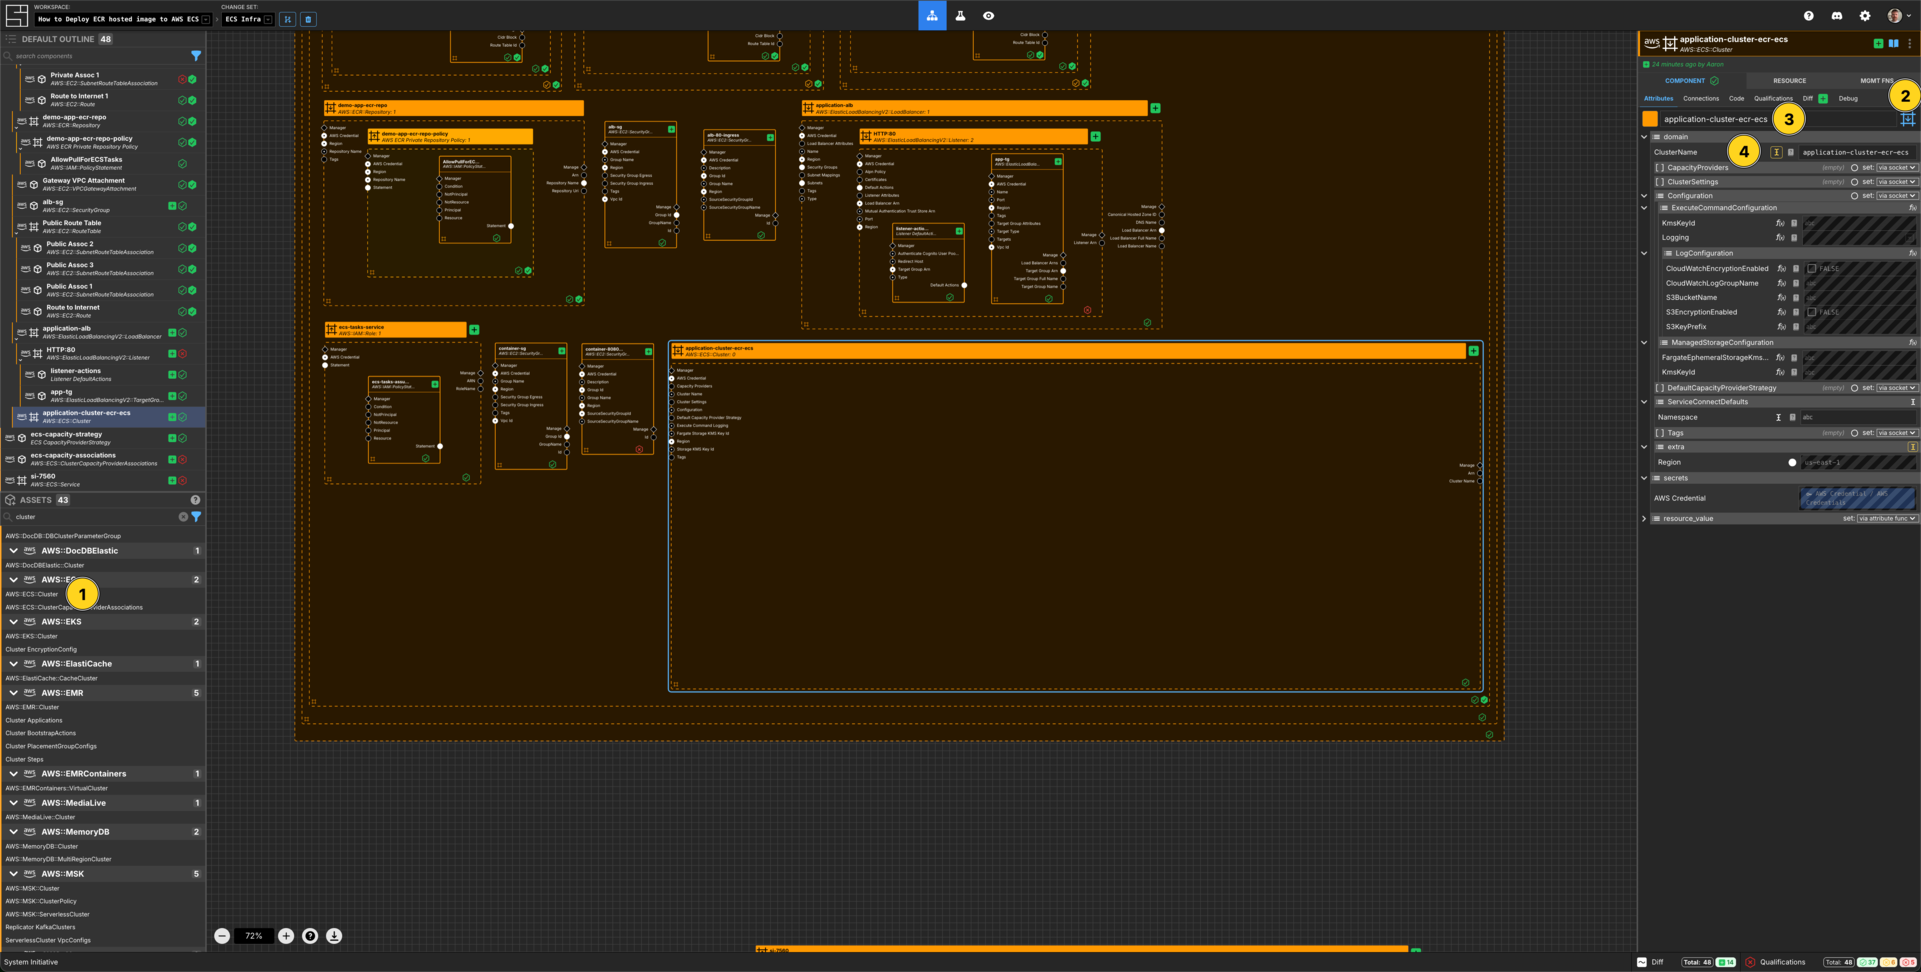
Add an AWS::ECS::Cluster to your VPC How-to vpc frame.
Set the Component type to be Down Frame.
Set the Component name to application-cluster-ecr-ecs.
Set the ClusterName to application-cluster-ecr-ecs.
Create a ECS Capacity Provider Strategy
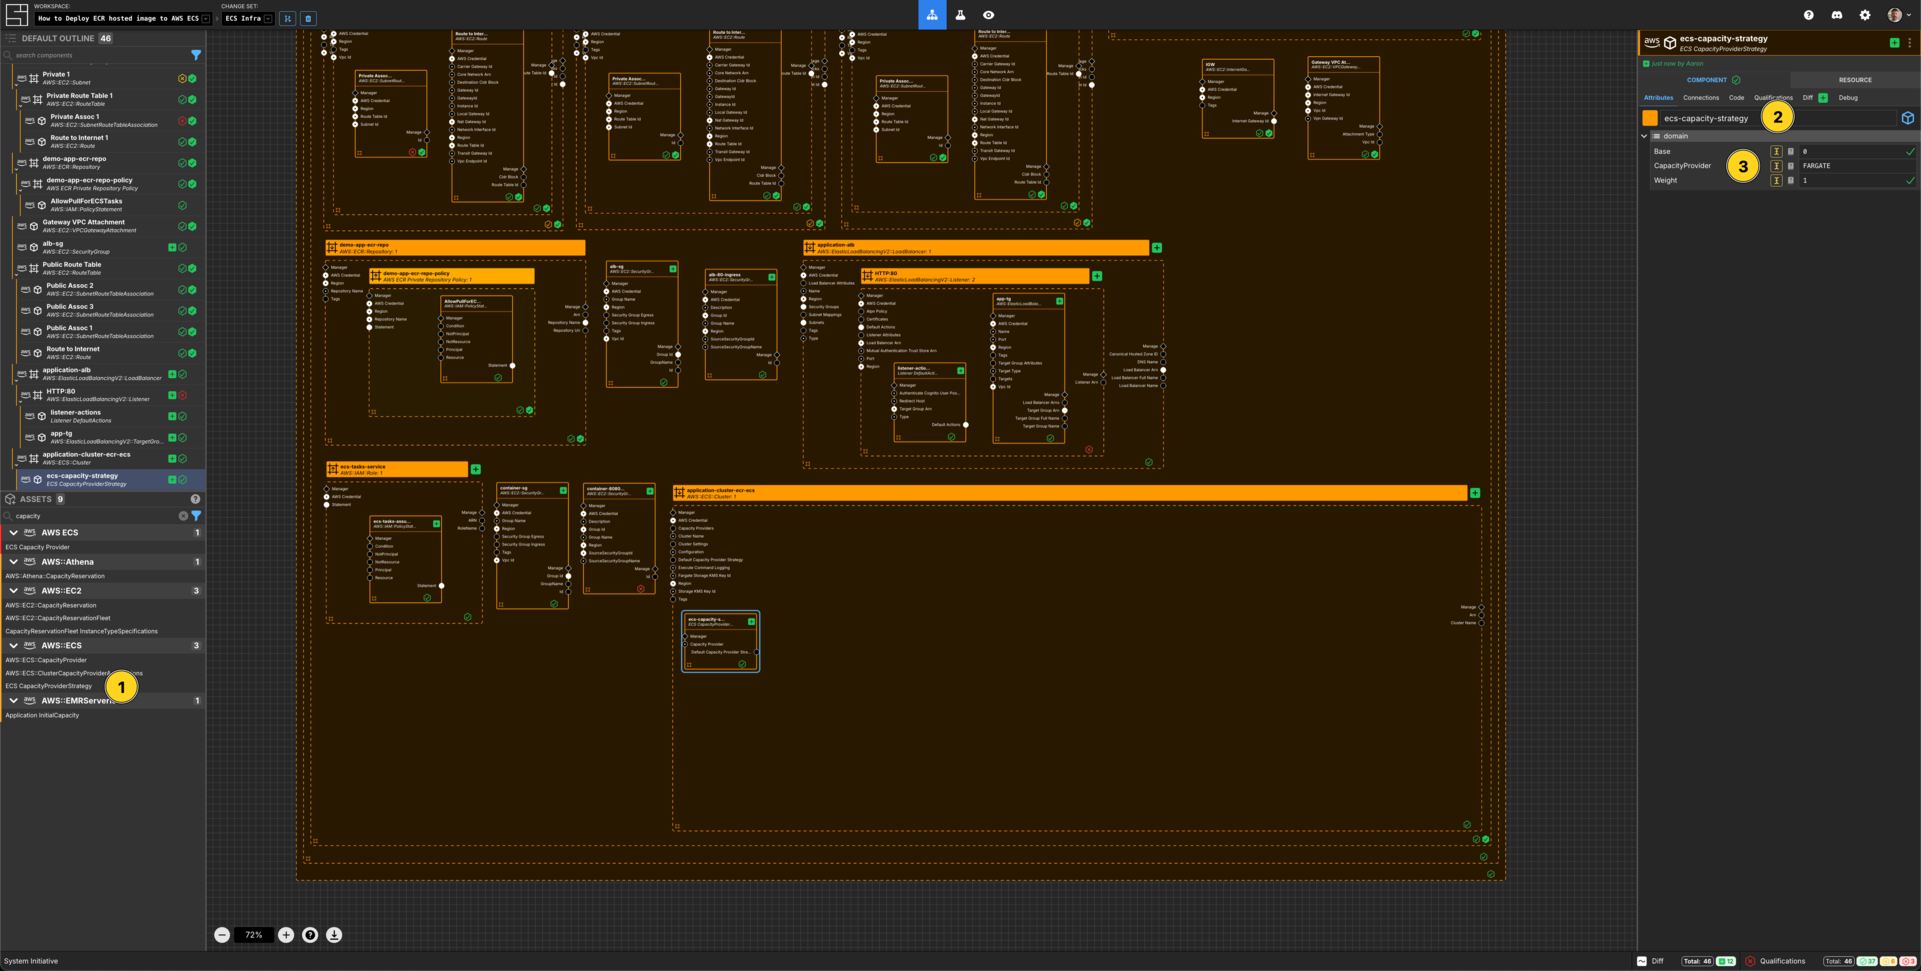
Add a ECS CapacityProviderStrategy component to the application-cluster-ecr-ecs frame.
Set the Component name to ecs-capacity-strategy.
Set Base to 0.
Set CapacityProvider to FARGATE.
Set Weight to 1.
Create a ECS Cluster Capacity Provider Association
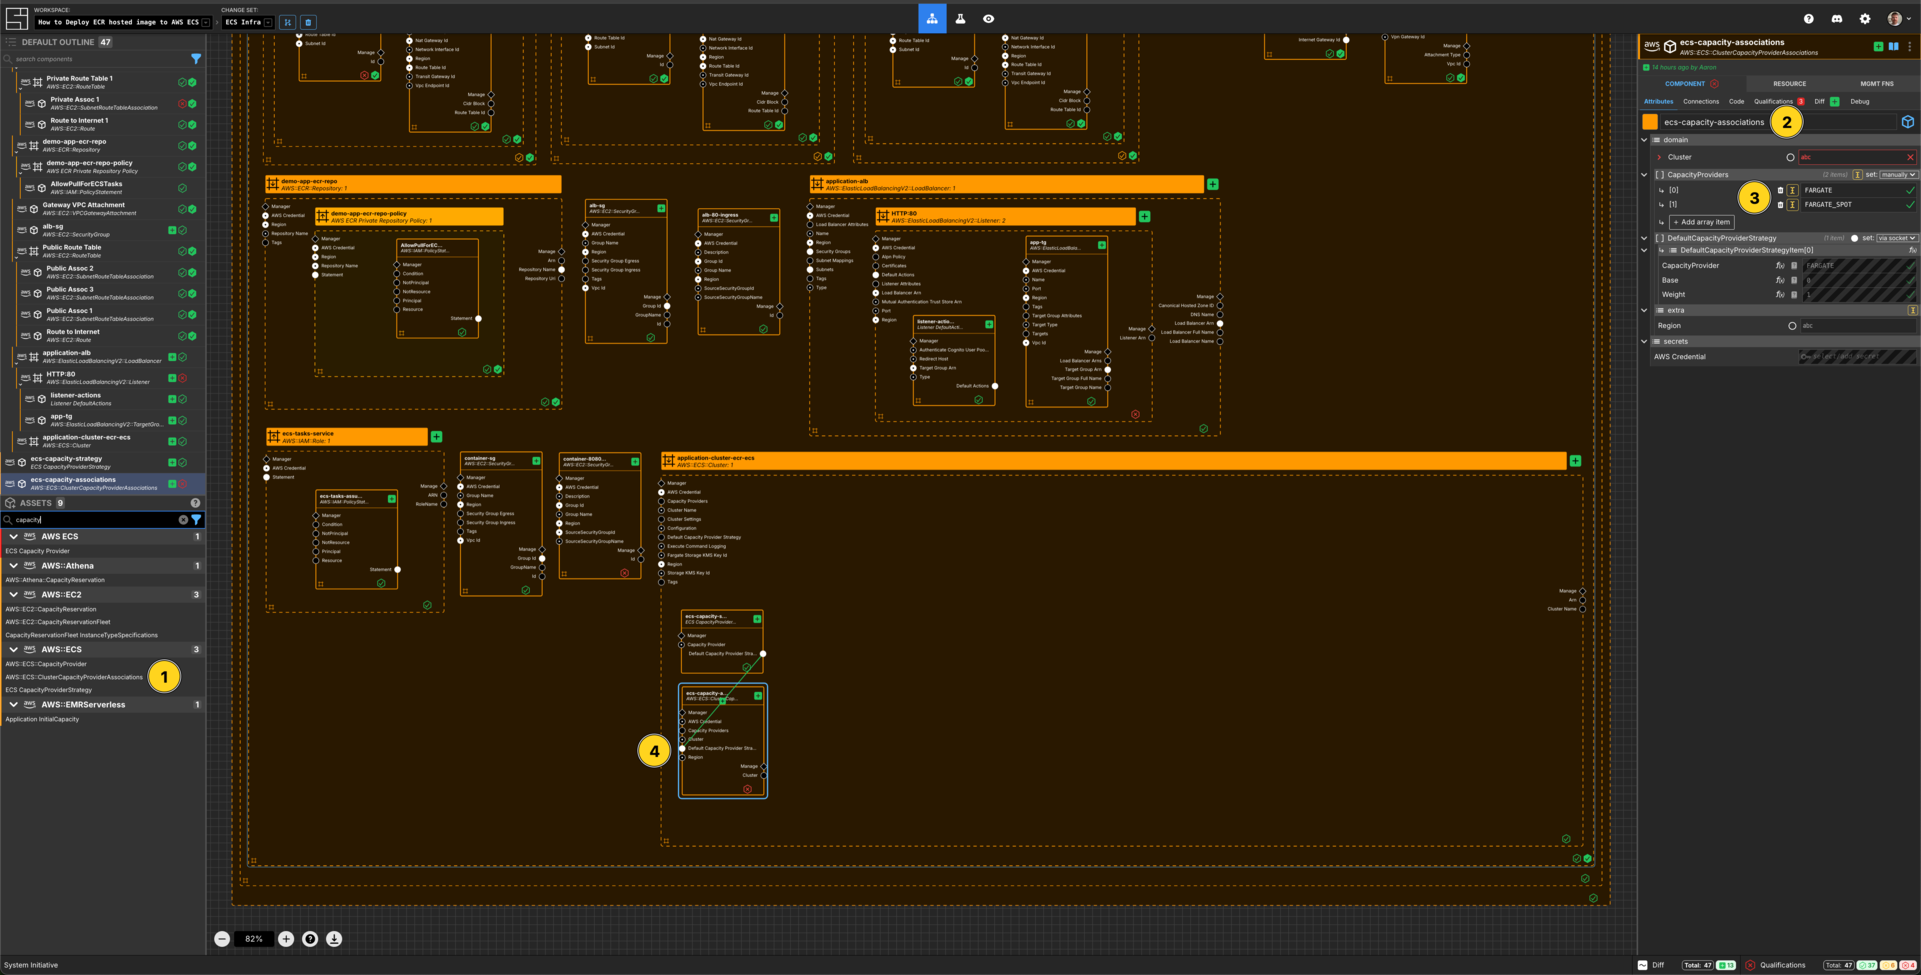
Add an AWS::ECS::ClusterCapacityProviderAssociations Component to the application-cluster-ecr-ecs frame.
Set the Component name to ecs-capacity-associations.
Add two array items to the CapacityProviders array.
Set the [0] value for the CapacityProviders array to FARGATE.
Set the [1] value for the CapacityProviders array to FARGATE_SPOT.
Connect the Default Capacity Provider Strategy Output Socket of the ecs-capacity-strategy Component to the Default Capacity Provider Strategy Input Socket of this ecs-capacity-associations Component.
Create an ECS Service
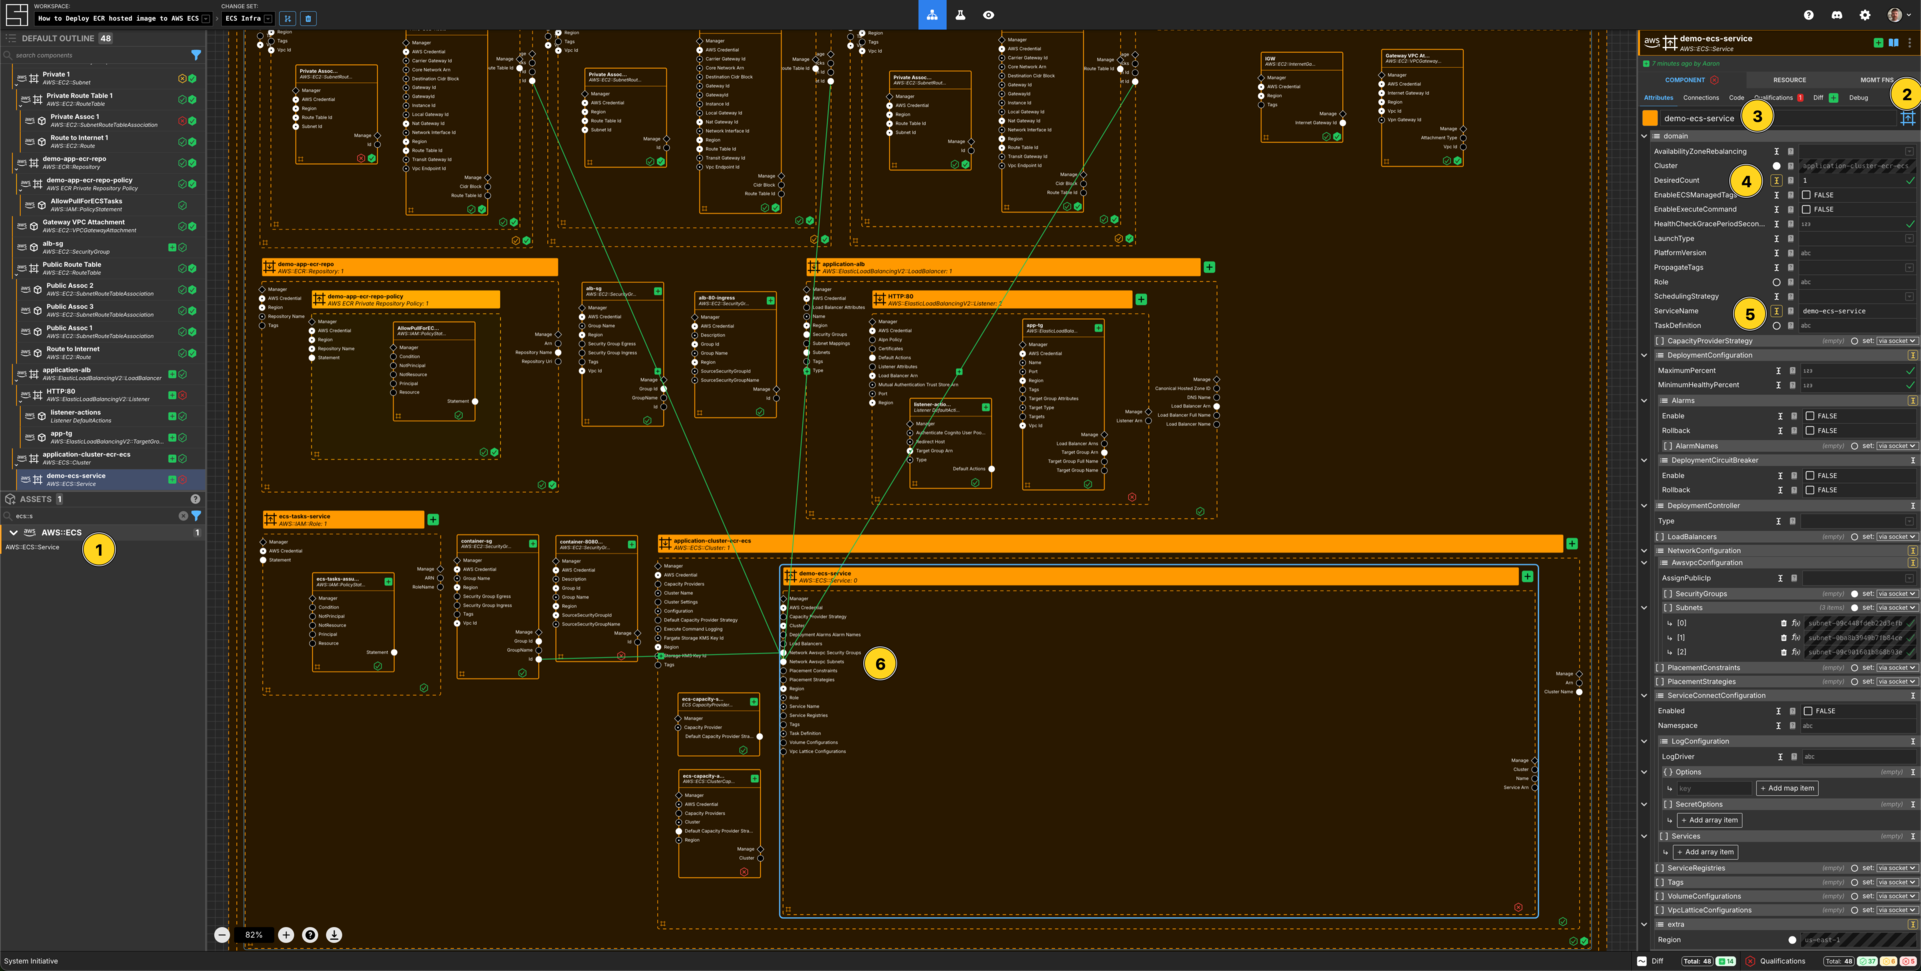
Add an AWS::ECS::Service to your application-cluster-ecr-ecs frame.
Set the Component type to be Up Frame.
Set the Component name to demo-ecs-service.
Set the DesiredCount to be 1.
Set the LaunchType to FARGATE.
Set the ServiceName to demo-ecs-service.
Connect the Subnet ID Output Socket of each of the private subnet Components to the Network Awsvpc Security Groups Input Socket of this demo-service Component.
Connect the Id Output Socket of container-sg Component to the Network Awsvpc Security Groups Input Socket of this demo-service Component.
Create an ECS Task Definition
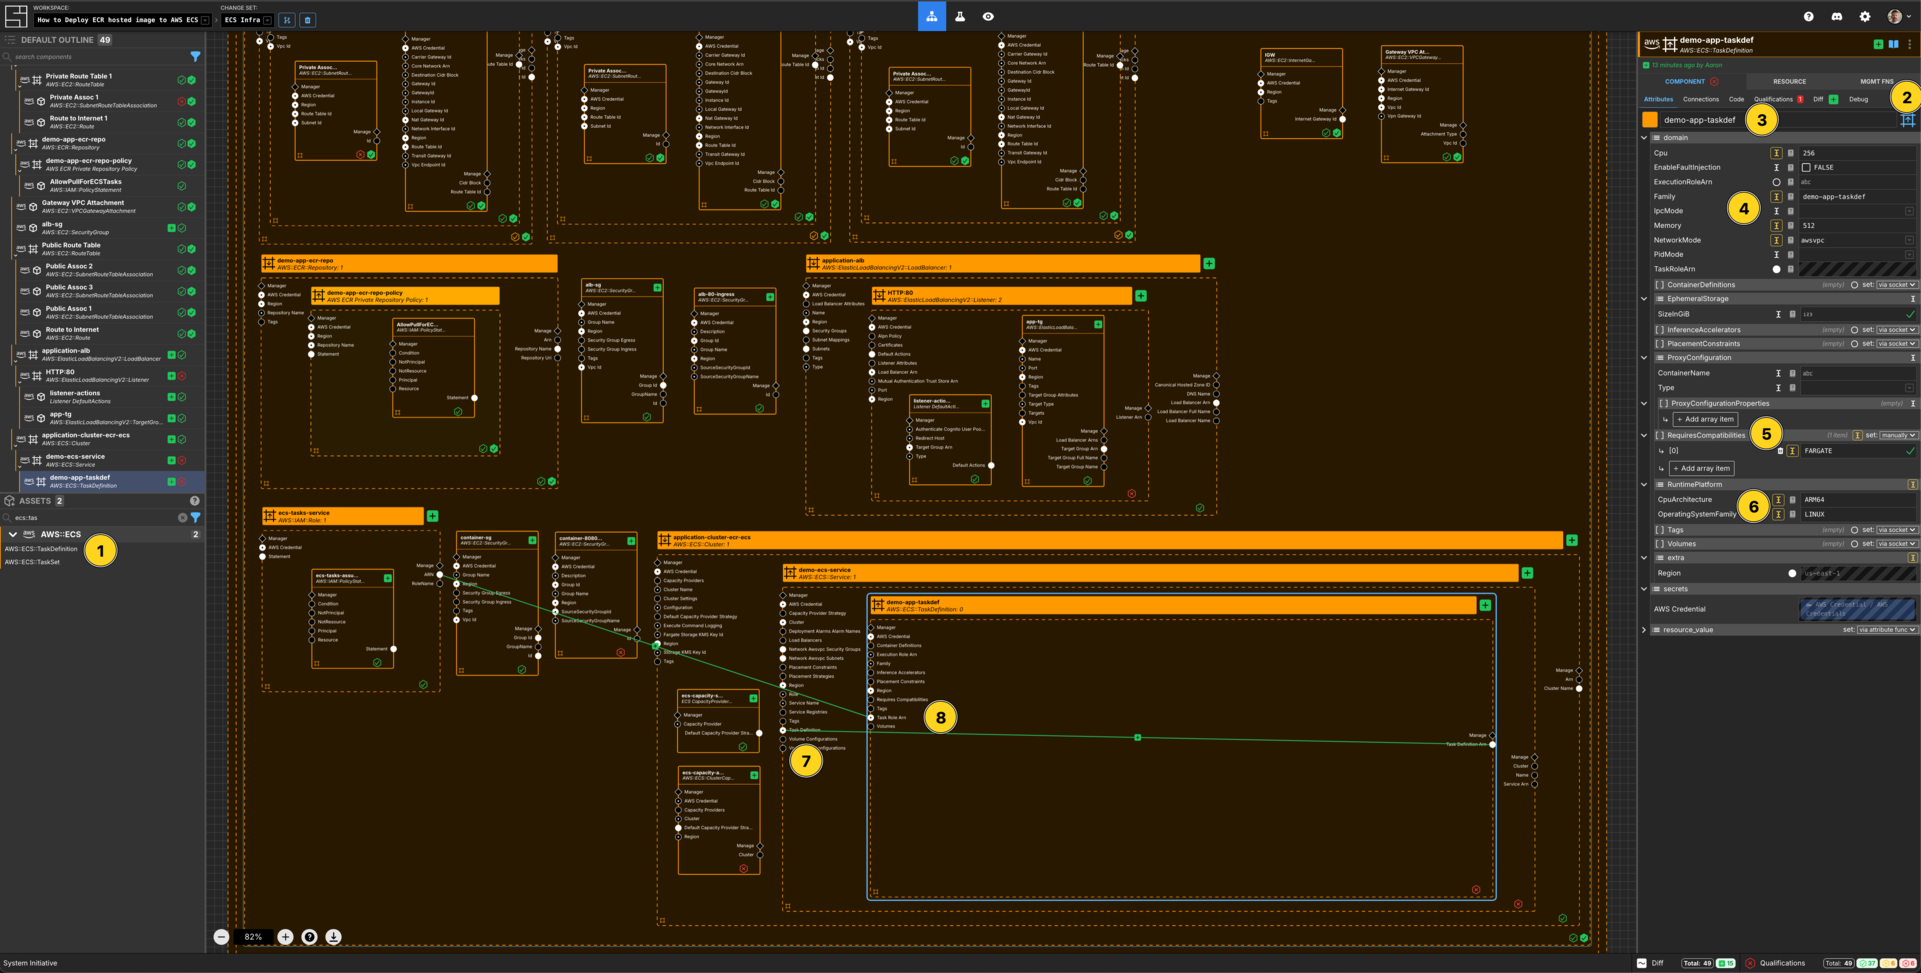
Add an AWS::ECS::TaskDefinition to your demo-service service frame.
Set the Component type to be Frame Up.
Set the Component name to demo-app-taskdef.
Set Cpu to be 256.
Set the Family to be demo-app-taskdef.
Set Memory to be 512.
Set NetworkMode to be awsvpc.
Click set: manually on RequiresCompatibilities, then Add array item.
In item [0] add the value FARGATE.
Set the RuntimePlatform properties based on the architecture of the container image:
Set CpuArchitecture to ARM64 then set OperatingSystemFamily to LINUX.
Connect the Task Definition Arn Output Socket of the TaskDefition to the Task Defition input Socket of the ECS Service.
Connect the ARN Output Socket of the ecs-tasks-service IAM Role to the Task Role Arn Input Socket of your demo-app-taskdef.
Connect the ARN Output Socket of the ecs-tasks-service IAM Role to the Execution Role Arn Input Socket of your demo-app-taskdef.
Create a Container Definition
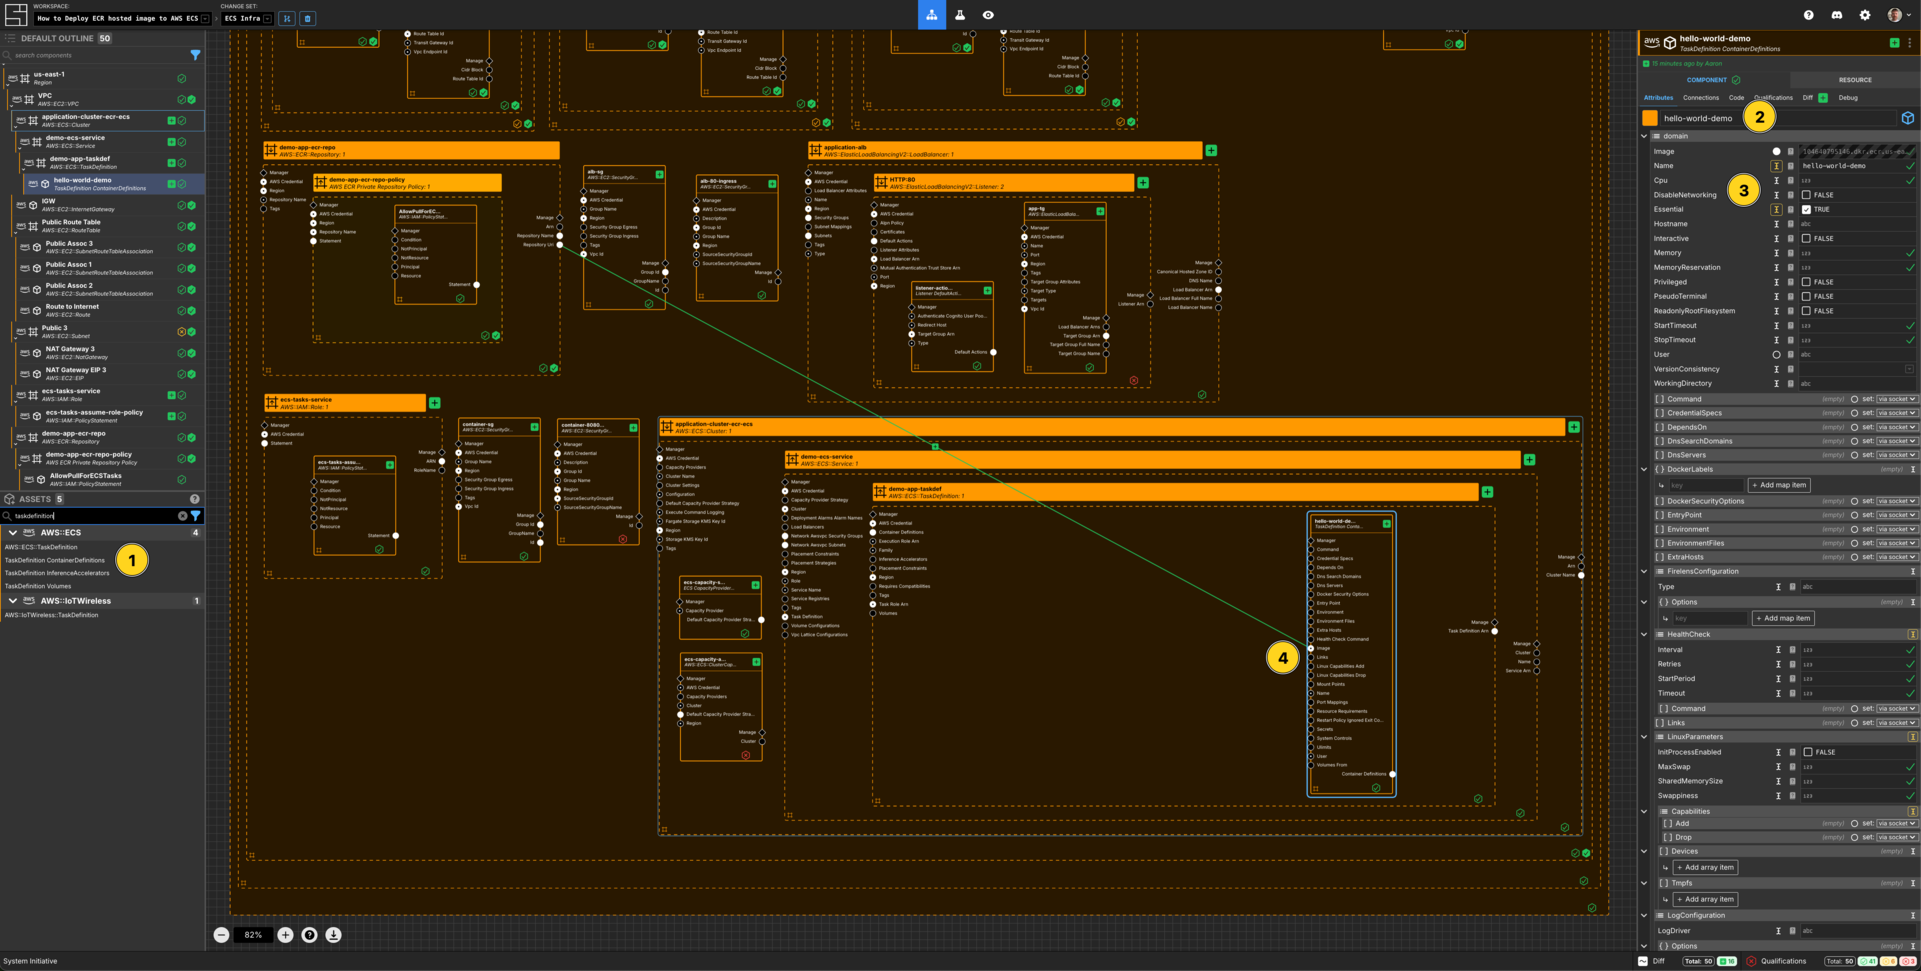
Add a TaskDefinition ContainerDefinitions Component to your demo-app frame.
Set the Component name to hello-world-demo.
Set Name to hello-world-demo.
Set Essential to TRUE.
Connect the Repository Uri Output Socket of the demo-app-ecr-repo to the Image Input Socket of this hello-world container definition.
Create an ECS Container Definition Port Mapping
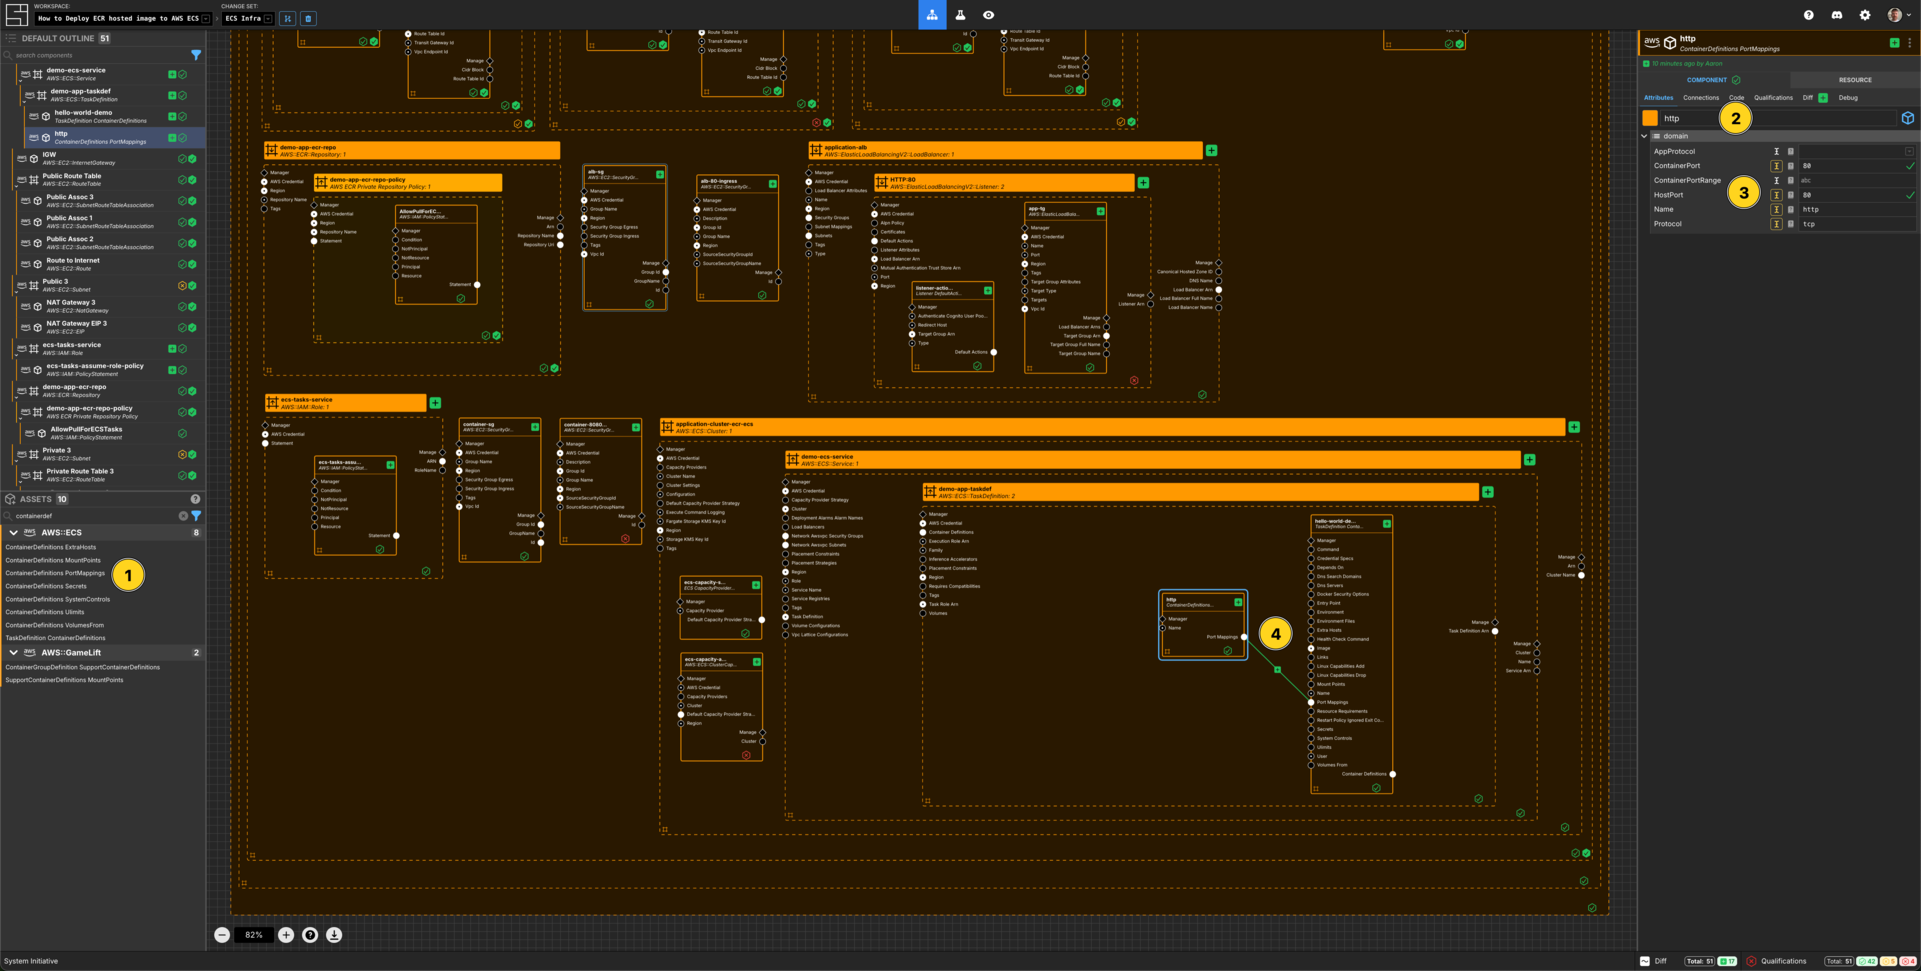
Add a ContainerDefinitions PortMappings to the demo-app-taskdef frame.
Set the Component name to be http.
Set the ContainerPort to be 8080.
Set the HostPort to be 8080.
Set the Name to be http.
Set the Protocol to be tcp.
Connect the Port Mappings Output Socket of this http ECS ContainerDefintions PortMappings Component to the Port Mappings Input Socket of the hello-world TeskDefinition ContainerDefintions Component.
Create a ECS Load Balancer Configuration
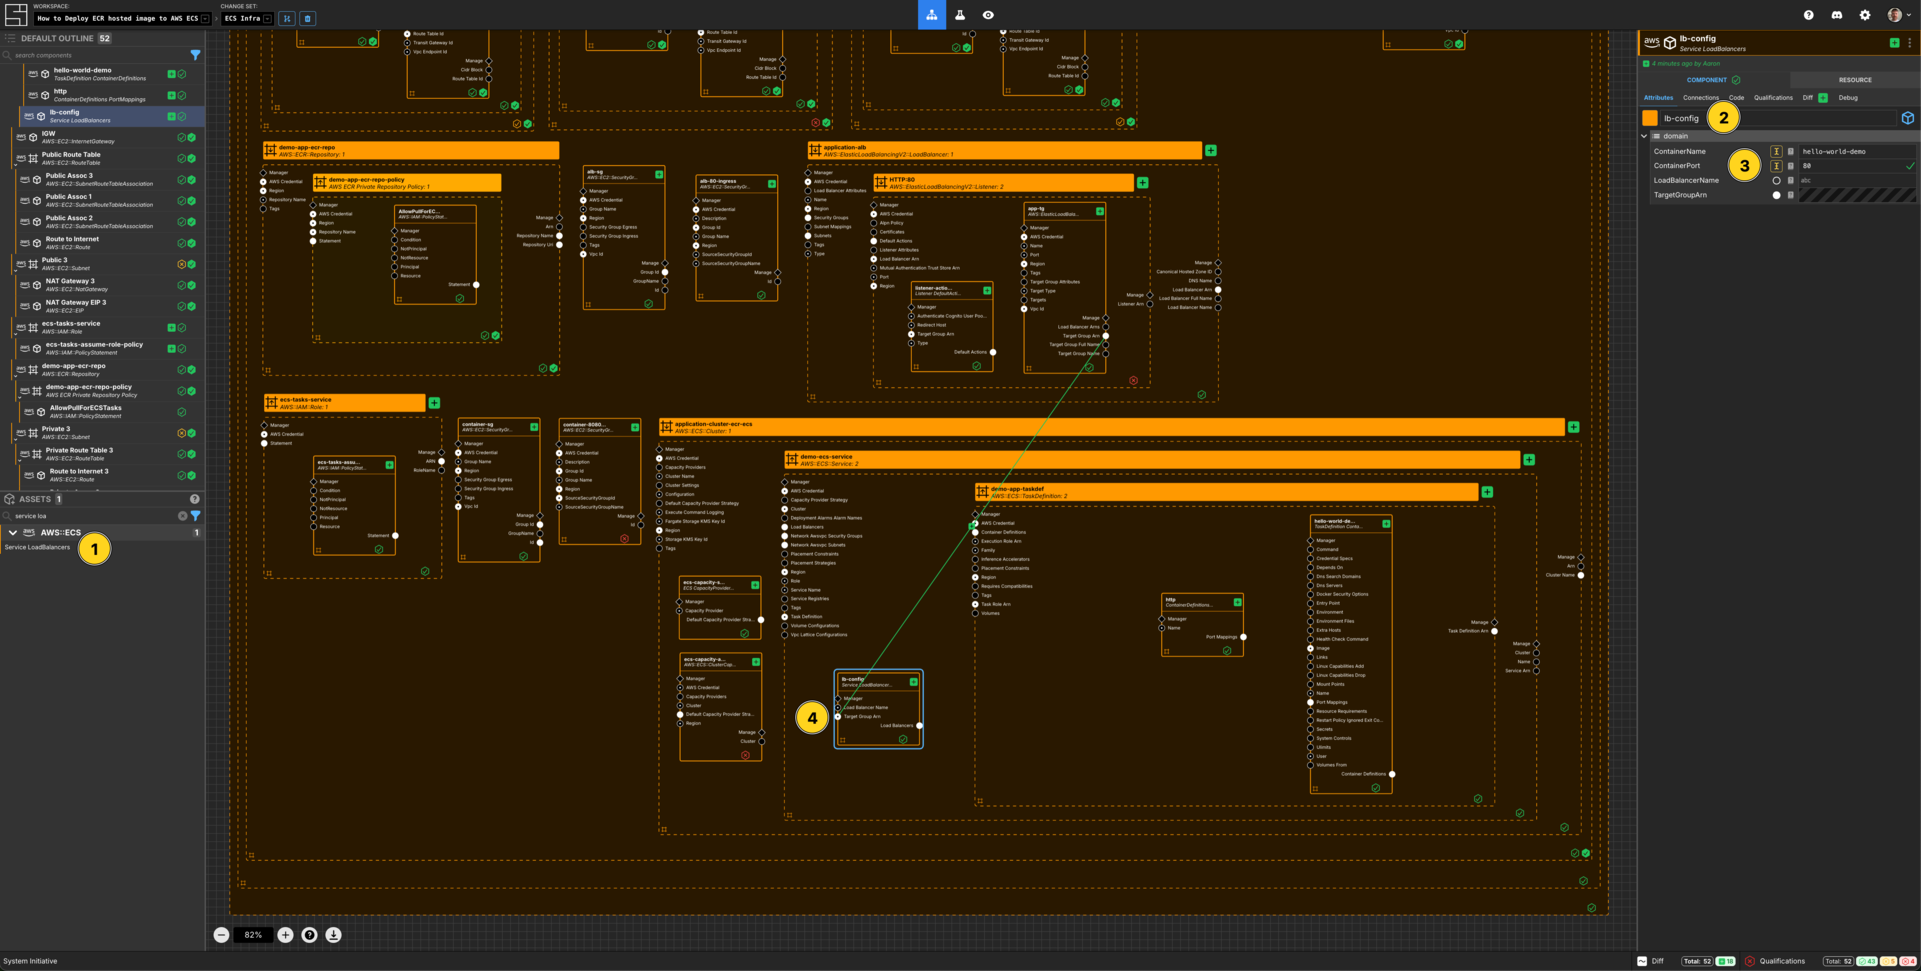
Add a Service LoadBalancers Component to the demo-service frame.
Set the Component name to be lb-config.
Set the ContainerName to be hello-world-demo.
Set the ContainerPort to 8080.
Connect the Target Group Arn Output Socket of the app-tg Target Group to the Target Group Arn Input Socket of this lb-config Component.
Create an IAM Role Policy
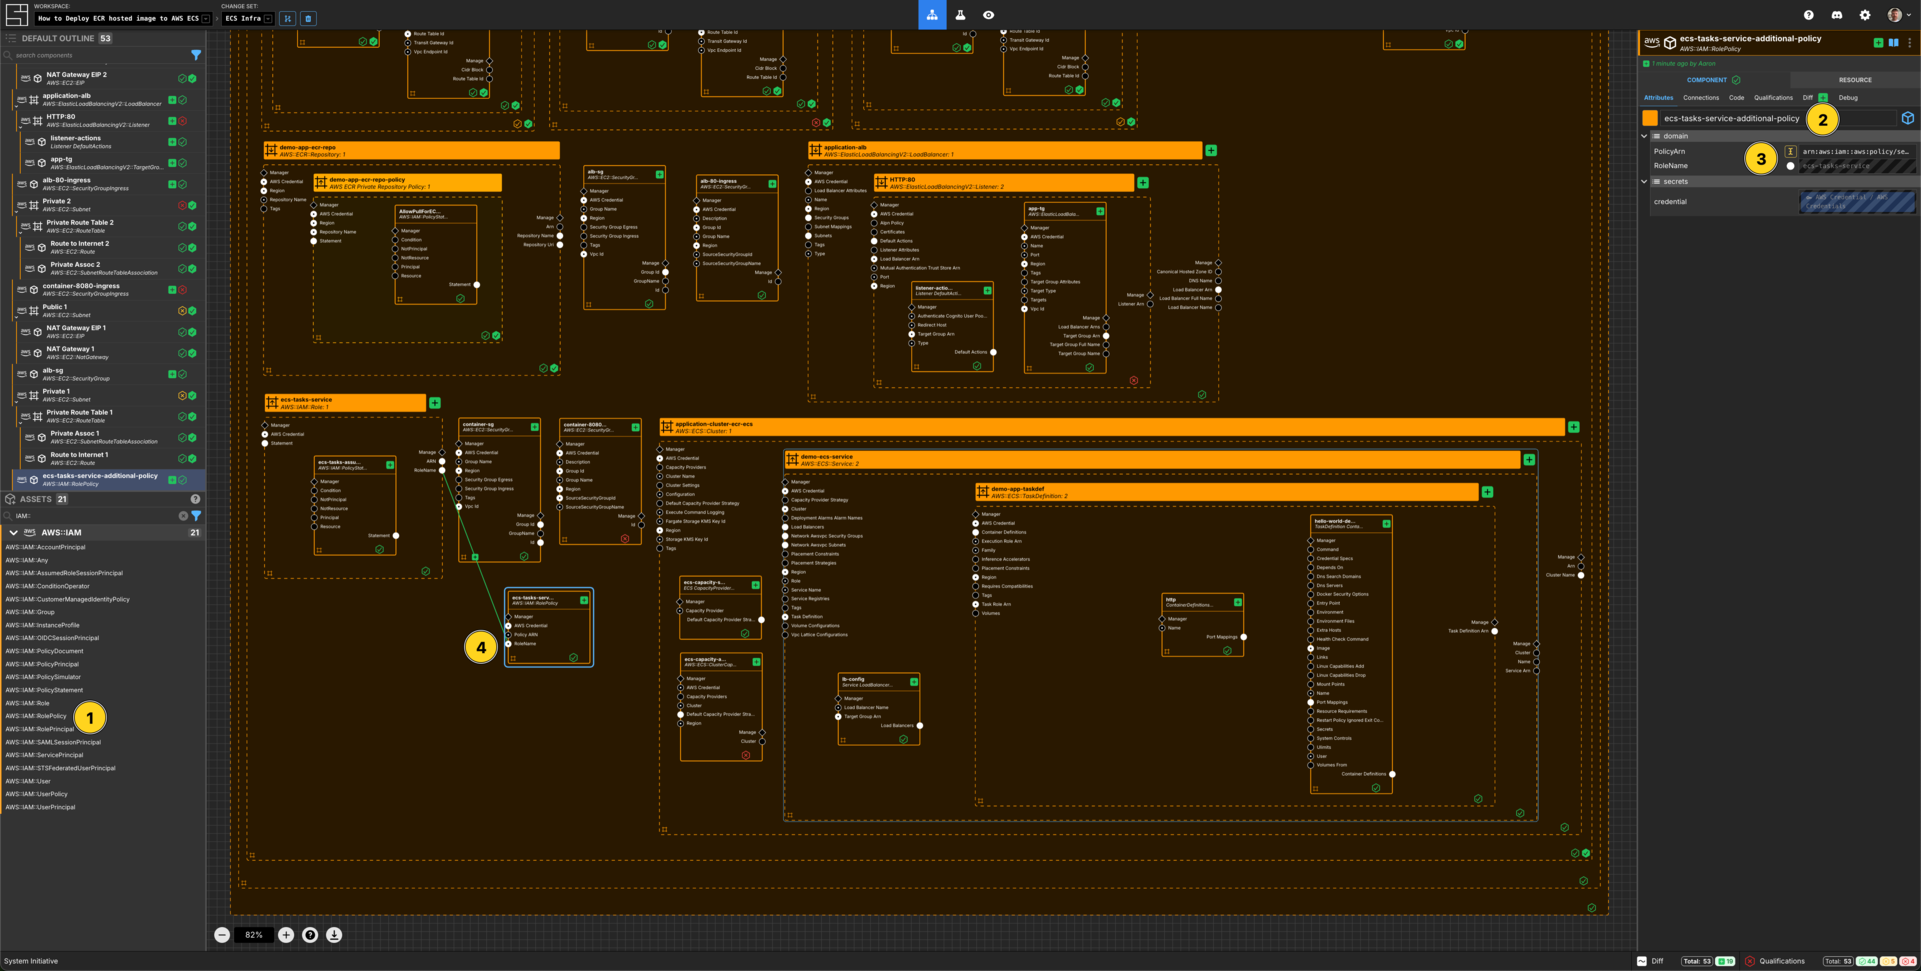
Add a AWS::IAM::RolePolicy to the VPC frame.
Set the Component name to be ecs-tasks-service-additional-policy
Set the PolicyArn to be arn:aws:iam::aws:policy/service-role/AmazonECSTaskExecutionRolePolicy
Connect the RoleName Output Socket of the ecs-tasks-service IAM Role to the RoleName Input Socket of this ecs-tasks-service-additional-policy Component.
Apply your Change Set
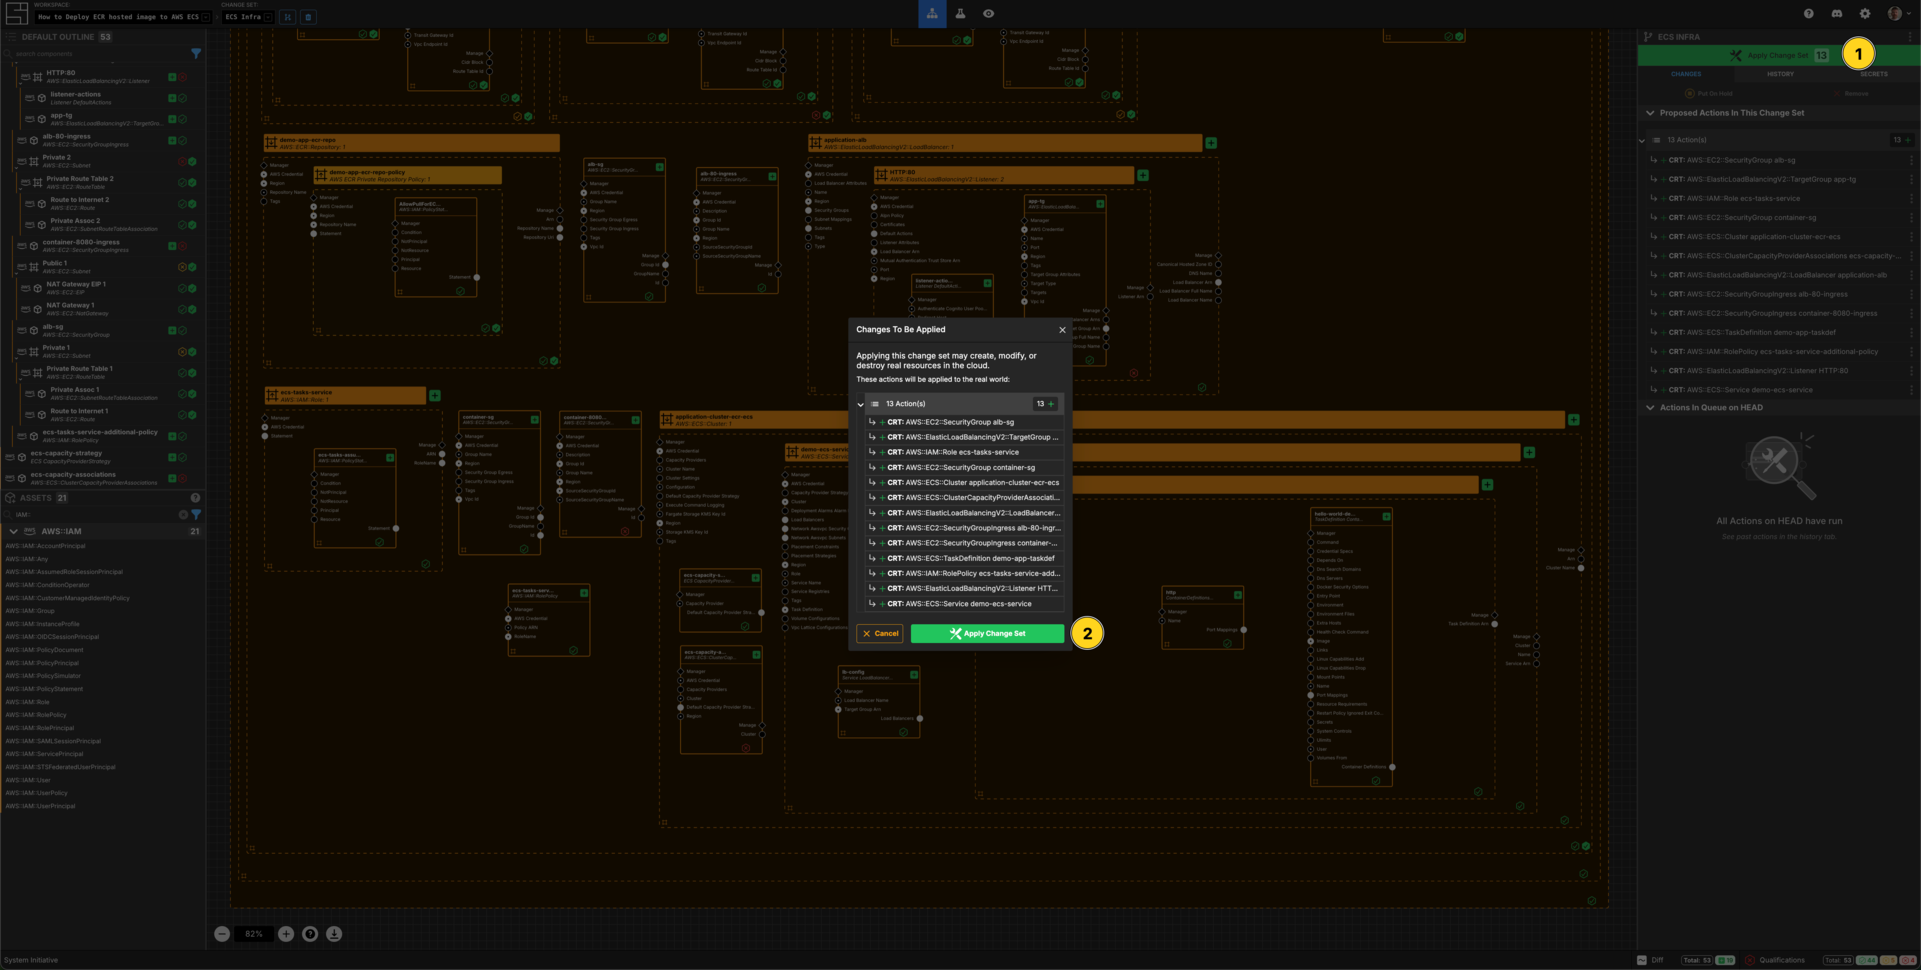
Press Escape or click anywhere on the canvas background to select the Workspace.
Click the Apply Change Set button to:
- Create 2 Security Groups and associated ingress rules
- Create an application load balancer, a listener and a target group
- Create an IAM Role and IAM Instance Profile
- Create an ECS Cluser and the associated service with a running task
Explore your resources
Review the completed AWS resources by clicking the Resource sub-panel for each of your new resources.
Select the application-alb Component on the Model. Go to the Resource Data screen and you will find the DNSName. You can visit that URL in the browser and inspect the running application.
Clean Up
Create a new Change Set called Clean up How-to
Delete your VPC How-to VPC frame. All of the Components inside will be marked for deletion.
Click Apply Change Set.
All your new resources should be deleted from your AWS account.
Vocabulary
In this guide bits of System Initiative Vocabulary will be shown with a capital letter. All definitions for these can be found here: System Initative - Vocabulary